Configure a Pipenv environment
Pipenv is a tool that provides all necessary means to create a virtual environment for your Python project. It automatically manages project packages through the Pipfile file as you install or uninstall packages.
Pipenv also generates the Pipfile.lock file, which is used to produce deterministic builds and create a snapshot of your working environment. This might be particularly helpful for security sensitive deployment, when project requirements and packages versions are critical. For more details about pipenv, see project documentation at pipenv.kennethreitz.org/.
To use Pipenv with PyCharm, you need to implement several preparation steps.
Install Pipenv
Run the following command to ensure you have pip installed in your system:
You should expect to receive a system response indicating the pip version. If no pip is discovered, install it as described in the Installation Instructions. Alternatively, you can download and install Python from http://python.org.
Install pipenv by running the following command:
When installation completes, you will see the following message:

For your convenience, you might add the user base’s binary directory to your PATH environmental variable. If you skip this procedure, PyCharm will prompt you to specify the path to the pipenv executable when adding a pipenv environment.
Run the following command:
A sample output can be:
Replace site-packages with Scripts in this path to receive a string for adding to the PATH variable, for example:
$ setx PATH «%PATH%;C:\Users\jetbrains\AppData\Roaming\Python\Python37\Scripts»
Run the following command to find the user base’s binary directory:
An example of output can be
/Users/jetbrains/.local (masOS) or /home/jetbrains/.local (Linux)
Add bin to this path to receive a string for adding to the
/.bashrc file, for example:
Run the following command to make the changes effective:
After the preparation steps are done, you can use pipenv to create a virtual environment for new or existing projects.
Set pipenv for a new Python project
Initiate creating a new Python project as described in Creating a pure Python project.
If you have added the user base’s binary directory to your PATH environmental variable, you don’t need to set any additional options: the path to the pipenv executable will be autodetected.
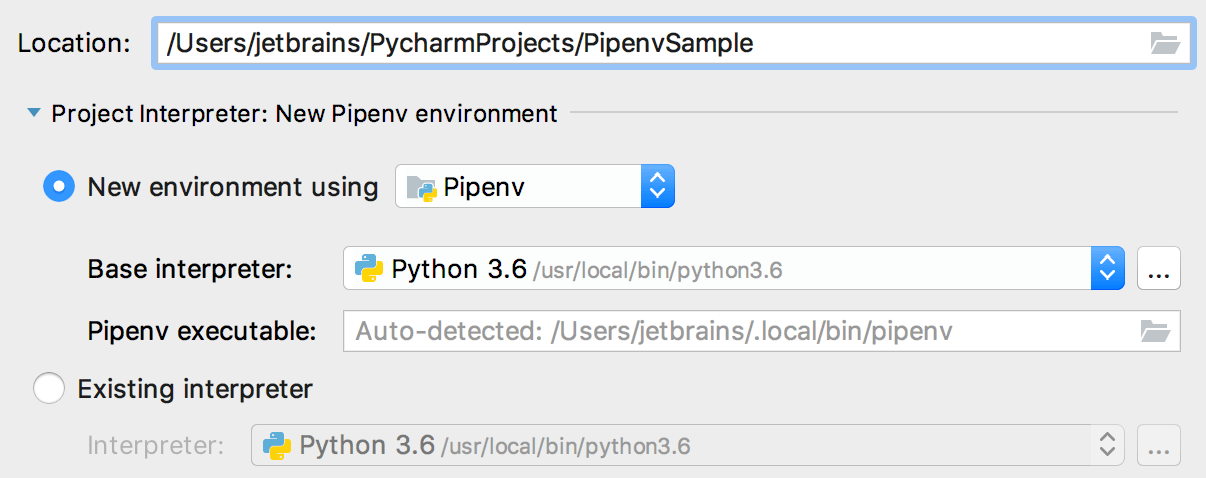
Click OK to complete the task.
Click OK to save the changes and complete the task.
You can also set up pipenv for any of your earlier created projects.
Configure pipenv for an existing Python project
Do one of the following:
Press Ctrl+Alt+S to open the project Settings/Preferences and go to Project

If you have added the user base’s binary directory to your PATH environmental variable, you don’t need to set any additional options: the path to the pipenv executable will be autodetected.
If you see the Pipenv executable is not found error message, follow the pipenv installation procedure to discover the executable path and add it to the Pipenv executable field.
Click OK to complete the task.
Once all the steps are done, the new pipenv environment is set for your project and the packages listed in the Pipfile are installed.
If you open a project with a Pipfile file added but no any interpreter configured, PyCharm offers you to use Pipenv environment.

If you select this option, PyCharm sets pipenv for you automatically. Alternatively, you can click Configure Python interpreter to follow the standard workflow.
Similarly, when you open a project with a Pipfile file in PyCharm for the very first time, for example, by checking it out from the Version Control, the Pipenv virtual environment will be configured automatically.
PyCharm can create a Pipenv environment for your project based on the project requirements recorded in the Pipfile.
Create an environment using the Pipfile
Open any directory with your source files that contains the Pipenv file: select File | Open from the main menu and choose the directory.
If no any environment has been created for this project, PyCharm suggests creating it:
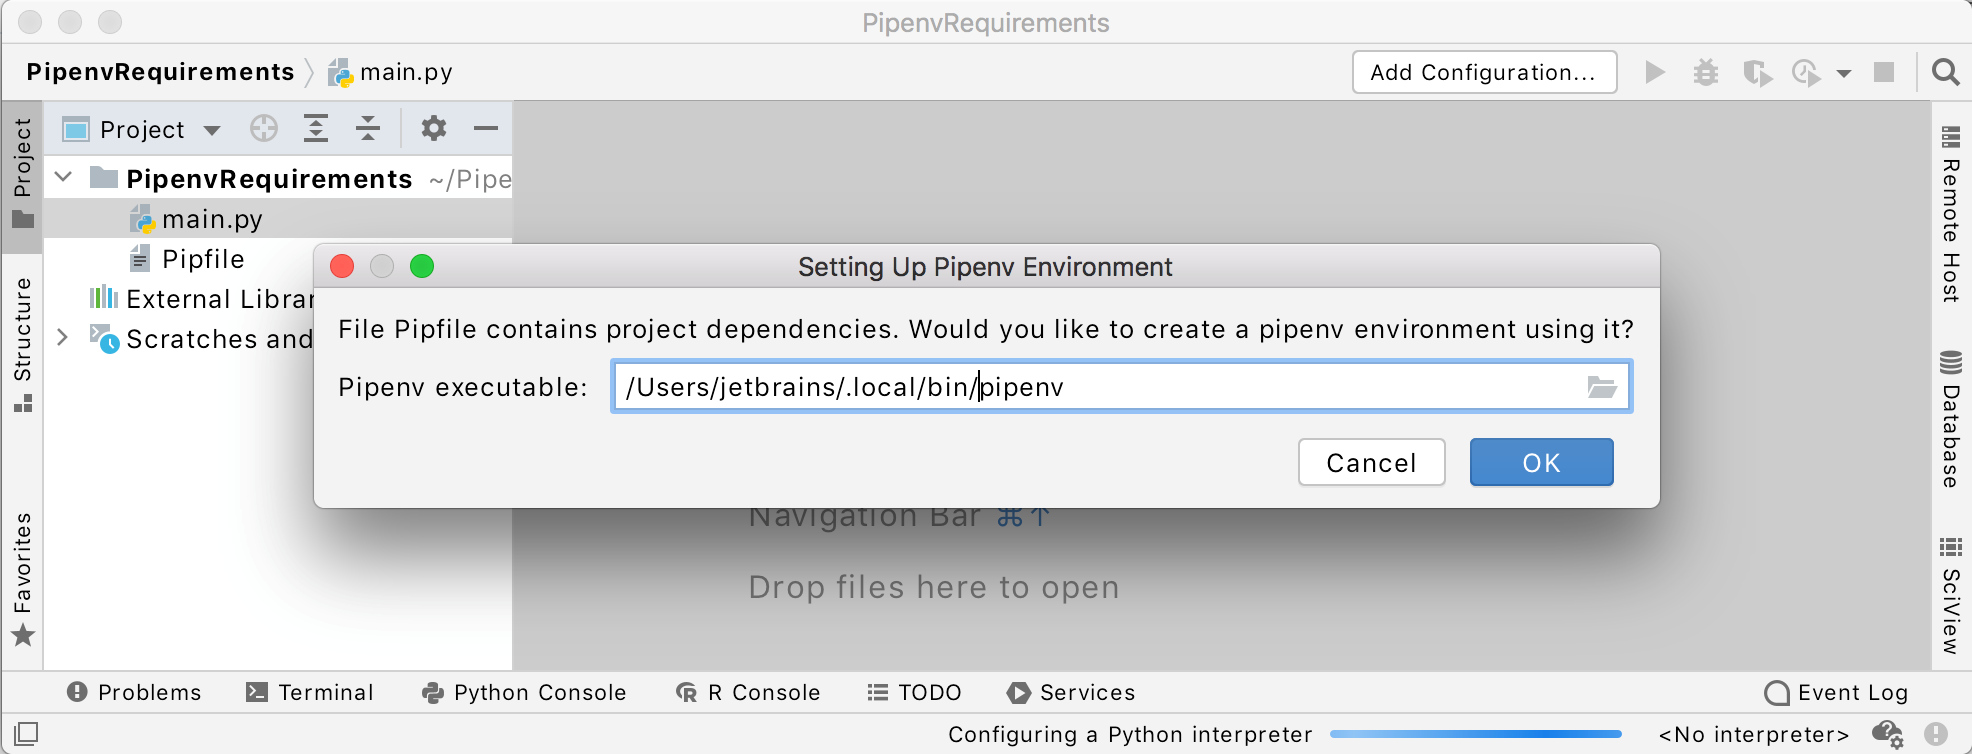
If PyCharm cannot autodetect the pipenv executable, specify a path to it. Click OK to complete the task.
/.bashrc and re-login to your OS in order for all the GUI processes to inherit new environment variables from your shell config.
For any of the configured Python interpreters (but Docker-based), you can:
Pipenv — современный менеджер зависимостей для Python-проектов
P ipenv — менеджер зависимостей для Python-проектов. С его помощью можно создавать виртуальные среды и управлять зависимостями приложений. Pipenv решает ряд проблем, которые возникали при использовании pip, virtualenv и requirements.txt.
Чем хорош Pipenv
Рано или поздно, каждый разработчик сталкивается с проблемой контроля версий пакетов pip и настройкой виртуального окружения. С помощью Pipenv вы можете:
Можно забыть про pip и virtualenv
Вам больше не нужно использовать pip и virtualenv по отдельности. В pipenv этот функционал реализован «из коробки».
Requirements.txt больше не нужен
Для своей работы менеджер использует 2 файла: Pipfile (по сути замена requirements.txt) и Pipfile.lock (связывает версии пакетов, тем самым обеспечивая дополнительную безопасность).
Пример файла Pipfile :
[[source]] name = «pypi» url = «https://pypi.org/simple» verify_ssl = true [dev-packages] [packages] questionary = «*» [requires] python_version = «3.7»
Ваше приложение может зависеть от конкретной версии библиотеки, а эта библиотека может зависеть от конкретной версии другой библиотеки. Если производить настройку вручную, во всем этом очень просто запутаться 🤷. Pipenv создан, чтобы облегчить эту задачу. Он отслеживает дерево взаимозависимостей вашего приложения в файле с именем Pipfile.lock В свою очередь, Pipfile.lock также проверяет, используются ли корректные версии зависимостей.
Пример файла Pipfile.lock :
Pipenv удобен, когда над проектом работают несколько разработчиков. Рассмотрим простой пример — компания ведет разработку своего корпоративного сайта. Мария работает над вкладкой «Отчеты», Иван — над вкладкой «Чат».
Если бы Иван и Мария использовали Pipenv, Pipfile был бы автоматически обновлен и включен в коммит Марии. Они бы сэкономили время и завершили свой продукт быстрее. Вот что делает Pipenv таким важным.
Возможность создавать собственные шорткаты
Pipenv позволяет создавать собственные шорткаты (сокращения) в секции [scripts] файла Pipfile :
Теперь в консоли вы можете вызвать шорткат командой pipenv run print_hello
Автоматизация рутинных задач
Больше не придется тратить время на выполнение рутинных задач, выискивая причины отсутствия синхронизации и возникновения ошибок в версиях. Всю рутинную работу pipenv берет на себя:
Установка
Самый простой вариант — установка с помощью pip.
Для Linux и MacOS есть альтернативный способ установки:
brew install pipenv
sudo apt install pipenv
sudo dnf install pipenv
pkg install py36-pipenv
После установки, вы можете фактически забыть о pip — pipenv по сути заменяет pip и virtualenv.
Пример использования
Рассмотрим простой пример использования pipenv.
Создаем виртуальную среду
Для инициализации виртуальной среды Python 3, выполните команду:
Если виртуальной среды еще не существует, она будет создана.
Устанавливаем пакеты
Далее можно установить сторонний пакет. Существует 3 варианта установки:
pipenv install scrapy
Установится последняя версия пакета. При этом в Pipfile добавится запись scrapy = «*»
Установятся все пакеты из Pipfile и обновится Pipfile.lock
Установятся все пакеты из Pipfile.lock
Запускаем скрипты
Запустить python-скрипты можно несколькими способами:
pipenv run python script-name.py
Настройка pipenv в PyCharm
Процесс настройки pipenv в PyCharm:
После того как все шаги выполнены, для текущего проекта устанавливается новая среда pipenv и устанавливаются пакеты, перечисленные в Pipfile.
Если вы открываете какой-либо проект с добавленным файлом Pipfile, но в нем не настроен интерпретатор, PyCharm предложит вам использовать среду Pipenv. Если вы выберете эту опцию, PyCharm автоматически установит для вас pipenv.
Команды pipenv
Pipenv и Docker
В качестве альтернативы можно выполнить экспорт в самой сборке:
—deploy — pipenv выдаст ошибку если Pipfile.lock устарел, вместо того, чтобы сгенерировать новый Pipfile.lock файл.
—system — устанавливать зависимости в родительскую систему.
Рассмотрим пример Dockerfile для развертывания Flask приложения:
Конфигурирование pipenv
Pipenv дает возможность конфигурировать свое поведение с помощью переменных окружения ( Environment Variables ). Просто создайте переменную и pipenv обнаружит её. Вот некоторые их них:
Полный список переменных можно посмотреть в официальной документации pipenv, в разделе » Configuration With Environment Variables «.
Стоит ли использовать Pipenv?
Определенно да! 🎉 Pipenv сведет всю работу по управлению пакетами и виртуальным окружением в одну консоль, решит проблему с версионированием пакетов и добавит новый, весьма приятный функционал.
pipenv — как pip, только удобнее
Изначальный автор проекта — Кеннет Рейц (Kenneth Reitz) — он ещё и автор requests и множества других проектов «for humans», очевидно, вдохновлялся пакетными менеджерами из других экосистем, такими как npm (JavaScript) и bundler (Ruby), так что если вы когда-то пользовались этими инструментами, то можете заметить множество параллелей.
В названии проекта кроются два основных его назначения:
Грубо говоря, pipenv можно рассматривать как симбиоз утилит pip и venv (или virtualenv ), которые работают вместе, пряча многие неудобные детали от конечного пользователя.
Помимо этого pipenv ещё умеет вот такое:
Итак, начнём по порядку.
Установка
Как я писал в посте про виртуальные окружения, не стоит устанавливать пакеты в глобальный интерпретатор, поэтому предпочтительным способом установки является пакетный менеджер вашей ОС.
Например, на MacOS pipenv можно установить через brew :
А на Fedora Linux вот так:
На Ubuntu можно установить pipenv из специального PPA:
Во всех остальных случаях, в частности на Windows, самый простой способ — это установка в домашнюю директорию пользователя (опять же, см. пост про виртуальные окружения):
Теперь проверим установку:
Если вы получили похожий вывод, значит, всё в порядке.
При возникновении проблем с установкой, обратитесь к официальной документации. Если совсем беда, то напишите комментарий под этим постом, попробуем помочь 😊
Файлы pipenv
Оба этих файла можно и нужно сохранять в системе контроля версий (git).
Вообще, идею использовать два файла для описания зависимостей нельзя назвать новой. Здесь явно прослеживается параллель между Gemfile и Gemfile.lock из мира Ruby и package.json и package-lock.json из мира JavaScript. Все эти файлы имеют схожее назначение.
Использование
Инициализация проекта
Создать новый проект, использующий конкретную версию Python можно вот такой командой:
Если же вам не нужно указывать версию так конкретно, то есть шорткаты:
После выполнения одной из этих команд, pipenv создал файл Pipfile и виртуальное окружение где-то в заранее определенной директории (по умолчанию вне директории проекта).
Очень полезно правильно разделять зависимости на «основные» и «разработческие». Это позволит уменьшить размер окружения при развёртывании на продакшн (например, размер Docker-образа). Кроме того, чем меньше в системе, работающей на продакшне, установлено пакетов, тем меньше потенциальных уязвимостей.
Если вам нужно узнать, где именно pipenv создал виртуальное окружение (например, для настройки IDE), то сделать это можно вот так:
Управление зависимостями через pipenv
Теперь давайте установим в проект первую зависимость. Делается это при помощи команды pipenv install :
В секцию [packages] добавилась зависимость requests с версией * (версия не фиксирована).
Теперь можно увидеть всё дерево зависимостей проекта при помощи команды pipenv graph :
Это бывает полезно, чтобы узнать, что от чего зависит, или почему в вашем виртуальном окружении есть определённый пакет.
Управление виртуальными окружениями
Давайте удалим созданное виртуальное окружение:
И представим себя в роли другого разработчика, который только присоединился к вашему проекту. Чтобы создать виртуальное окружение и установить в него зависимости нужно выполнить следующую команду:
Эта команда на основе Pipfile.lock воссоздаст точно то же самое виртуальное окружение, что и у других разработчиков проекта.
Чтобы «войти» внутрь виртуального окружения, нужно выполнить:
В этом режиме будут доступны все установленные пакеты, а имена python и pip будут указывать на соответствующие программы внутри виртуального окружения.
Есть и другой способ запускать что-то внутри виртуального окружения без создания нового шелла:
Переменные окружения
Давайте напишем небольшой скрипт ( script.py ), который будет использовать эту переменную окружения:
Попробуем запустить его без использования pipenv :
Запуск скриптов
Теперь тот же самый скрипт можно запустить при помощи команды:
В качестве бонуса pipenv автоматически подгрузит переменные окружения, так что таким же образом можно выполнять и скрипты, которые зависят от конфигурации проекта (миграции БД, очистки кэшей, удаление временных файлов, да что угодно).
Распространённые проблемы
Лишние зависимости в виртуальном окружении
Пререлизные зависимости
Что произойдёт, если всё-таки рискнуть:
На первый взгляд, всё хорошо. Но давайте заглянем в Pipfile :
Чтобы установить пререлизную зависимость правильно, нужно указать конкретную версию:
Мердж-конфликты в Pipfile.lock
План выхода из такой ситуации следующий: 1. Не пытайтесь осознанно решать конфликты в Pipfile.lock вручную, всё равно не сможете; pipenv сам создал этот файл, вот пусть сам и разбирается. 2. Разрешите конфликт в любую сторону, главное, чтобы в итоге получился валидный JSON. 3. Пересоздайте Pipfile.lock заново:
Статус проекта: пациент скорее мертв, чем жив, но надежда есть
Заключение
Вместо заключения оставлю вас поразмышлять над вот этой программой:
Дополнительное чтение
Подпишитесь!
Чтобы получить уведомление о новом посте можно:
Configure a Python interpreter
Python interpreters in PyCharm
Python interpreters can be configured for a new project or for the current project (you can create a new interpreter or use one of the existing interpreters).
Setting an existing Python interpreter
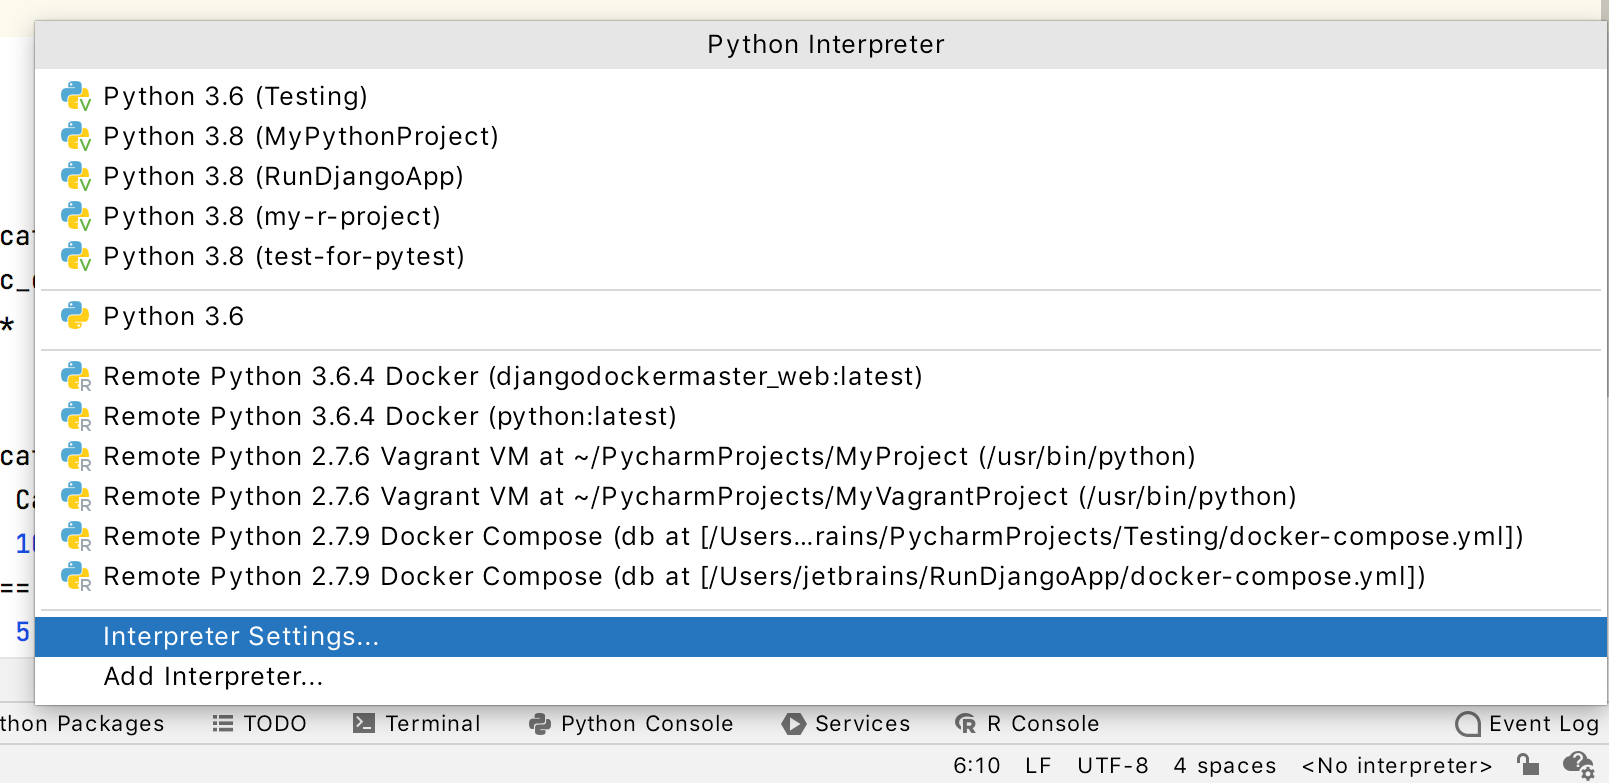
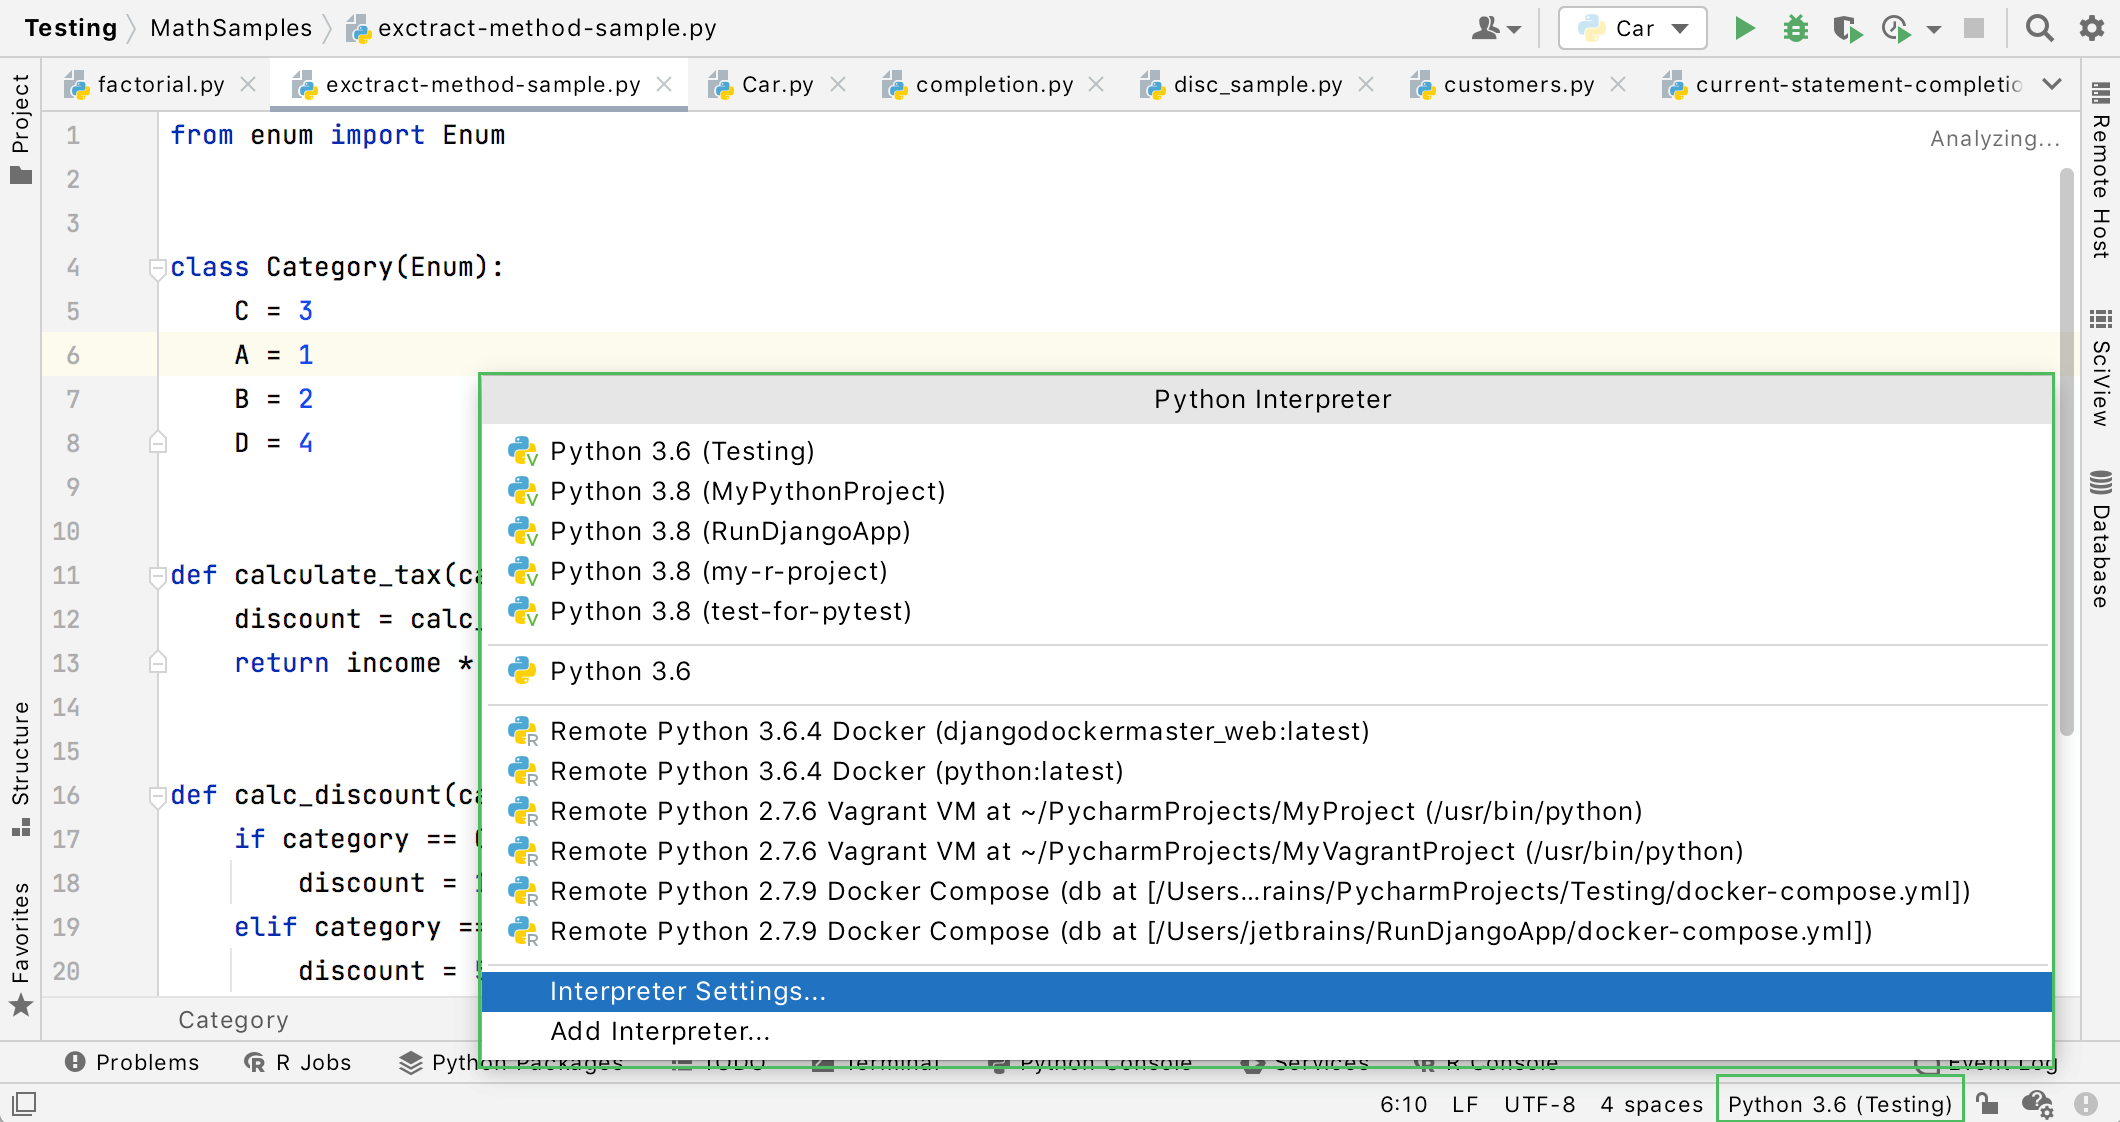
Change the Python interpreter using the Python Interpreter selector
The Python Interpreter selector is located on the status bar. It is the most convenient and quickest way to switch the Python interpreter. Just click it and select the target interpreter:
Change the Python interpreter in the project settings
Press Ctrl+Alt+S to open the IDE settings and select Project

Select the target interpreter.
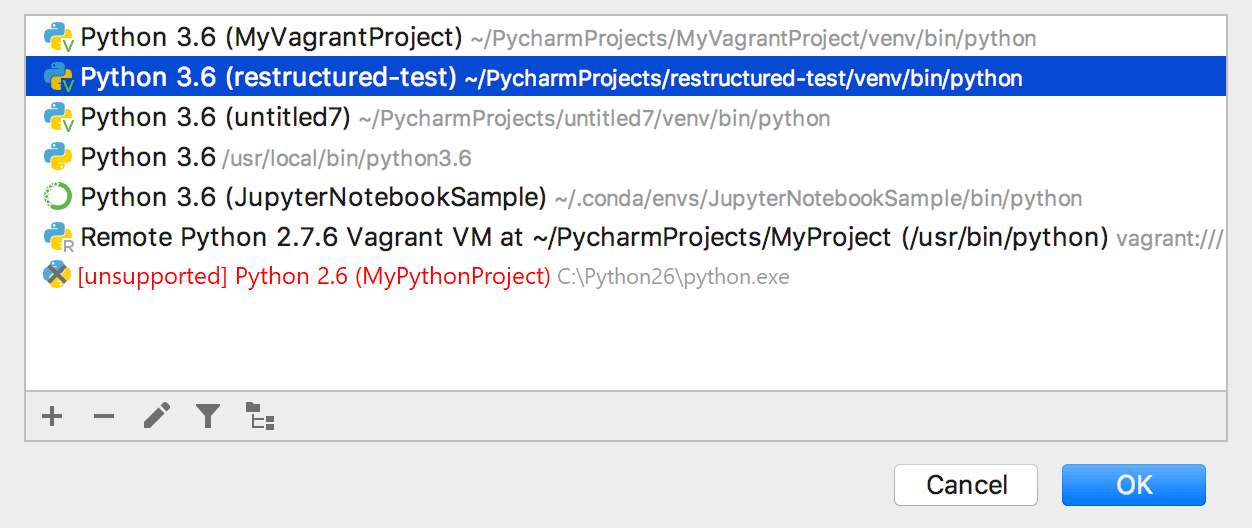
When PyCharm stops supporting any of the outdated Python versions, the corresponding Python interpreter is marked as unsupported.
When you change an SSH interpreter, you might need to synchronize local content with the target server. Mind a notification balloon in the lower-right corner.  You can click one of the links to perform the following actions:
Auto-upload files to the server
Synchronize files and then enable auto-uploading
Modify a Python interpreter
Press Ctrl+Alt+S to open the IDE settings and select Project
You can specify an alternative interpreter name for the selected interpreter. The Python interpreter name specified in the Name field, becomes visible in the list of available interpreters. Click OK to apply the changes.
For remote interpreters (that are available in PyCharm Professional ) you can modify configuration parameters.

Creating a new Python interpreter
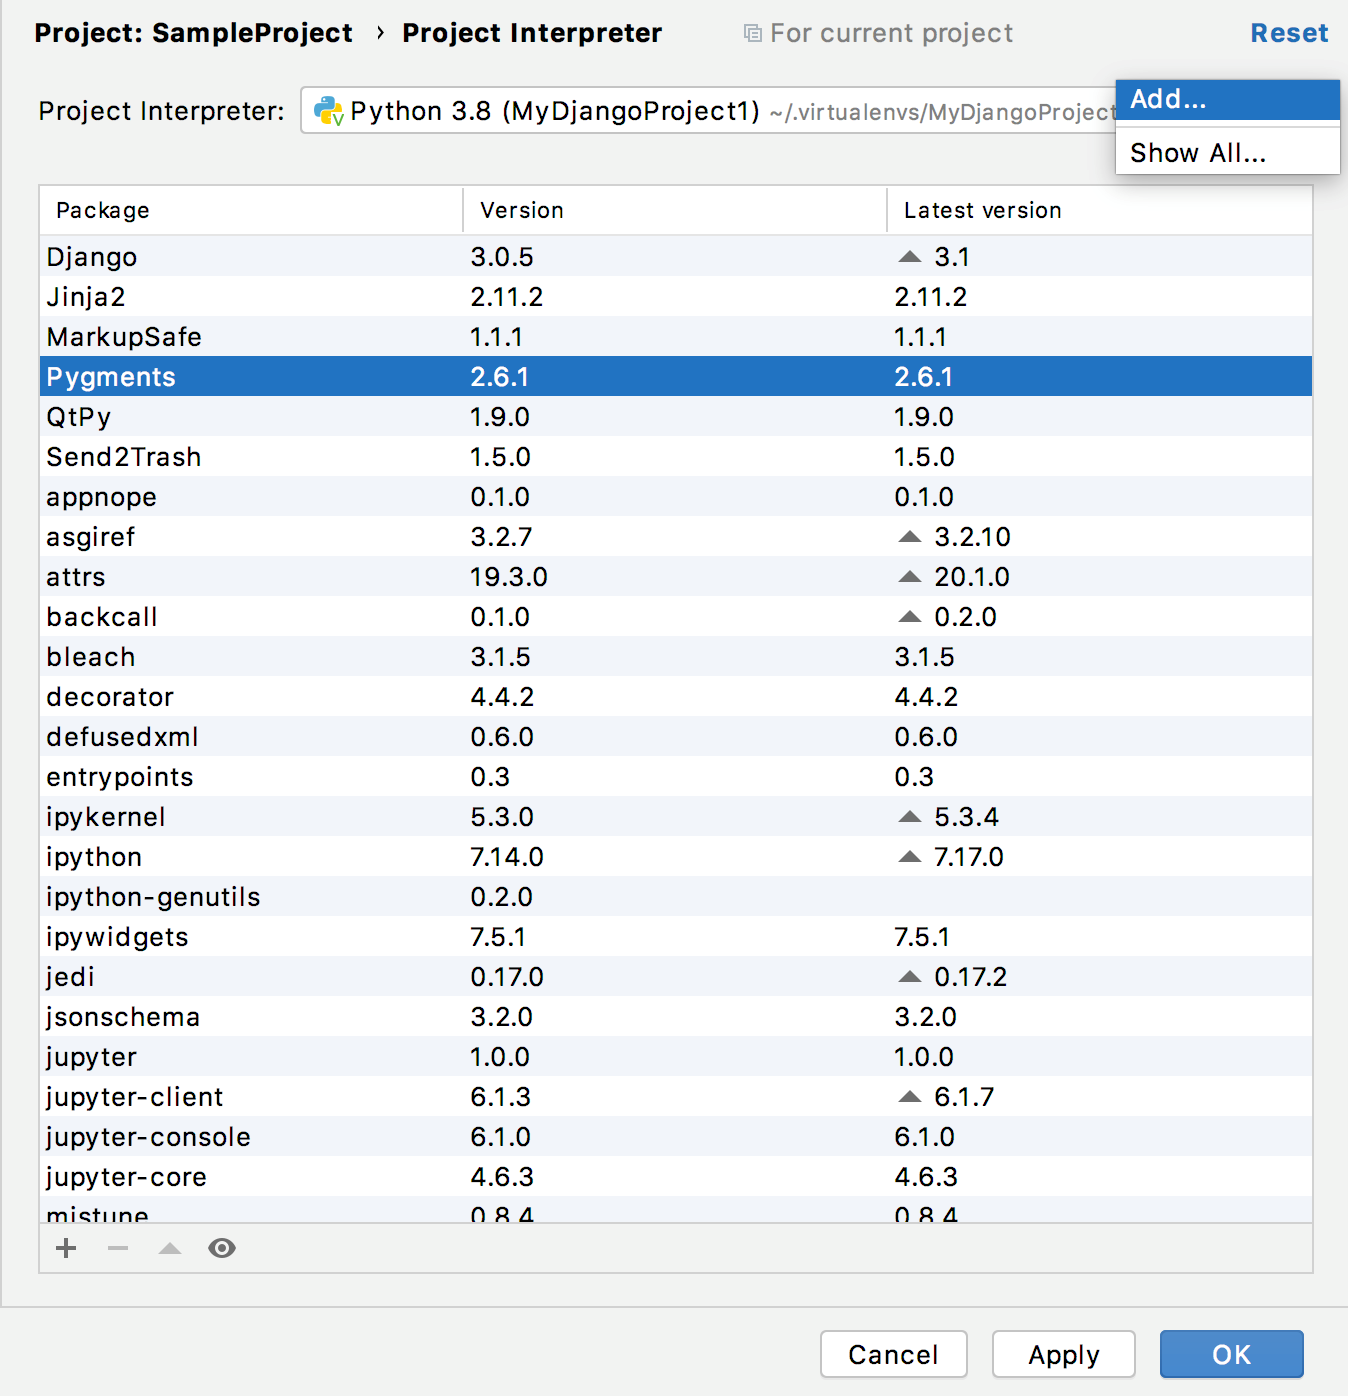
To add a new interpreter to the current project:
Do one of the following:
Press Ctrl+Alt+S to open the project Settings/Preferences and go to Project
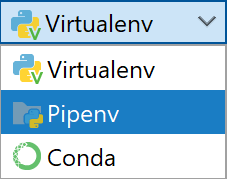
Choose the interpreter type to add and perform the specific settings:
Note that SSH, WSL, Vagrant, Docker, and Docker Compose are available only for the commercial version of PyCharm. WSL is Windows specific.

If New environment is selected:
If PyCharm detects no Python on your machine, it provides two options: to download the latest Python versions from python.org or to specify a path to the Python executable (in case of non-standard installation). 
Select the Make available to all projects checkbox if you want to reuse this environment when creating Python interpreters in PyCharm.
If Existing environment is selected:
Select the Make available to all projects checkbox if you want to reuse this environment when creating Python interpreters in PyCharm.
Click OK to complete the task.
If you have added the user base’s binary directory to your PATH environmental variable, you don’t need to set any additional options: the path to the pipenv executable will be autodetected.
Click OK to complete the task.
Click OK to save the changes and complete the task.
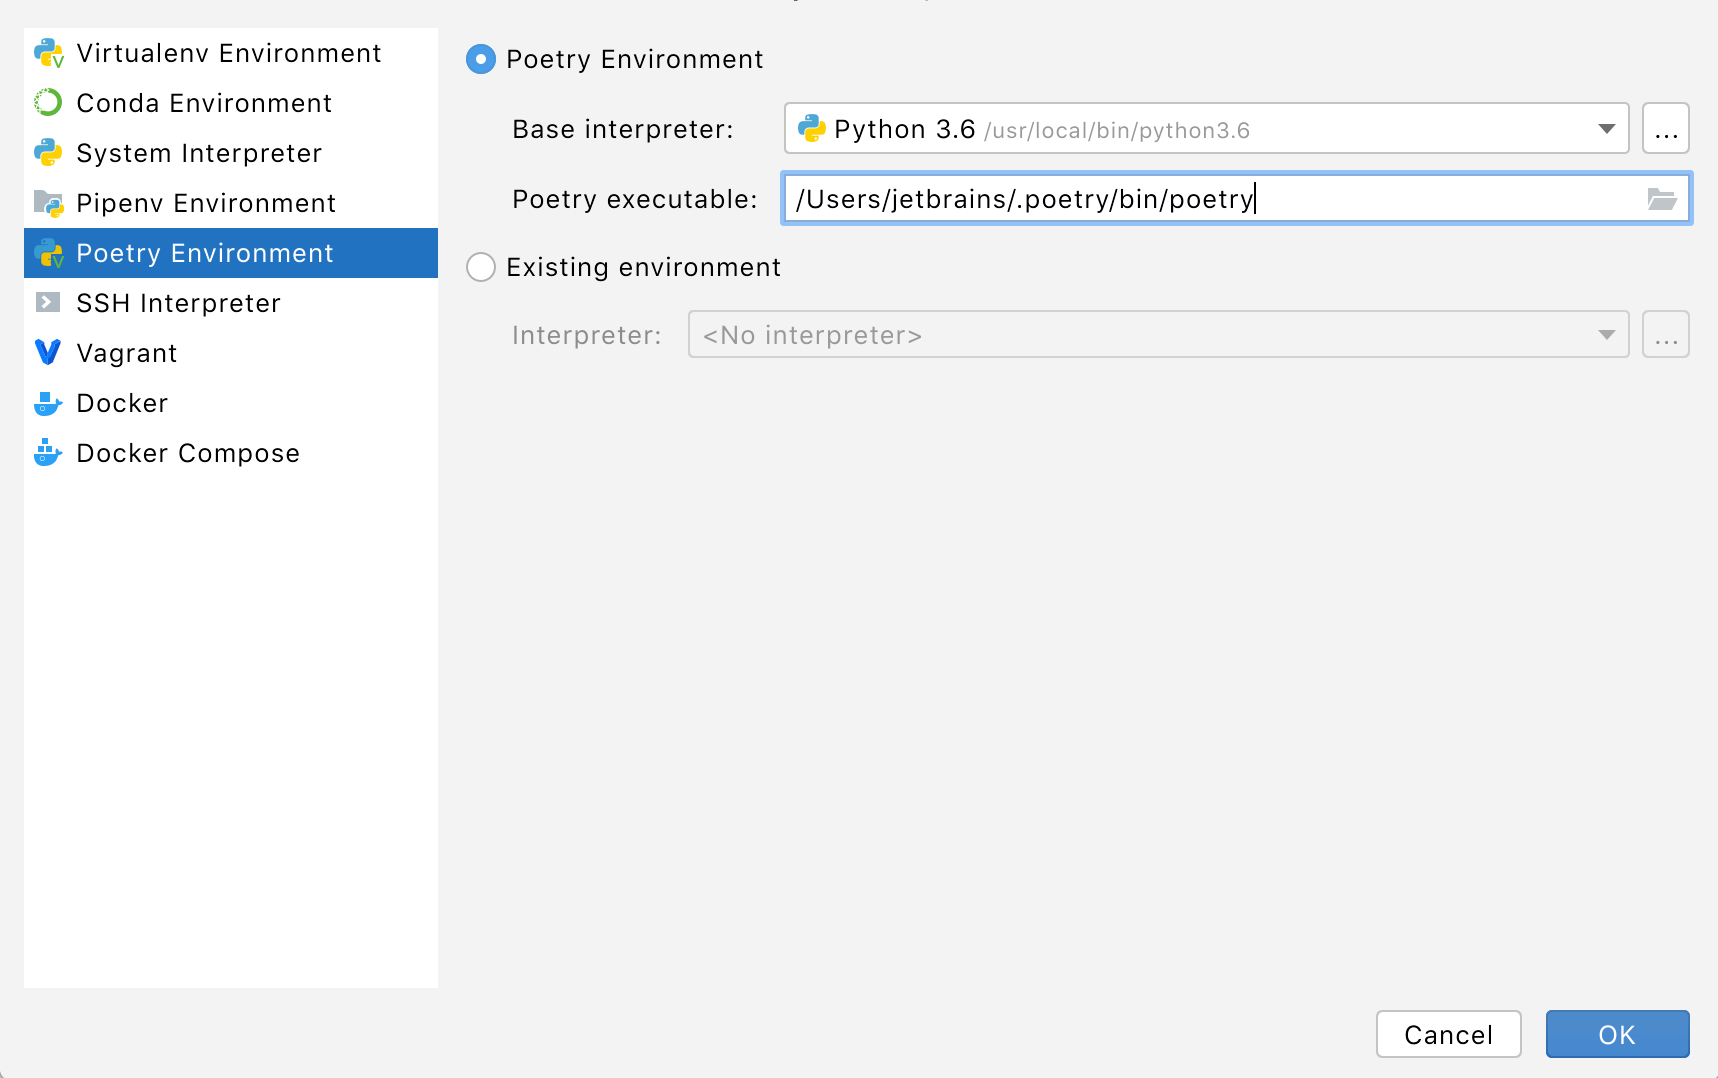
If Poetry environment is selected:
If Existing environment is selected:
Click OK to complete the task.
If New environment is selected:
Select the Python version from the list.
Select the Make available to all projects checkbox if you want to reuse this environment when creating Python interpreters in PyCharm.
If Existing environment is selected:
Select the Make available to all projects checkbox if you want to reuse this environment when creating Python interpreters in PyCharm.
Click OK to complete the task.
If PyCharm detects no Python on your machine, it provides two options: to download the latest Python versions from python.org or to specify a path to the Python executable (in case of non-standard installation). 
You will need admin privileges to install, remove, and upgrade packages for the system interpreter. When attempting to install an interpreter package through an intention action, you might receive the following error message:  As prompted, consider using a virtual environment for your project.
Click OK to complete the task.
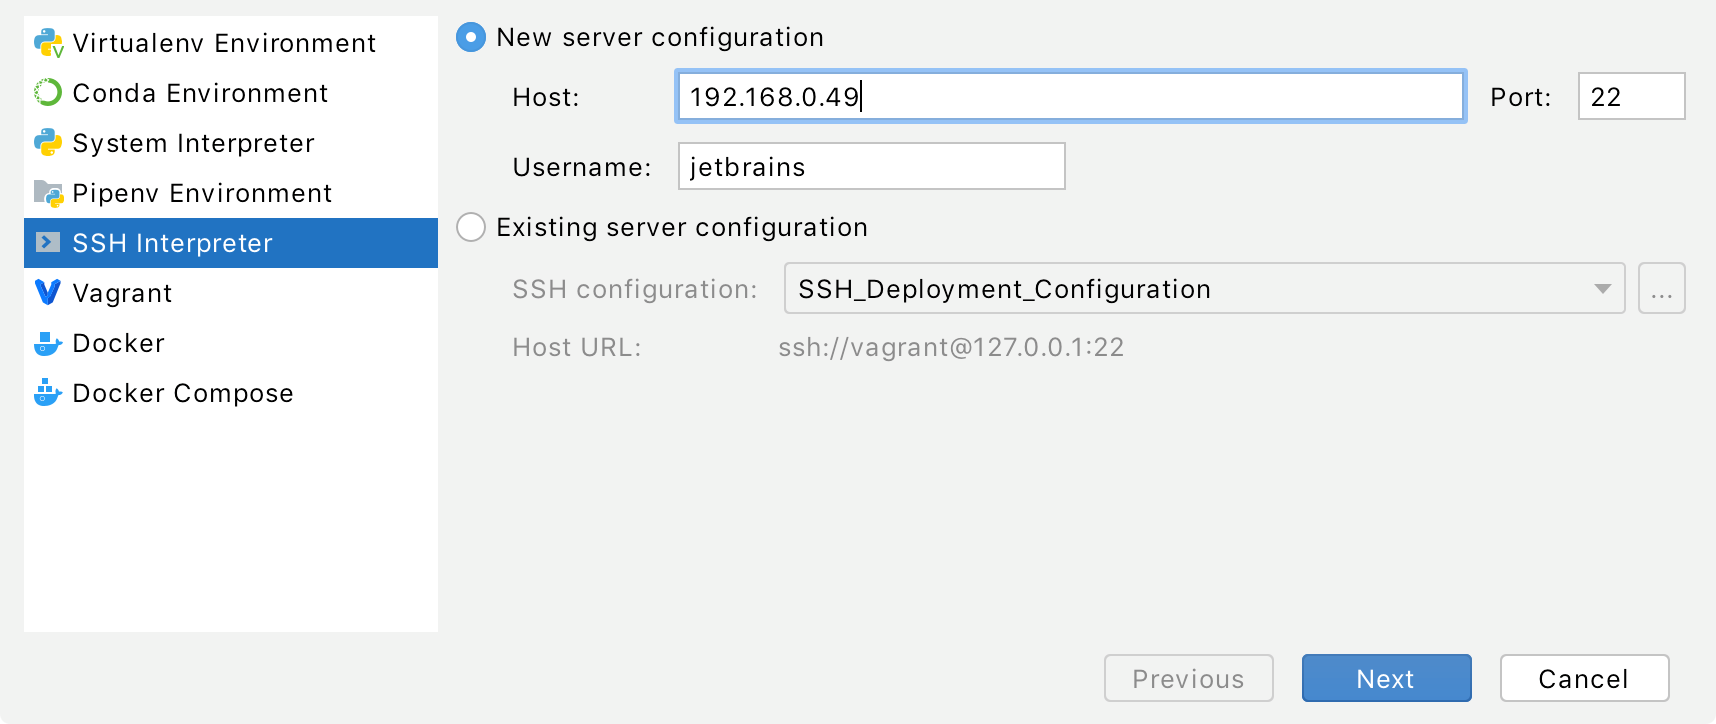
In the next dialog window, provide the authentication details to connect to the target server. 
Select Password or Key pair (OpenSSL or PuTTY) and enter your password or passphrase. If Key pair (OpenSSL or PuTTY) is selected, specify:
Private key file : location of the file with a private key
Passphrase : similar to a password, it serves to encrypt the private key.
The RFC 4716 format for OpenSSH keys is not supported by PyCharm. See the workaround.
Click Next to proceed with the final configuration step.

You can also select the lowest checkbox to enable automatic upload of the local changes to the remote server.
In the left-hand pane of the Add Python Interpreter dialog, click Vagrant :

This results in showing the link to Vagrant host URL.
The Python interpreter path field displays the path to the desired Python executable. You can accept default, or specify a different one.

Select the Linux distribution and specify the path to the python executable in the selected Linux distribution. Typically, you should be looking for wsl.exe but you can specify any non default WSL distro.
Python interpreter path should have the default value:

Click OK to complete the task.
In the dialog that opens, select the Docker Compose option, from the drop-down lists select the Docker server, Docker Compose service (here web ), configuration file (here docker-compose.yml ) and Python interpreter path (here python ).

Next, wait while PyCharm starts your Docker Compose configuration to scan and index:
Click OK to complete the task.
When a remote Python interpreter is added, at first the PyCharm helpers are copied to the remote host. PyCharm helpers are needed to run remotely the packaging tasks, debugger, tests and other PyCharm features. Next, the skeletons for binary libraries are generated and copied locally. Also all the Python library sources are collected from the Python paths on a remote host and copied locally along with the generated skeletons. Storing skeletons and all Python library sources locally is required for resolve and completion to work correctly. PyCharm checks remote helpers version on every remote run, so if you update your PyCharm version, the new helpers will be uploaded automatically and you don’t need to recreate remote interpreter. SFTP support is required for copying helpers to the server.
Setting the default interpreter
In PyCharm, you can specify an interpreter that will be automatically set for all newly created projects.
From the main menu, select File | New Projects Setup | Settings for New Projects (on Window and Linux) or File | New Projects Setup | Preferences for New Projects (on macOS).
The change will become effective for all newly created projects in PyCharm.
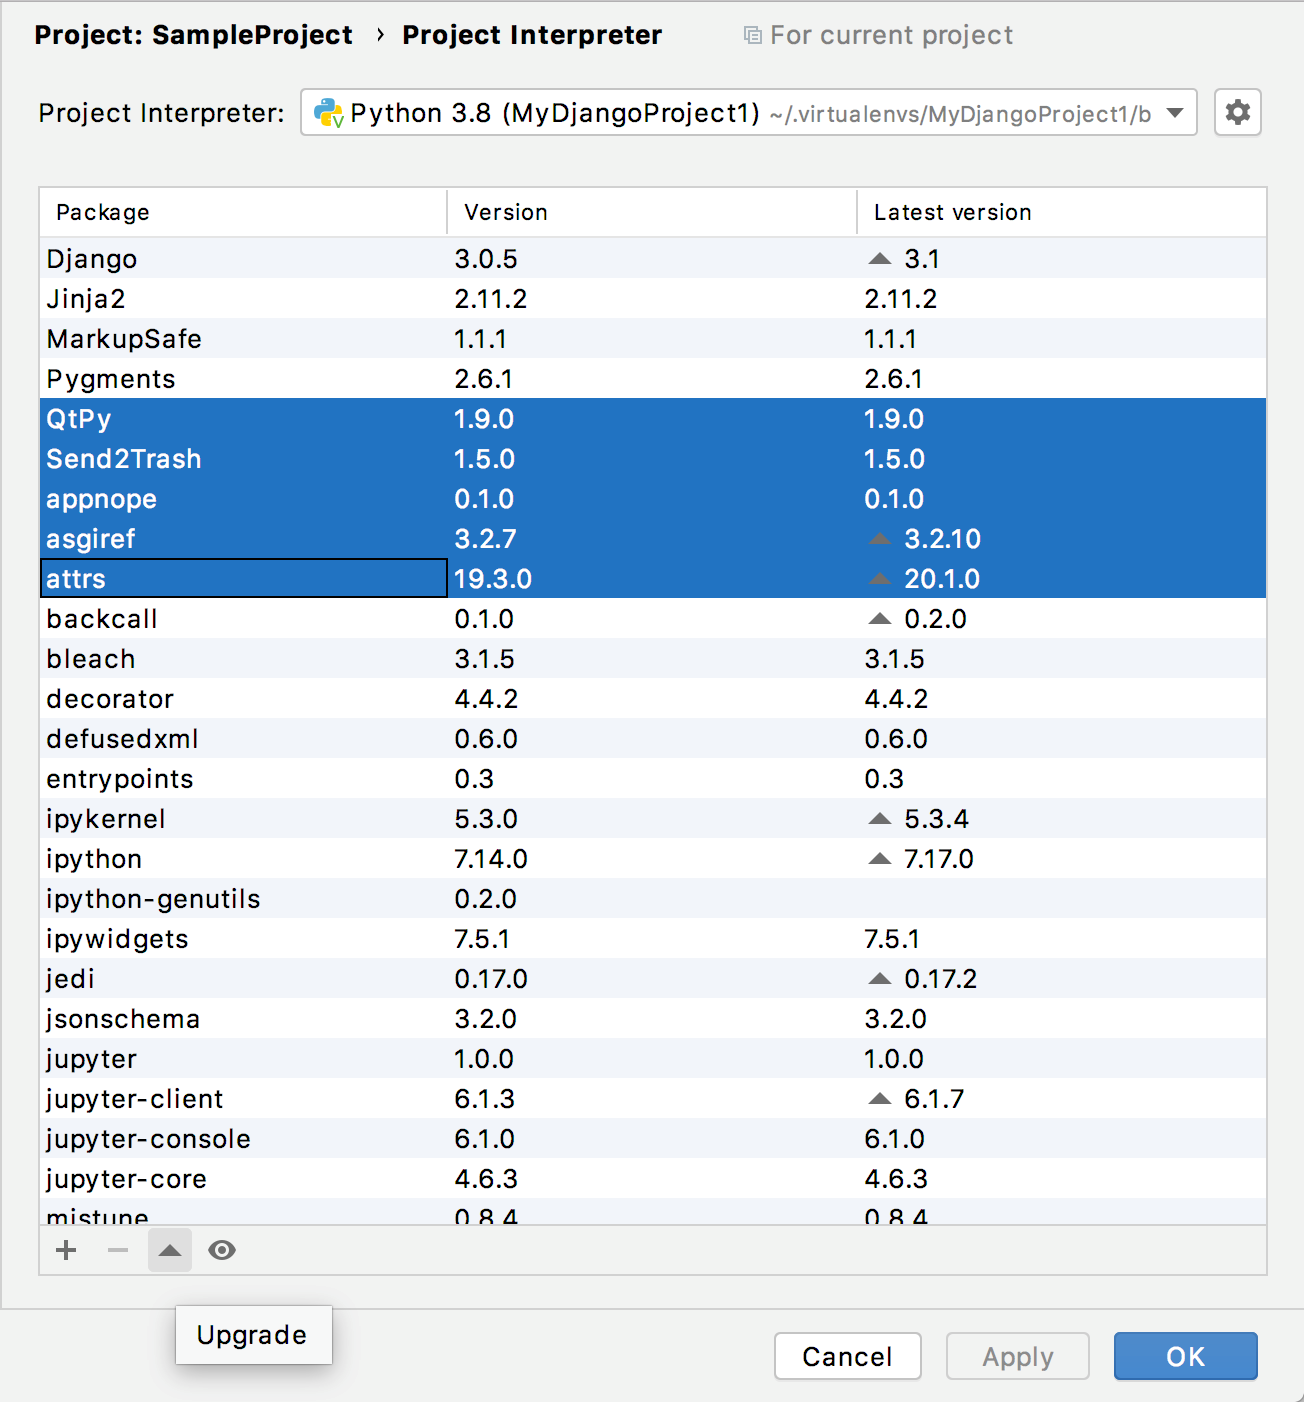
Managing interpreter packages
For each interpreter, you can install, upgrade, and delete Python packages. By default, PyCharm uses pip to manage project packages. For Conda environments you can use the Conda package manager.