ИТ База знаний
Полезно
— Онлайн генератор устойчивых паролей
— Онлайн калькулятор подсетей
— Руководство администратора FreePBX на русском языке
— Руководство администратора Cisco UCM/CME на русском языке
— Руководство администратора по Linux/Unix
Навигация
Серверные решения
Телефония
FreePBX и Asterisk
Настройка программных телефонов
Корпоративные сети
Протоколы и стандарты
Как пользоваться утилитой screen в Linux?
Окно в «новую жизнь»
Онлайн курс по Linux
Мы собрали концентрат самых востребованных знаний, которые позволят тебе начать карьеру администратора Linux, расширить текущие знания и сделать уверенный шаг к DevOps

Прости, что напомнили. Знаем, это болезненно. Что же, вытрем слезы. Для этих ситуаций есть команда screen о которой мы и поговорим.
Немножко теории
Установка screen в Linux

Установка screen в Ubuntu и Debian
Установка screen в CentOS и Fedora
Запуск screen в Linux
У вас откроется новая сессия в новом окне. Уже здесь вы можете вводить все нужные shell команды. Находясь в режиме скрина (screen) вы можете посмотреть список доступных вам команд управления этим режимом. Вот так:
Сессия screen с именем
Ну очень удобная фича. Если вы делаете несколько процессов параллельно, просто обзовите их так, чтобы потом понять, что и где выполняется. Синтаксис такой:
Всегда используйте скрин именно так. Будет значительно удобнее.
Как правильно работать с окнами в Windows
Ниже мы собрали все команды, которые понадобятся вам для управления скринами:
Выход из screen сессии
Самое важное: запущенная вами в этот момент команда не остановится и будет продолжать свое выполнение.
Возврат к screen сессии
Вывод этой команды будет выглядеть вот так:
Немножко кастомизации screen под вас
Когда screen запускается, он считывает свои конфигурационные параметры из /etc/screenrc и
Посмотрите пример с комментариями, как мы закастомили screen для себя:
Типовой сценарий использования screen
Общий случай, так сказать. Обычно он состоит из следующих шагов:
Выводы
Мы разобрались, как создавать screen сессии, управлять ими внутри, открывая новые окна, выходить из их режима управления (без прекращения выполнения команды), делить горизонтально и вертикально экраны.
Ах да, ещё мы научились кастомизировать screen под себя. Профит!
Онлайн курс по Linux
Мы собрали концентрат самых востребованных знаний, которые позволят тебе начать карьеру администратора Linux, расширить текущие знания и сделать уверенный шаг к DevOps
IT заметки
Моя записная книжка
среда, 14 марта 2012 г.
Screen – управления окнами из консоли
Иногда приходится работать с *nix серверами удаленно по ssh, в моем случае через putty. Если дисканектит по причине херового интернета, ссесия рвется, то хана всем нашим не завершенным процессам, наработкам в не сохраненных конфигах и.т.д. Что бы предостереч себя от подобных казусов, а так же хранить сессии и в любое время из любого места к ним подключаться я открыл для себя оконный менеджер Screen. Теперь по делу.


Запустим в этом окне какой-либо процесс. Пусть это будет top и создаем еще одно окно
Ctrl+a – c и запустим в нем какой-либо процесс. На этот раз путь это будет man screen
На данный момент мы имеем в одном окне терминала putty три запущенных окна screen.
Как глянуть сколько окон? как вариант Ctrl+a – w

Мы видим в левом верхнем углу окна строку:
0$ bash 1*$ bash 2-$ bash

Можно перейти на нужное окно, зная его номер, по команде:
Ctrl+a – номер_окна
Например, перейдем на второе окно:
Ctrl+a – 1
Или, чуть переиначив команду:
Ctrl+a – ‘
В нижней строке появится предложение ввести номер окна, в которое мы хотим перейти. Допустим, нам нужно перейти в первое окно — вводим номер 0 и нажимаем Enter:
Как мы видели из вывода команд Ctrl+a – w и Ctrl+a – “, имена (заголовки) окон одинаковые. Давайте исправим это. Наберем команду Ctrl+a – A
В нижней строке появится приглашение изменить заголовок окна. Исправляем с bash на main и нажимаем Enter. Узнать имя текущего окна можно Ctrl+a – N мы увидим в левом верхнем углу окна его имя.
Информацию об окне:
Ctrl+a – i

Мы увидим в левом верхнем углу окнаинформацию и его имя, в нашем случае имя Main.
Закрытие окна в Screen производится выполнением команды exit в окне. Предварительно, нужно остановить все запущенные процессы в нем. Закрытие окон можно произвести и комбинацией Ctrl+a – k. Однако, выполнять ее не рекомендуется, так как эта операция идентична команде kill – “убить” процесс.
Давайте закроем второе окно. Остановим процесс top и выполним exit. А затем посмотрим вывод команды.


Видим, что нумерация теперь следующая: 0 — 2. Давайте поменяем нумерацию окон, в частности, окна под номером 2 и присвоим ему номер 1. Выполним команду:
Ctrl+a – :
Внизу окна появится приглашение в виде двоеточия для ввода команды.
Введем команду:
number 1
И нажимаем Enter.
Смотрим результат:
Ctrl+a – “
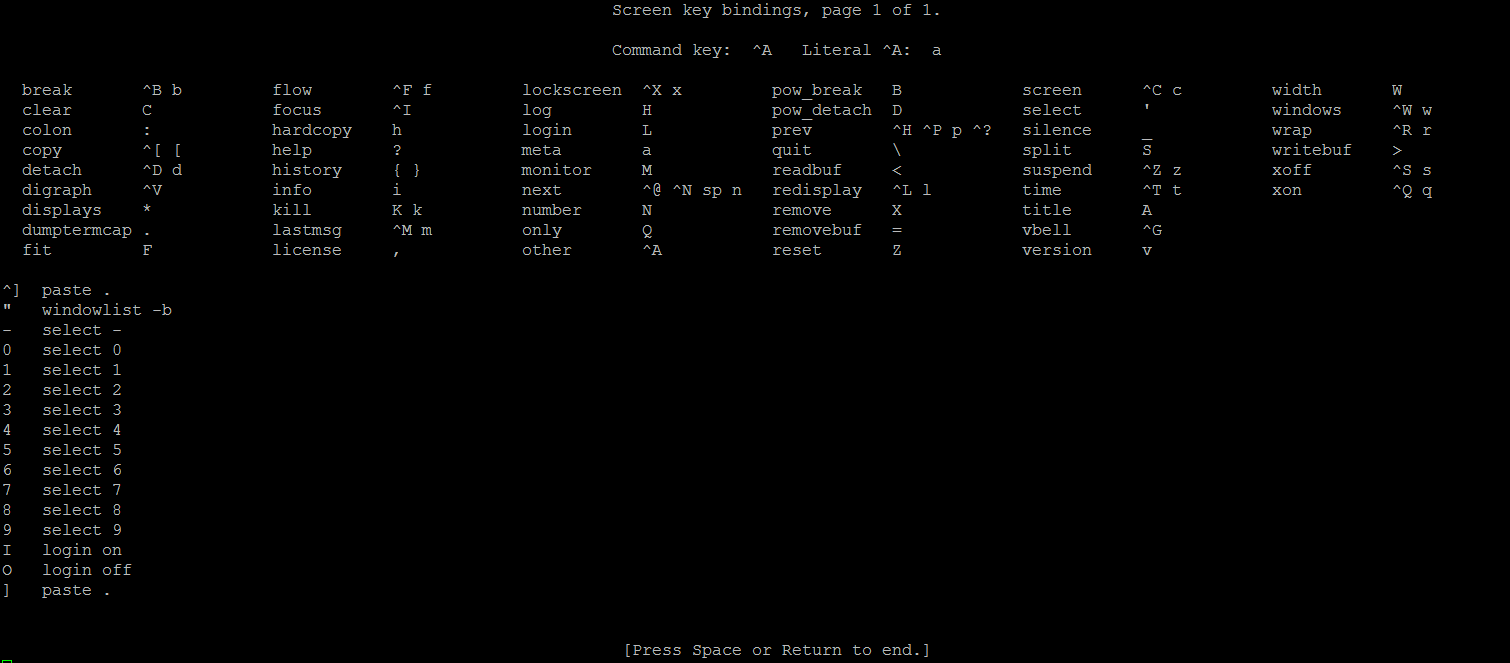
Cправка по клавиатурным комбинациям Screen:
Ctrl+a – ?
По умолчанию, Screen отображает только одно окно на экране эмулятора терминала. Однако, имеется возможность разбивать окно Screen в терминале на несколько. Для этого существует команда разбивки окна на горизонтальные части – регионы. Удобство в этом случае заключается в том, что нет надобности переключаться между окнами – все они находятся на виду и все процессы под контролем, достаточно лишь перевести взгляд на нужное окно.
Открываем эмулятор терминала и запускаем в нем Screen и выполняем команду разбивки экрана эмулятора на две горизонтальные части – регионы:
Ctrl+a – S

Как видно на скриншоте, окно эмулятора терминала putty было разбито на две одинаковые горизонтальные части. В Screen такие части, выполненные с помощью команды Ctrl+a – S, называются регионами. Таких регионов может быть не обязательно два, а много больше. Допустим, чтобы получить три окна Screen в нашем случае, нужно в текущем регионе (он у нас верхний) снова выполнить команду Ctrl+a – S. Так можно создать три, четыре, пять и т. д. окон Screen. Но мы остановимся на варианте из двух окон, для наглядности.
В верхнем регионе у нас запущен Screen и на этом регионе установлен фокус (зеленый курсор). Нижний регион у нас пуст – в нем не запущен Screen и пока там ничего нет. Нам необходимо перейти на нижний регион, создать там окно Screen и запустить в нем процесс.
Переведем фокус на нижний регион:
Ctrl+a – Tab
и создадим в нем окно Screen:
Ctrl+a – c


Закрытие текущего региона в Screen производится командой Ctrl+a – X. Выполним ее в нашем текущем верхнем регионе:
Ctrl+a – X

Если открыто несколько (больше двух) регионов, можно закрыть сразу все, кроме одного – текущего, выполнив команду:
Ctrl+a – Q
и вот еще:
Ctrl+a—| (вертикальное разбиение)
Как использовать screen в Linux
Вы когда-нибудь сталкивались с ситуацией, когда вы выполняете длительную задачу на удаленном компьютере, и внезапно ваше соединение разрывается, сеанс SSH завершается, и ваша работа теряется. Что ж, в какой-то момент это случилось со всеми нами, не так ли? К счастью, есть утилита screen которая позволяет нам возобновлять сеансы.
Введение
Экран или GNU Screen — это терминальный мультиплексор. Другими словами, это означает, что вы можете запустить сеанс экрана, а затем открыть любое количество окон (виртуальных терминалов) внутри этого сеанса. Процессы, запущенные в Screen, будут продолжать работать, если их окно не отображается, даже если вы отключитесь.
Установить Linux GNU Screen
В настоящее время пакет screen предустановлен в большинстве дистрибутивов Linux. Вы можете проверить, установлен ли он в вашей системе, набрав:
Если в вашей системе не установлен screen, вы можете легко установить его с помощью диспетчера пакетов вашего дистрибутива.
Установите Linux Screen в Ubuntu и Debian
Установите Linux Screen на CentOS и Fedora
Экран запуска Linux
Чтобы начать сеанс экрана, просто введите screen в консоли:
Это откроет сеанс экрана, создаст новое окно и запустит оболочку в этом окне.
Теперь, когда вы открыли сеанс экрана, вы можете получить список команд, набрав:
Начало именованного сеанса
Именованные сеансы полезны, когда вы запускаете несколько сеансов экрана. Чтобы создать именованный сеанс, запустите экранную команду со следующими аргументами:
Всегда рекомендуется выбирать описательное имя сеанса.
Работа с Linux Screen Windows
Когда вы запускаете новый сеанс экрана, он создает одно окно с оболочкой в нем.
У вас может быть несколько окон внутри сеанса Screen.
Ниже приведены некоторые наиболее распространенные команды для управления экраном Linux в Windows:
Отключиться от сеанса экрана Linux
Вы можете отключиться от сеанса экрана в любое время, набрав:
Программа, запущенная в сеансе экрана, продолжит работу после того, как вы отключитесь от сеанса.
Повторное подключение к экрану Linux
Чтобы возобновить сеанс экрана, используйте следующую команду:
Чтобы найти идентификатор сеанса, укажите текущие сеансы запущенного экрана с помощью:
Если вы хотите восстановить экран 10835.pts-0, введите следующую команду:
Настроить экран Linux
Когда screen запускается, он считывает свои параметры конфигурации из /etc/screenrc и
Вот пример конфигурации
/.screenrc с настроенной строкой состояния и несколькими дополнительными параметрами:

Базовое использование экрана Linux
Ниже приведены основные шаги для начала работы с экраном:
Выводы
Если у вас есть какие-либо вопросы или отзывы, не стесняйтесь оставлять комментарии.
Attaching to and detaching from screen sessions
Screen is a «must» tool for Unix Administrators
Introduction
GNU Screen is a simple, but at the same time flexible and programmable windows manager. It is often called terminal multiplexer, but the key functionality of screen is in the area of windows management: creation, destruction and resizing of windows. For example it can split the console screen horizontally and display two windows at the same time. Screen is a Unix program (Cygwin version exists and is quite usable). For good Windows terminal emulator see Teraterm
Authodetach capability
One of the most important) feature of screen is that like VNC it provides the ability to detach the terminal emulator from the running programs and then reattach the same or new terminal to them.
Autodetach setting might not be enabled by default so it make sense to put a corresponding directive in your .screenrc
Detaching and reattaching
You can detach just by closing the terminal emulator that contains the session. Neither of these actually end your session. All they do is unbind your session from the current terminal. All of the programs you started running within screen are still running.
To detach a session, use Ctrl-a d. If that’s the only session running (which is typical for novices) you can reattach with Ctrl-a r.
To reattach outside the screen type
You can also use the command:
To join a screen that is already attached
Will attach you to that screen. In this case you have two session for the same UserID. Both users have control so be careful.
Naming screen sessions
Assuming you want named sessions for clarity, you can name a session in screen by starting screen as:
You can then reattach to a session using:
or kill/quit a session using:
Summary
List available screen sessions
Reconnect to specific session
Connect to specific session in «watching/spy mode»
Reattaching to session within the screen
If you have more than one session running, you will need to know the PID to attach or reattach to an existing session. To detach a session, use Ctrl-a d. If that’s the only session running, you can reattach with Ctrl-a r If more than one session is detached, you’ll need to run Ctrl-a r XXXXX where XXXXX is the PID.
Dr. Nikolai Bezroukov
Your browser does not support iframes.
NEWS CONTENTS
Old News 😉
Jan 01, 2013 | askubuntu.com
I have a program running under screen. In fact, when I detach from the session and check netstat, I can see the program is still running (which is what I want):
But how do I know which one is the session running that process I created?
Now one of the documents I came across said:
«When you’re using a window, type C-a A to give it a name. This name will be used in the window listing, and will help you remember what you’re doing in each window when you start using a lot of windows.»
The thing is when I am in a new screen session, I try to press control+a A and nothing happens.
(I am reconnected to the myprogramrunningunderscreen session)
worked for me. It detached the previous screen and allowed me to reattach. See the Man Page for more information.
An easy way is to simply reconnect to an arbitrary screen with
Then once you are running screen, you can get a list of all active screens by hitting Ctrl-A » (i.e. control-A followed by a double quote). Then you can just select the active screens one at a time and see what they are running. Naming the screens will, of course, make it easier to identify the right one.
I tend to use the following combo where I need to work on several machines in several clusters:
This creates the new screen session where I can build up the environment.
This is what I use subsequently to reattach to that screen session. The nifty bits are that if the session is attached elsewhere, it detaches that other display. Moreover, if there is no session for some quirky reason, like someone rebooted my server without me knowing, it creates one. Finally. if multiple sessions exist, it uses the first one.
Also here’s few useful explanations from man screen on cryptic parameters
You will get a list like this
[Nov 02, 2018] How to Recover from an Accidental SSH Disconnection on Linux RoseHosting
Nov 02, 2018 | www.rosehosting.com
. I can get a list of all previous screens using the command:
And this gives me the output as shown here:
As you can see, there is a screen session here with the name:
To reconnect to it, just type:
And this will take you back to where you were before the SSH connection was terminated! It’s an amazing tool that you need to use for all important operations as insurance against accidental terminations.
Manually Detaching Screens
When you break an SSH session, what actually happens is that the screen is automatically detached from it and exists independently. While this is great, you can also detach screens manually and have multiple screens existing at the same time.
For example, to detach a screen just type:
And the current screen will be detached and preserved. However, all the processes inside it are still running, and all the states are preserved:
Changing the Screen Names to Make Them More Relevant
By default, the screen names don’t mean much. And when you have a bunch of them present, you won’t know which screens contain which processes. Fortunately, renaming a screen is easy when inside one. Just type:
We saw in the previous article that «ctrl+a» is the trigger condition for screen commands. The colon (:) will take you to the bottom of the screen where you can type commands. To rename, use:
And now when you detach the screen, it will show with the new name like this:
Now you can have as many screens as you want without getting confused about which one is which!
If you are one of our Managed VPS hosting clients, we can do all of this for you. Simply contact our system administrators and they will respond to your request as soon as possible.
If you liked this blog post on how to recover from an accidental SSH disconnection on Linux, please share it with your friends on social media networks, or if you have any question regarding this blog post, simply leave a comment below and we will answer it. Thanks!
[Solved] screen autodetach problem
The FreeBSD Forums
kattenjanson
Junior Member Join Date: Mar 2011
Posts: 4
Thanks: 0
Thanked 0 Times in 0 Posts
screen autodetach problem
I am usually able to solve these problems myself and I have been looking through forums and googled the issue but I am unsure how to proceed troubleshooting. Any advice or the like would be greatly appreciated!
———————————————————————————
Last edited by DutchDaemon; March 2nd, 2011 at 01:14. Reason: It’s «I»: http://en.wikipedia.org/wiki/Capitalization#Pronouns
kattenjanson
View Public Profile
Send a private message to kattenjanson
Find all posts by kattenjanson
#2 March 1st, 2011, 23:03
gordon@
FreeBSD Developer Join Date: Feb 2008
Location: San Diego, CA
gordon@
View Public Profile
Send a private message to gordon@
Find all posts by gordon@
#3 March 2nd, 2011, 10:28
kattenjanson
Junior Member Join Date: Mar 2011
Yes, I have tried this as well, although to no avail. It seems that the same problem occurs under archlinux. I might have used the wrong topic, btw. The real issue is that when not detaching properly, the session runs for about 4 or 5 hours then dies. I noticed this when my irssi session pinged out after about the same time. What happens is, I cannot attach the session at all after this has happened.
kattenjanson
View Public Profile
Send a private message to kattenjanson
Find all posts by kattenjanson
#4 March 3rd, 2011, 11:21
mix_room
Member Join Date: Aug 2009
Posts: 371
Thanks: 8Thanked 26 Times in 24 Posts
How are you closing the connection?
mix_room
View Public Profile
Send a private message to mix_room
Find all posts by mix_room
#5 March 4th, 2011, 20:21
kattenjanson
Junior Member Join Date: Mar 2011
Posts: 4
Thanks: 0
Thanked 0 Times in 0 Posts
kattenjanson
View Public Profile
Send a private message to kattenjanson
Find all posts by kattenjanson
#6 March 4th, 2011, 20:46
wblock@
FreeBSD Developer Join Date: Sep 2009
Location: Milky Way galaxy
Posts: 4,234
Thanks: 124
Thanked 789 Times in 707 Posts
Some people mention sysutils/tmux as a new alternative to sysutils/screen.
wblock@
View Public Profile
Send a private message to wblock@
Visit wblock@’s homepage!
Find all posts by wblock@
#7 March 4th, 2011, 21:30
bes
Junior Member Join Date: Aug 2010
Posts: 76
Thanks: 4
Thanked 28 Times in 25 Posts
I like tmux better than screen.There is a pretty good tutorial online that even has purty pictures.
bes
View Public Profile
Send a private message to bes
Find all posts by bes
#8 March 7th, 2011, 11:57
kattenjanson
Junior Member Join Date: Mar 2011
Posts: 4
Thanks: 0
Thanked 0 Times in 0 Posts
Thank you very much for the help, all of you, greatly appreciated! Tmux works very well.
[Jan 23, 2012] A guide to GNU Screen by Steve ‘Ashcrow’ Milner and Anderson Silva
October 5, 2007 Red Hat Magazine
Sharing a session with others
Another great application of Screen is to allow other people to login to your station and to watch the work you are doing. It is a great way to teach someone how to do things on the shell.
Setup to allow screen to be shared
Connecting to the shared screen:
And now both users (from the host and guest) will be sharing a screen session and can run commands on the terminal.
Working from multiple locations
Let’s say you have a screen session open at work with X number of windows on it. Within those screens you may be running an IRC client, an SSH connection to the web server, and your favorite text-based email client. It’s 5 p.m. and you have to go home, but you still have work left to do.
Without Screen you would probably go home, VPN into your company’s network, and fire up all the shells you need to keep working from home. With Screen, life gets a little easier.
You can simply SSH into your workstation at work and list your available screen sessions with the command:
And connect to the sessions you were running at work with the command:
This way screen will let you pick things up exactly from where you left off.
Applications to make Screen your window manager
Now that you have seen what Screen can do for you, you probably are wondering how to make it your main interaction point, like a terminal window manager.
Let’s start with IRC, a very common and popular chat system. Instead of using a graphical client like Pidgin, install Irssi. Irssi sports a slick console interface, tons of add-ons and scripts, and can be enhanced with Perl. It’s even theme-able!
Another important part of any user’s setup is email. Today most people use graphical clients such as Thunderbird, Evolution, or Sylpheed. My favorite client happens to run in a terminal: Mutt. While Mutt isn’t the easiest client in the world to set up, it sure is a joy to use. You can even use your favorite console text editor for doing emails.
Speaking of favorite text editors, there is a good chance that you work on some code projects or configurations. Instead of using gedit/kedit or powering up a heavy IDE such as Eclipse, you can pick up on Vim. Vim is a powerful text editor which, as is stated on the Vim website, could be considered an entire IDE in itself and sports syntax coloring in over 200 programming languages. If Vim doesn’t fit your style, there is always emacs, nano, or JOE.
Now all you need you need to do is edit your
/.screenrc to meet your needs.
/.screenrc looks like the following:
Once you get used to the shortcuts in GNU screen, not only will your desktop become more organized (due to the lower number of open windows), but your efficiency as a developer or system administrator will increase not only at work but at your home office as well.
Just like abeowitz, I’m wondering whether it is possible to use screen to send commands to multiple screens.
According the documentation this should be possible with the «at» command, but I don’t get it to work.
So the command sequence:
C-a :at # date
Should result in a date executed on all windows (to my understanding, but the result I get is:
«: at: at least two arguments required»)
OTOH according the TODO file at:
ftp://ftp.uni-erlangen.de/pub/utilities/screen/screen-4.0.3.tar.gz
states: «- type into several windows at once (for cluster admins)»
That file has been changed in august 2003 for the last time…
Hopefully someone reading this article knows how to use the at command.
A way to broadcast commands to all windows is the following:
^a:at \# stuff «ls12?
Thanks goes to Michael, (one of the screen devs) who provided this information to me.The command above should read: double quote ls backslash zero twelve double quote. Somehow the parser removes the blackslash zero. One more try:
^a:at \# stuff «ls\\12″
This is a great intro. I’ve used screen for many years. (Just stopped to count. I think it’s been a decade!) However, I’d never bothered with learning about the hardstatus line until this article. It’s a nice addition. Thanks!
P.S. I think there are two mistakes in the example given. Again, this is my first foray in screen’s string escapes, so I might be way off. I think «%<=kw>» should have a space, as «%<= kw>«. Without this change on my system windows before the current are green instead of white. I also think there is an extra «%?» before the the closing «]» on the window list. This made no difference on my system. Here’s a version with these changes.
I’ve used Screen for more than a decade. For years now I’ve used it to keep open ssh sessions to various systems, doing things like tailing logs and such, and disconnecting then reconnecting when necessary. My latest session has been running upwards of 2 years, only ever bringing it down for critical patching. Sometimes I connect to the same session from multiple windows, displaying different screen «windows» for multiple views. I also use an always on statis as well.
The few modifications I’ve made are to increase the MAXWIN param to allow for more windows, and change the command key to ^w so I don’t have to unlearn my emacs ^a habits.
One good use of Screen is when performing remote updates of systems using apt-get or yum. You can start the update going, then disconnect, then come back later and check that it finished OK. If your remote connection goes down, it doesn’t mess everything up. Also, using the screen ‘logging’ function, you can keep a full history of the update, and check it for error messages that you might have missed.
[Oct 19, 2010] Make GNU Screen Your Default Shell
October 18 2010 | ServerWatch.com
Or better yet, especially if you’re on a multi-user system, edit
If I understand your write-up then you’ll have a ton of screen sessions on your system because everytime you log in you’ll create another screen.
As a funny bonus I now know everytime the server’s rebooted because my main screen session goes away and I have to restart it.
On my office workstation I also launch screen this way, but since I often login to it remotely (unlike my laptop) I also check to see if SSH_CONNECTION is zero-length:
This means I still need to launch screen manually when logging in remotely, but I often leave a screen session running on my workstation (because I’m in the middle of something) and resume it once I login.
Maybe I’m a bit «old fashion» but I like screenie http://goo.gl/xVj4
Screenie is a small and lightweight GNU screen(1) wrapper that is designed to be a session handler that simplifies the process of administrating detached jobs by providing an interactive menu.
I actually use a combination of environment variables and bash aliases to make `irssi` launch or reconnect an in-screen instance of irssi; similarly, `rtorrent` launches or reconnects an in-screen instance of rtorrent.
If you’re interested, in my method: http://pbrisbin.com/posts/screen_tricks/
[Oct 19, 2010] Taking Command of the Terminal with GNU Screen by Joe ‘Zonker’ Brockmeier
February 11, 2010 | linux.com
Attaching and Detaching from Screen
One of the most powerful features of screen is the ability to detach and attach to running sessions. If you tend to work from several machines, it might be a good habit to start an instance of screen when you log in. Then if you’re at a different system you can simply attach or re-attach to the running session and resume where you left off.
Note that you can also share a screen session, so it’s not necessary to detach from a session in order to log into the same session from another location. So, for example, if you’ve logged into a system remotely using SSH and then started a screen session, you could then go to another computer and attach to the same session.
To connect to a session that’s still attached, use Ctrl-a x XXXXX instead. This will let you re-attach to an existing session without any problems.
Can I have a Copy of That?
Want a quick and dirty way to take notes of what’s on your screen? Yep, there’s a command for that. Run Ctrl-a h and screen will save a text file called «hardcopy.n» in your current directory that has all of the existing text. Want to get a quick snapshot of the top output on a system? Just run Ctrl-a h and there you go.
You can also save a log of what’s going on in a window by using Ctrl-a H. This will create a file called screenlog.0 in the current directory. Note that it may have limited usefulness if you’re doing something like editing a file in Vim, and the output can look pretty odd if you’re doing much more than entering a few simple commands. To close a screenlog, use Ctrl-a H again.
Note if you want a quick glance at the system info, including hostname, system load, and system time, you can get that with Ctrl-a t.
Simplifying Screen with Byobu
If the screen commands seem a bit too arcane to memorize, don’t worry. You can tap the power of GNU Screen in a slightly more user-friendly package called byobu. Basically, byobu is a souped-up screen profile originally developed for Ubuntu. Not using Ubuntu? No problem, you can find RPMs or a tarball with the profiles to install on other Linux distros or Unix systems that don’t feature a native package.
Note that byobu doesn’t actually do anything to screen itself. It’s an elaborate (and pretty groovy) screen configuration customization. You could do something similar on your own by hacking your
/.screenrc, but the byobu maintainers have already done it for you.
Since most of byobu is self-explanatory, I won’t go into great detail about using it. You can launch byobu by running byobu. You’ll see a shell prompt plus a few lines at the bottom of the screen with additional information about your system, such as the system CPUs, uptime, and system time. To get a quick help menu, hit F9 and then use the Help entry. Most of the commands you would use most frequently are assigned F keys as well. Creating a new window is F2, cycling between windows is F3 and F4, and detaching from a session is F6. To re-title a window use F8, and if you want to lock the screen use F12.
The only downside to byobu is that it’s not going to be on all systems, and in a pinch it may help to know your way around plain-vanilla screen rather than byobu.
For an easy reference, here’s a list of the most common screen commands that you’ll want to know. This isn’t exhaustive, but it should be enough for most users to get started using screen happily for most use cases.
Finally, if you want help on GNU Screen, use the man page (man screen) and its built-in help with Ctrl-a :help. Screen has quite a few advanced options that are beyond an introductory tutorial, so be sure to check out the man page when you have the basics down.
Automation can be further enhanced though the -p argument.
Screen makes it very handy if you want to automate both the left and right hand site of an application (simulate the user and server).
Scroll back isn’t as friendly as in vim, but there is some overlap with the key strokes
| keystroke | action |
|---|---|
| h | Move the cursor left by one character |
| j | Move the cursor down by one line |
| k | Move the cursor up by one line |
| l | Move the cursor right by one character |
| 0/^ | Move to the beginning of the current line |
| $ | Move to the end of the current line |
| g | Move to the begging of the buffer |
| G | Moves to the specified line (defaults to the end of the buffer) |
| C-u | Scrolls a half page up |
| C-b | Scrolls a full page up |
| C-d | Scrolls a half page down |
| C-f | Scrolls the full page down |
| keystroke | purpose |
|---|---|
| v | Sets line numbers |
| a/A | Press this after selecting text and the following space will append marked text to the buffer rather than overwriting the contents, uppercase to toggle |
| > | This writes the buffer to the screen-exchange file where the contents can be read later. |
| x | reposition the start of the marker |
Suppose you want a set of sessions created to various hosts, one way to do that might be something along the lines of:
This will create three sessions to host[1..3] with the title of host[1..3].
This is perhaps one of the most useful features that I’ve found with screen (besides all the other useful things of course). There is a maximum of 40 windows allowed with the default build of screen. If you want to change this, reconfigure your screen build with -DMAXWIN=255, or edit the config and set the MAXWIN there.
When using the screen command it might be worth noting the following very useful parameters
| parameter | description |
|---|---|
| -T | Sets the TERM environment, such as vt100, xterm, xterm-color and xterm-256color. This is highly useful if the default TERM does not support the bells and whistles of xterm |
| -M | Monitors the window for activity |
| -t | Sets the title of the window |
In the previous example we have a number of screen windows with title host1. Should you wish to select for example host1 and list a file, then write something to the terminal you might do something like this:
I hope this gives you an idea of how even more useful screen can be than it first appears!
[Jun 27, 2010] switching from gnu screen to tmux (updated)
Linux
update #1: upstream accepted my patch, so the next tmux release will provide window-status-alert-
update #2 [2010/05/17]: uploaded my updated config file, now using ` as my prefix key
I gave tmux a try yesterday.
Clean config file, thorough documentation and a few nice touches here and there (i.e. better, persistent window splitting) make it a nice alternative to screen, but the biggest difference lies in memory usage. Screen can easily eat up to 40-50mb with just a few windows open, but tmux has yet to reach the 10mb mark!
You may argue that ram is cheap these days, but when you’re on a 360mb VPS ram matters
Turns out that’s not tmux’s fault but bash’s, I’ll have to create a patch for that as well If you have the same issue, you can use the above hack as a temporary fix.
Also version 1.2 does not provide a way for you to customize the colors used on window titles with alerts (either monitored or when the bell is active), but I patched that and sent it upstream
The patch was accepted upstream so it’ll be in the next release.
unbind-key C-b
bind-key C-a last-window
bind-key ` last-window
bind-key a send-prefix
bind e previous-window
bind f next-window
bind j up-pane
bind k down-pane
# `+r reloads the configuration, handy
bind r source-file
Selected Comments
I gave tmux a serious effort a few months ago. There’s a few things that made me switch back to screen.
2) Tmux handles windows very differently from screen. What Vim calls «tabs», tmux calls «windows», what Vim and screen call «windows», tmux calls «panes», and what Vim and Screen call «buffers», tmux has no equivalent – which is has been a huge pain in the ass until possibly the latest version of Tmux which added the join-pane command which I haven’t tried since it was released. Still, I find working with it in that way a bit unnatural.
Clearly Tmux looks like the better long-term solution. It’s configuration actually makes sense and it’s session handling are superior to screen.
Screen development is stalled and the live ebuild from the berkano overlay with the vertical split patch hasn’t been building for the last 6 months or so. Since switching to xmonad as a tiling wm really the only thing I need is the detachable sessions support, which Screen does just fine.
You probably had mouse-select-pane set to on. That way, tmux grabs the mouse click. You can still hold down the shift key to mark things by clicking and dragging Not sure if you can make tmux define a protected region though.
Join-pane and break-pane work as advertised in 1.2.
I don’t use splitting much on localhost either, since I’m using the awesome window manager, but splitting is very useful when doing work over ssh
Yeah splitting is definitely useful over ssh. That’s primarily why I started using it.
I tried turning mouse-select-pane off. I had a chat with one of the tmux devs on irc a few months ago and apparently the problem is simply that they don’t implement that yet. My workaround was setting a hotkey in vim to turn line numbers on and off so it’s possible to copy/paste between a browser window without having to abuse xclip too much.
I didn’t realize Screen was that hard on resources either. Kinda stinks. I’ve been using Konsole too which apparently isn’t so lightweight. I like it though since I have kde installed anyway and has always worked flawlessly.
you could define an alias (or write a small bash script) that does that automatically:
The biggest memory saving I made on my machine recently was switching away from gnome-terminal to urxvt(d). I’ve never really noticed much of a memory issue with screen although I do wish it was easier to script/configure. I shall check out tmux when I next have a spare few hours
gnu screen and tmux are bloatware.
well, if your needs are satisfied with dtach, then sure, the others are bloatware for you! I, on the other hand, actually use their features
I don’t know why your ‘screen’ use is bloated. This is from a 256 MiB home server:
Its size is 100Ч25, four bash/dash sessions plus one mc session, no
/.screenrc, the default /etc/screenrc has defscrollback 1000. The system runs gentoo on a Geode LX processor.
nice seeing you switching to tmux too
How did you measure the RAM usage? Did you have the same scrollback in tmux as screen?
All of the stuff at that link is possible in tmux and is often much easier…
[Sep 15, 2009] The Many Uses of Screen By Juliet Kemp
September 11, 2009 | ServerWatch.com
Monitor a window for output: Hit Ctrl-A Shift-M when in window 1, and then flip to window 2 (with Ctrl-A N), and you’ll be notified in window 2 when there’s output in window 1. This is useful if you’re running a job that takes a long time; no need to keep flipping between windows. You can also monitor for silence with Ctrl-A _. This is useful if you’re running a compile job or something else that outputs a lot of stuff when it’s running successfully.
By berto September 15 2009 2:26 PMPDT
defscrollback 1024
hardstatus on
hardstatus alwayslastline
Note: gvim is not supported. You must be running vim in a console.
Currently tested on Linux and cygwin, but should work on any unix based
platform where screen is supported (OSX, BSD, Solaris, etc.). Note that
in my testing of cygwin, invocations of screen were significantly slower
and less fluid than on Linux.
This plugin aims to simulate an embedded shell in vim by allowing you to
easily convert your current vim session into one running in gnu screen
with a split gnu screen window containing a shell, and to quickly send
statements/code to whatever program is running in that shell (bash,
python, irb, etc.).
Note: If you are already in a gnu screen session, then only steps
4 and 5 above will be run.
An example workflow may be:
Open a python file to work on:
$ vim something.py
Decide you want to run all or pieces of the code in an interactive
python shell:
:ScreenShell python
Send code from a vim buffer to the shell:
:ScreenSend
Quit the screen session and return to your original vim session:
:ScreenQuit
or
:qa
Gotchas:
— While running vim in gnu screen, if you detach the session instead of
quitting, then when returning to the non-screen vim, vim will complain
about swap files already existing. So try to avoid detaching.
— Not all vim plugins support saving state to or loading from vim
session files, so when running :ScreenShell some buffers may not load
correctly if they are backed by such a plugin.
Download the script and put it in your plugin directory (
[Jul 8, 2009] Useful Tricks With Screen
A final screen trick enables you to remotely look over a user’s shoulder if you’re trying to fix a problem.
Log on to the user’s machine as him, then type Then, get him to type and he’ll join your screen session. After this, whatever he does will be replicated on your screen (and vice versa). (‘debug’ is the identifier; any other name would also be fine.) This can save a lot of time when trying to track down a problem or to explain a solution!
[Jul 7, 2009] tmux 0.9
tmux is a «terminal multiplexer». It allows a number of terminals (or windows) to be accessed and controlled from a single terminal. It is intended to be a simple, modern, BSD-licensed alternative to programs. such as GNU screen
Red Hat Magazine A guide to GNU Screen
/.screenrc to do two things:
The lines below are numbered for reference. Your config file should not have numbered lines.
On lines 1 and 2, you are setting the hardstatus. Line 1 makes the hardstatus always show up as the last line. Line 2 is about what will be shown in the hardstatus line. In this case you will see something like so at the bottom:
[June 1, 2009] Screen – Manages multiple sessions on one terminal Ubuntu Geek
From your ssh login prompt enter the following command
and select your profile option.

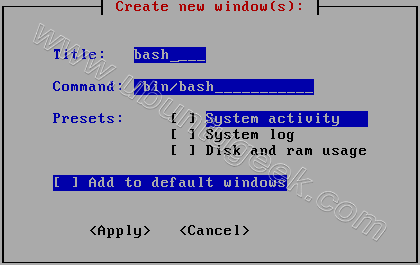
If you look in the bottom right corner you’ll see there’s an «F9 Menu» you can press F9 to reconfigure your screen profiles. Once it opens you should see similar to the following screen here you can see list of changes you can do

Sample screenshots for screen-profile options


[Feb 12, 2004] Curiosity is bliss Essential utility screen
Screen is a command line utility that comes with lots of Unix variants (including Linux). It is a bit hard to describe and to discover. It provides two main features: multiplexing a terminal and detaching/re-attaching sessions.
Multiplexing: If you start a remote shell (say SSH) but want to do more than one thing at a time, you may want to open more sessions, but you can also use screen. It allows you to switch between multiple shells on the same connection.
You need to first run «screen», then use «Ctrl-A Ctrl-C» (control A, control C) to create a new shell, and you now can switch between shells with «Ctrl-A Ctrl-*» where * is the number for you shell (for ex, use «Ctrl-A Ctrl-1» to switch to shell 1).
First, launch Script Editor and type/paste in the following code:
screen uses Control-A to take commands directed to it. So type Control-A followed by Control-\ to exit your screen session. If you fail to do this and exit a Terminal session, you’ll leave the screen session alive and the serial resource unavailable until you kill the screen session manually. man screen will show you further commands to send to a screen session.
Continued.
Recommended Links
Google matched content
Softpanorama Recommended
Top articles
Sites
Red Hat Magazine A guide to GNU Screen
Email To
Send bug reports or queries to screen@uni-erlangen.de.
Upgrading Packages
When upgrading from an earlier GNU screen package, remember to pkgrm GNUscreen before you pkgadd the new version.
Solaris Issues
Click here to read about 32 bit and 64 bit packages.
Special Issues
You may need to configure your terminal definitiosn to get the most out of GNU screen. See the files in the /usr/local/share/screen directory for more information.
See the main packages README for installation information.
User Manual
Reference
Manpage
[GNU screen manpage]
Each window in a screen session emulates a VT100 terminal, with some extra functions added. The VT100 emulator is hardcoded; no other terminal types can be emulated.
But if you do a rlogin on another machine or your machine supports only terminfo this method fails. Because of this, screen offers a way to deal with these cases. Here is how it works:
When the po and pf capabilities are present in the terminal’s termcap entry, applications running in a screen window can send output to the printer port of the terminal. This allows a user to have an application in one window sending output to a printer connected to the terminal, while all other windows are still active (the printer port is enabled and disabled again for each chunk of output). As a side-effect, programs running in different windows can send output to the printer simultaneously. Data sent to the printer is not displayed in the window. The info command displays a line starting ‘PRIN’ while the printer is active.
Screen maintains a hardstatus line for every window. If a window gets selected, the display’s hardstatus will be updated to match the window’s hardstatus line. If the display has no hardstatus the line will be displayed as a standard screen message. The hardstatus line can be changed with the ANSI Application Program Command (APC): ESC_ ESC\. As a convenience for xterm users the sequence ESC]0..2; ^G is also accepted.
Command line options
Screen has the following command-line options:
Random Findings
dtach is a tiny program that emulates the detach feature of screen, allowing you to run a program in an environment that is protected from the controlling terminal and attach to it later. dtach does not keep track of the contents of the screen, and thus works best with programs that know how to redraw themselves.
dtach does not, however, have the other features of screen, such as its support of multiple terminals or its terminal emulation support. This makes dtach extremely tiny compared to screen, making it more easily audited for bugs and security holes, and also allows it to fit in environments where space is limited, such as on rescue disks.
dtach has many possible uses, even though it is tiny. With dtach, you can:
The changes in version 0.7 are:
You can send any comments or questions about dtach to the author. Comments and suggestions are welcome.


