Веб-контроль Raspberry Pi GPIO
Доброго времени суток! В этом посте я хочу показать, как управлять электроникой через Интернет используя Raspberry Pi. Выглядеть это будет примерно вот так.

Шаг 1. База знаний
Если хотите узнать, как всё это настроить, вам сюда (инструкция на английском языке).
Шаг 2. Создание root аккаунта
Пропустите это, если у вас уже есть аккаунт, а если нет — продолжайте прочтение 🙂
Теперь введите и подтвердите пароль для учётной записи.
Затем нужно закрыть SSH сессии и перезапустить его, войдя в систему как root.

Шаг 3. Настройка баз данных и phpMyAdmin
Это решение основано на базах данных MySQL, сейчас мы их и настроем.
Итак, для начала скачайте этот файл.
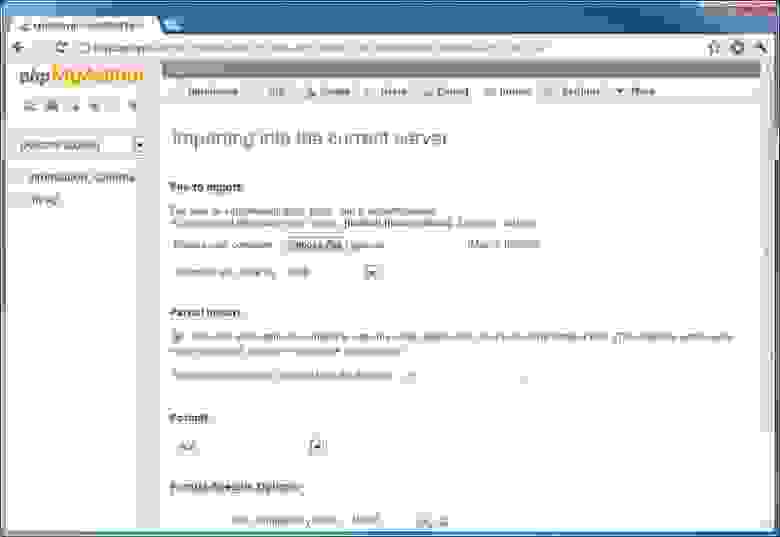
Залогиньтесь в панели управления phpMyAdmin и нажмите кнопку «Import» в верхнем меню.
Теперь, в пункте «File to Import«, нажмите кнопку «Choose File» и выберите файл, который скачали до этого (gpio.sql).
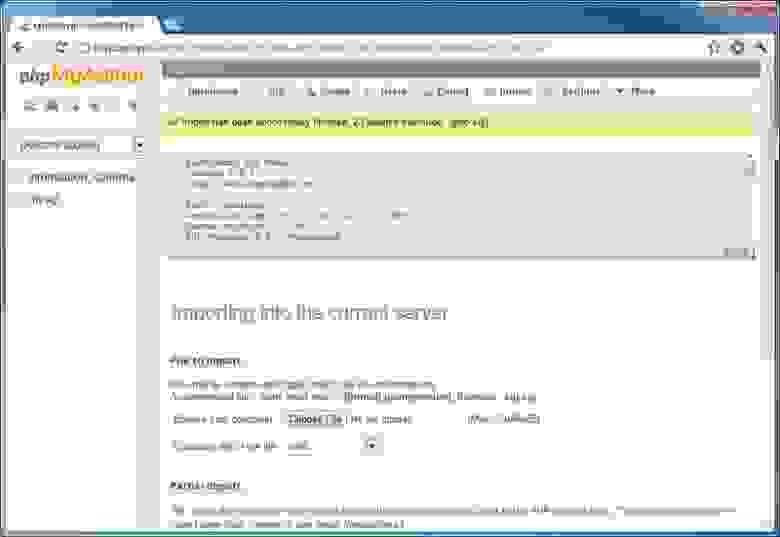
И в завершении нажмите кнопку «Go» внизу страницы.
Это позволит создать все необходимые таблицы.


Шаг 4. Shell Script
Это та часть, которая запускает проверку значений в базе данных MySQL на Raspberry Pi.
Этот сценарий довольно прост, но требует настройки.


После того как всё изменили, удерживайте клавишу Ctrl и нажмите X, затем отпустите Ctrl и нажмите Y. Нажмите Return / Enter.
Шаг 5. Настройка веб-страницы
Финальный шаг, перед тем как вы сможете использовать это, — настройка веб-страницы.
Теперь вам нужно изменить пару переменных перед использованием файла, поэтому напишите nano /var/www/control.php и нажмите Return / Enter.
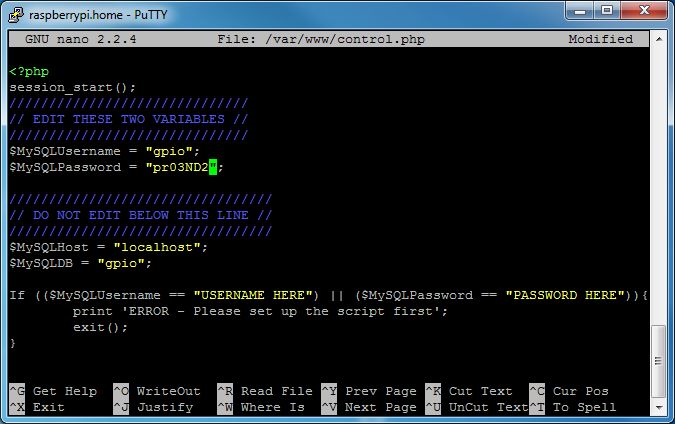
Сейчас через браузер зайдите на страницу control.php (у меня raspberryPi/control.php, где raspberryPi — имя хоста.)
Там потребуется ввести следующие данные:
Имя пользователя: admin
Пароль: gpio

Я рекомендую нажать на ссылку «Change Password» сверху страницы и сменить пароль по очевидным причинам.
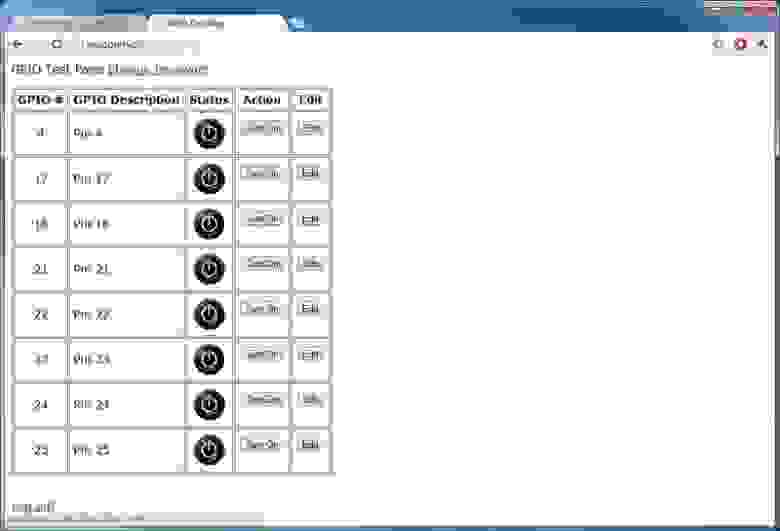

Шаг 6. Использование
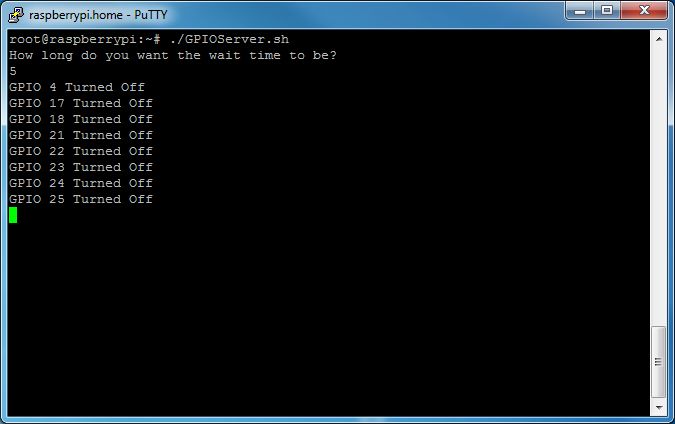
Он попросит ввести время ожидания, оно будет зависеть от потребностей ваших приложений. Но, чем короче время ожидания, тем больше ресурсов сценарий будет использовать (я обычно использую 5).
Готово! Теперь войдите в панель управления (http://ИМЯ ХОСТА/control.php) и наслаждайтесь!
Для безопасности следует удалить root аккаунт.
Remote control GPIO on a Raspberry Pi with GPIO Zero
By Russell Barnes. Posted over 4 years ago.
GPIO Zero is a very powerful tool, and now you can use it when you’re not even on the Raspberry Pi! Using the new Remote control GPIO feature.

The MagPi issue 113 out now
Discover everything you need to know about Raspberry Pi for the year 2022 with our New User Guide. Our January issue is packed with information for newcomers about Raspberry Pi OS (bullseye) along with new information for seasoned hands with Raspberry Pi OS (Legacy). We have all your questions answered alongside in-depth guidance from the engineering team.


The GPIO Zero Python library not only makes programming simple electronics easier; it comes with some advanced features.
These offer seamless interfacing between different devices, while helping you progress along the Python learning curve. One useful thing about GPIO Zero is that you can choose which low-level pin library to use, allowing you to take advantage of the power of another library as required, without having to rewrite your code. By default, Ben Croston’s RPi.GPIO library is used, and that’s fine for most purposes.
One of the supported alternative libraries is Joan 2937’s pigpio library, which supports remote GPIO. This allows you to remotely control the GPIO pins of a Pi over a network. You can control the pins from a PC or Mac, or from another Pi, and even use the GPIOs of multiple Pis within the same script.
This month, GPIO Zero v1.4 was released, stabilising the remote pins syntax. This guide is written for v1.4 and will not work on earlier versions. Make sure you upgrade before you start: open a Terminal and enter:
Remote control GPIO: How to use GPIO Zero
A simple GPIO Zero Python script looks like this:
Running this script on a Pi will work as expected: a button connected to pin 2 (BCM numbering) will light an LED connected to pin 17 when pressed. However, when configured correctly, running this same script can control the pins of a Pi over the network.
Remote control GPIO: Pin factories
The way GPIO Zero wraps around low-level pin libraries is by providing a pin factory. By default, an RPi.GPIO-based factory is used, and when you ask for a pin, the factory gives you a connection to it using the chosen pin library. A pigpio pin factory can be used on its own (simply use the pigpio library instead of RPi.GPIO), but if an IP address is provided too, this can be used to remotely control a Pi’s pins.
Now, when the script runs, the GPIO commands are executed on the remote Pi over the network.
An alternative to running a script from the command line is to set the environment variables before launching your Python editor. For example:
Hot-swapping pin factories
The previous example showed how to set the default pin factory. Unless otherwise specified, any GPIO devices created will be connected to pins created by this default pin factory. Alternatively, you can specify a pin factory (and with pigpio, an IP address) within the Python code. There are two options for doing this. You can create a pin factory instance, and pass that in as you create a new object, like so:
Alternatively, you can change the default pin factory in the middle of your script, like so:
Press the button on your Pi and watch the LED light up on the remote Pi. With no environment variables set, RPi.GPIO is used as the default pin factory. When the button is created, it uses RPi.GPIO to address a local pin. The default pin factory is replaced with pigpio, connecting to a particular IP address, and the LED is created on pin 17, which now refers to the remote Pi.
While this can be a confusing concept, it’s quite simple once you get used to the idea, and it could be very useful in many projects. You can even run this code on a PC (not a Raspberry Pi) and use it to control a Pi on the network. Any platform (Windows, Mac or Linux) will work, as long as you have Python, pip, GPIO Zero, and pigpio installed. For full instructions, head over to the Remote GPIO documentation.
Security in Remote control GPIO Zero
It’s worth pointing out that allowing remote GPIO connections over the network can be risky. You probably shouldn’t do this in a real project on a network with other users. However, you can take precautions to make it more secure. An easy method is to only allow remote connections from a particular IP address when launching the pigpio daemon:
Learn more about GPIO Zero
GPIO Zero is an amazing tool for creating simple electronics and making your projects just that little bit easier. Check out our Essentials book, Simple Electronics with GPIO Zero.


Russell runs Raspberry Pi Press, which includes The MagPi, Wireframe, and HackSpace magazine, and book projects. He’s a massive sci-fi bore.
4. Configuring Remote GPIO
One of the pin libraries supported, pigpio, provides the ability to control GPIO pins remotely over the network, which means you can use GPIO Zero to control devices connected to a Raspberry Pi on the network. You can do this from another Raspberry Pi, or even from a PC.
See the Remote GPIO Recipes page for examples on how remote pins can be used.
4.1. Preparing the Raspberry Pi
Alternatively, pigpio is available from abyz.me.uk.
You’ll need to enable remote connections, and launch the pigpio daemon on the Raspberry Pi.
4.1.1. Enable remote connections
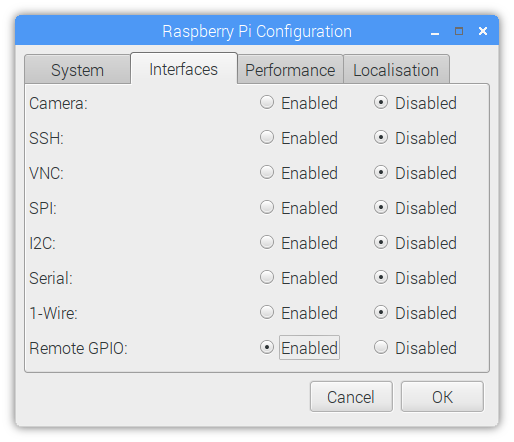
On the Raspberry Pi OS desktop image, you can enable Remote GPIO in the Raspberry Pi configuration tool:
Alternatively, enter sudo raspi-config on the command line, and enable Remote GPIO. This is functionally equivalent to the desktop method.
This will allow remote connections (until disabled) when the pigpio daemon is launched using systemctl (see below). It will also launch the pigpio daemon for the current session. Therefore, nothing further is required for the current session, but after a reboot, a systemctl command will be required.
4.1.2. Command-line: systemctl
To automate running the daemon at boot time, run:
To run the daemon once using systemctl, run:
Управление контактами ввода/вывода (GPIO) Raspberry Pi через Bluetooth и Android приложение
Плата Raspberry Pi находит широкое применение в различных проектах, относящихся к тематике интернета вещей (Internet of Things, IoT), во многом благодаря тому что у нее есть встроенные Wi-Fi и Bluetooth, в настоящее время являющиеся самыми популярными протоколами беспроводной связи. В данной статье мы рассмотрим управление контактами ввода/вывода (GPIO) платы Raspberry Pi через Bluetooth и Android приложение. Ранее на нашем сайте мы рассматривали аналогичный проект для платы Arduino.

В данном проекте мы использовали плату Raspberry 2 Pi Model B, у которой нет встроенного модуля Bluetooth, поэтому для использования в ней возможностей данного протокола мы использовали простой USB Bluetooth адаптера. Для демонстрации возможностей данного проекта мы использовали светодиод, подключенный к плате Raspberry Pi через резистор 220 Ом. В данном проекте для беспроводной связи между смартфоном и платой Raspberry Pi мы использовали протокол RFCOMM Bluetooth.
Программирование Bluetooth в языке Python основано на концепции программирования сокетов (socket programming) и взаимодействие между Bluetooth устройствами в данном случае осуществляется через RFCOMM сокет. RFCOMM (Radio Frequency Communication) представляет собой Bluetooth протокол, который обеспечивает эмуляцию последовательного порта RS-232 и также известен под именем Serial Port Emulation. Профиль последовательного порта Bluetooth основан на этом протоколе. RFCOMM является достаточно популярным приложением Bluetooth поскольку он обеспечивается хорошей поддержкой и имеет свободно доступные инструменты API
Для работы с данным протоколом в нашем проекте мы будем использовать Bluetooth модуль HC-06, на нашем сайте вы можете посмотреть все проекты, в которых он был использован.
Установка необходимых пакетов для работы с Bluetooth в Raspberry Pi
Первым делом нам необходимо установить последние обновления для операционной системы Raspberry Pi OS:
Raspberry Pi Remote GPIO

Introduction: Raspberry Pi Remote GPIO


In this instructable, we’ll see how to configure Remote GPIO for the Raspberry Pi and use a remote computer (Windows) to control LEDs and Servo motors connected to the GPIO ports of the Pi.
Supplies
Raspberry Pi, breadboard, jumper cables, LED, Servo Motor
Step 1: Configuring the Raspberry Pi for Remote GPIO
There are a couple of things that need to be done on the Raspberry Pi.
First is to enable Remote GPIO from either the graphical interface or a terminal.
Using the Graphical Interface, go to:
Preferences > Raspberry Pi Configuration > Interfaces > Remote GPIO (Choose enable) and click on OK.
Using the Remote Terminal:
Second, you need to start the pigpiod from the terminal using the following command:
«sudo systemctl start pigpiod»
and if you’d like to have this daemon run every time the Pi boots, execute the following command as well:
«sudo systemctl enable pigpiod»
Step 2: Configuring the Windows Computer
On the Windows computer, you have to install the gpiozero and the pigpio libraries using the following command in the command prompt:
«pip install gpiozero pigpio»
Step 3: Controlling the LED With Remote GPIO
For this example, you need to connect an LED to the GPIO Port 17 on the Raspberry Pi over a resistor (330 Ohm or any other appropriate value in order to not to burn the LED later on). And connect the ground to any of the grounds on the Raspberry Pi.
Then use the following script:
from gpiozero import LED
from gpiozero.pins.pigpio import PiGPIOFactory
from time import sleep
Make sure that you change the «host = » with the ip address of the Raspberry Pi that you’ll be using. This script will blink the LED using the remote GPIO
Step 4: Controlling Servo Motor With Remote GPIO
For this example you need to connect the control cable (usually the Yellow one) of the servo motor to the GPIO 17 of the Raspberry Pi and you can use the 5V and Ground connections of the Raspberry Pi to the Servo’s Red and Brown cables respectively. Make sure that you don’t load any weight on the Servo for avoiding excess current.
from gpiozero import Servo
from gpiozero.pins.pigpio import PiGPIOFactory
from time import sleep
servo = Servo(17,min_pulse_width=0.8/1000, max_pulse_width=2.2/1000,pin_factory=factory)
In the code above, make sure you use the correct IP address for your Raspberry Pi, also try to use a simple servo instance if you’re using a simple, regular servo. In this example, the properties of the Power HD is given in the parameters (min_pulse_width=0.8/1000, max_pulse_width=2.2/1000), for a regular servo the line should be:
If you want to see similar content, please follow me in instructables and in YouTube
Thank you for your time..
Be the First to Share
Did you make this project? Share it with us!


