Практические советы по использованию профайлера в Unity
Авторизуйтесь
Практические советы по использованию профайлера в Unity
Инструмент профилировки Unity профайлер даёт конкретные данные о производительности игры и облегчает процесс её оптимизации. Профайлер предоставляет покадровые показатели, с помощью которых можно легче выявить проблемные места. Он также даёт информацию о производительности игры вне редактора. Имейте в виду, что использование профайлера частично сказывается на производительности. Чтобы увеличить точность показателей производительности, нужно создать билд для необходимой платформы и запустить игру на целевом устройстве. Хотя наилучшую производительность можно получить на неотладочной сборке (Development Build), профайлер Unity может работать только на отладочной сборке.
Чтобы активировать профайлер в приложении, необходимо в окне Build Settings (File→Build Settings) включить параметры Development Build и Autoconnect Profiler. При запуске приложения профайлер будет запускаться автоматически. Подключить профайлер также можно в Profiler Controls через выпадающий список в редакторе.
Профайлер даёт вам информацию о том, сколько времени требуется приложению на рендер каждого кадра, разбивая это на работу процессора, рендер, память, аудио, физику, UI и сеть.
Примечание Не сравнивайте показания профайлеров разных версий Unity. Разные архитектуры профайлеров по-разному отображают показания.
Профилирование в редакторе
Не стоит забывать о некоторых подводных камнях при профилировании приложения в редакторе. Из-за большого количества открытых окон могут проскакивать лаги. Даже рендер в самом редакторе даёт о себе знать. Поэтому крайне важно хоть иногда профилировать приложение на целевом устройстве и не полагаться только на данные из редактора.
Deep Profile
В этом режиме отдельно записываются вызовы каждого метода, обеспечивая чёткое представление дерева методов.
Примечание Начиная с Unity 2017.3, режим deep profile работает не только в редакторе, но и на Android, и на Desktop, с использованием бэкенда Mono.
Профилирование памяти в редакторе
Профилирование памяти в редакторе полезно для понимания общей модели памяти, но не для фактических показателей конкретных устройств.
Статистика рендера
В Unity есть функция отображения статистики рендера в реальном времени (окно Game). Туда входят fps, батчи draw calls, использование VRAM, количество вершин и треугольников. Для включения слоя статистики необходимо нажать на кнопку Stats на панели окна Game. Эта статистика поможет анализировать батчинг и GPU производительность, основываясь на количестве вызовов отрисовки.
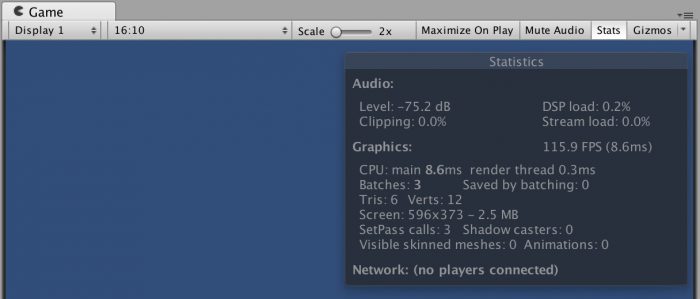
Статистика в окне Game
Для более детальной статистики рендера можно открыть вкладку рендера в профайлере.
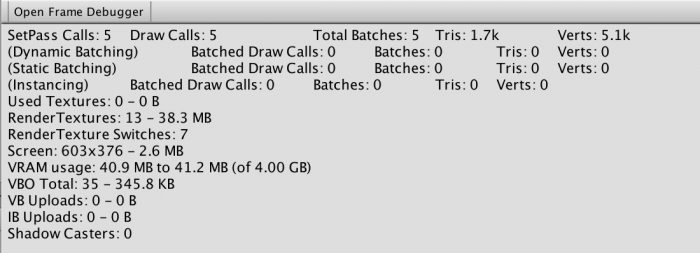
Вкладка рендера, показывающая детальную статистику за кадр
На изображении выше видно, что пустая сцена имеет 5 вызовов SetPass и 5 вызовов отрисовки.
Вызовы отрисовки
Частые вызовы отрисовки с похожими пайплайнами влияют на производительность лучше, чем редкие с разными пайплайнами. Unity кеширует одинаковые вызовы, что ускоряет процесс отрисовки. Для разных вызовов отрисовки Unity создает разные буферы. Это загружает графическую память.
Многопоточный рендер и Graphics Jobs
Многопоточный рендер и Graphics Jobs (Player Settings) чаще всего положительно сказываются на производительности, но во время отладки и профилирования некоторые показатели могут быть «размытыми». Для более точного профилирования можно посмотреть на оптимизацию графики в Unity.
Кадровый отладчик
Кадровый отладчик позволяет остановить игру на определённом кадре и пройтись по основным событиям. С его помощью можно просмотреть, как Unity выстраивает сцену и продумать возможные способы оптимизации. Отладчик также указывает на те GameObject’ы, рендер которых не обязателен. Отключив эти GameObject’ы, можно уменьшить число вызовов отрисовки на один кадр.
Отладчик не показывает отдельные вызовы отрисовки или разницу между ними. Он показывает процесс построения кадра. Только нативные GPU-профайлеры дадут исчерпывающую информацию о вызовах отрисовки (чаще всего привязанную к времени). Кадровый отладчик может оказаться полезным в отладке пайплайна и батчинга (особенно при работе с Unity UI). Детальная информация описана в документации кадрового отладчика.
Профайлер памяти
В этом проекте демонстрируется использование профайлера памяти. Также по нему есть документация.

Снимок с профайлера памяти
Данный инструмент отслеживает память, выделенную подсистемами Unity, а также пользовательскими скриптами (до версии Unity 2017.3). Профайлер не может отслеживать выделение памяти из сторонних инструментов. Начиная с версии Unity 2017.3 профайлер также поддерживает отслеживание управляемых объектов в среде выполнения Mono scripting.
Подробно профайлер можно изучить в этом видео и документации.
Unity 2018 and PlayerLoop

Jul 12, 2019 · 6 min read
New Location
I’m leaving this up for posterity, but I actually did not intend to use Medium for my future blogs. For the final resting place for this post (and my other blog content) you can go here:
Unity 2018 and PlayerLoop
This is a repost of a blog post I made on my old website, pretty much all of this information still applies in 2020…
Introduction
Before Unity 5.X (specifically 5.0), control over the applicatio n lifecycle was basically nonexistent. For application startup/initialization code you could’ve created a script that was sorted earliest in the Script Execution Order window and used Awake, but you would’ve ran into issues. An object with that script would need to exist in any scene that required that initialization code to run, a state that is really difficult to maintain while in the editor. It’s too easy to forget that object needs to be around, and that functionality needs to be explained to other developers working on the project.
With Unity 5.0 we were provided RuntimeInitializeOnLoad, an attribute placed on a static function which is then executed automatically at runtime consistently. Its a foolproof way of ensuring that some code always executes, regardless of scene setup. In 5.2 an optional argument in form of the RuntimeInitializeLoadType enum was added, allowing developers to decide if the marked function should execute before or after the initial scene is loaded (before the Awake message is sent). With this single feature it suddenly became viable to use Unity without scenes, slightly closer to using a game framework, such as MonoGame.
However, the systems that are updated each frame (some more often) were still out of reach. These systems are otherwise known as the main/game update loop. Systems could not be disabled for performance, reordered for preference, and, most importantly, new arbitrary systems could not be added into the Update loop. Of course you could always use functions like Update, FixedUpdate and LateUpdate to hook into the built in update systems, but these always occurred in-between Unity’s internal systems, beyond user control.
With Unity 2018.1, the PlayerLoop and PlayerLoopSystem classes and the UnityEngine.Experimental.PlayerLoop namespace have been introduced, allowing users to remove and reorder engine update systems, as well as implement custom systems.
The Default PlayerLoop
The first step to understanding the PlayerLoop is to find a way of viewing what the out-of-the-box loop is actually made of. You can get the default loop thusly:
PlayerLoopSystem is a struct that is organized in a recursive, tree-like structure. From this object you can get some information about the system:
For default systems this is a System.Type object that acts as a representation of what update system this is. These types are only used as identifiers, and don’t actually contain anything. For example, the type of the PlayerLoopSystem responsible for updating AI is UnityEngine.Experimental.PlayerLoop.AIUpdate. We’ll use this field later to search for built-in types from the default player loop. This field is mostly useless for custom systems, except for its use as a label for the system in the Profiler.
subSystemList
As previously stated, PlayerLoopSystem is a recursive structure, so this is an array of all of the PlayerLoopSystems underneath this system. Traversing this array recursively will let us inspect the default loop.
updateFunction
For default systems this is a pointer to the native-side function that is executed for this update system. This field is unused for custom systems.
updateDelegate
This is a C# delegate that is primarily used for custom systems. However, it seems that it is possible to use this to add a callback to default systems as well. When we implement a custom system this is where all the work will happen.
loopConditionFunction
For default systems this is a pointer to a native-side function that is executed to check if this system and all of the systems below it should be executed. This field is unused for custom systems.
The system returned by GetDefaultPlayerLoop is somewhat bogus. The only field that has a value is subSystemList. This is because this system is used as a “root node”, which every recursive structure requires. It’s fairly trivial to write a quick recursive function to pretty-print the contents of the default loop:
Running this gives us a pretty large tree of systems:
PlayerLoopSystem
struct in UnityEngine.LowLevel
Success!
Thank you for helping us improve the quality of Unity Documentation. Although we cannot accept all submissions, we do read each suggested change from our users and will make updates where applicable.
Submission failed
For some reason your suggested change could not be submitted. Please try again in a few minutes. And thank you for taking the time to help us improve the quality of Unity Documentation.
Description
The representation of a single system being updated by the player loop in Unity.
This struct represents a single system in the player loop. A system can be one of Unity’s built-in native systems, or you can new custom systems to add to the player loop using C#. Native systems can only be retrieved by calling PlayerLoop.GetDefaultPlayerLoop, and the parameters of them should not be modified.
Properties
| loopConditionFunction | The loop condition for a native engine system. To get a valid value for this, you must copy it from one of the PlayerLoopSystems returned by PlayerLoop.GetDefaultPlayerLoop. |
| subSystemList | A list of sub systems which run as part of this item in the player loop. |
| type | This property is used to identify which native system this belongs to, or to get the name of the managed system to show in the profiler. |
| updateDelegate | A managed delegate. You can set this to create a new C# entrypoint in the player loop. |
| updateFunction | A native engine system. To get a valid value for this, you must copy it from one of the PlayerLoopSystems returned by PlayerLoop.GetDefaultPlayerLoop. |
Is something described here not working as you expect it to? It might be a Known Issue. Please check with the Issue Tracker at issuetracker.unity3d.com.
Copyright ©2021 Unity Technologies. Publication Date: 2021-12-17.
PlayerLoop
class in UnityEngine.Experimental.LowLevel
Success!
Thank you for helping us improve the quality of Unity Documentation. Although we cannot accept all submissions, we do read each suggested change from our users and will make updates where applicable.
Submission failed
For some reason your suggested change could not be submitted. Please try again in a few minutes. And thank you for taking the time to help us improve the quality of Unity Documentation.
Description
The class representing the player loop in Unity.
This class contains functions for interacting with the player loop in the core of Unity. You can use this class to get the update order of all native systems and set a custom order with new script entry points inserted.
Static Methods
| GetDefaultPlayerLoop | Returns the default update order of all engine systems in Unity. |
| SetPlayerLoop | Set a new custom update order of all engine systems in Unity. |
Did you find this page useful? Please give it a rating:
Thanks for rating this page!
What kind of problem would you like to report?
Is something described here not working as you expect it to? It might be a Known Issue. Please check with the Issue Tracker at
Thanks for letting us know! This page has been marked for review based on your feedback.
If you have time, you can provide more information to help us fix the problem faster.
You’ve told us this page needs code samples. If you’d like to help us further, you could provide a code sample, or tell us about what kind of code sample you’d like to see:
You’ve told us there are code samples on this page which don’t work. If you know how to fix it, or have something better we could use instead, please let us know:
You’ve told us there is information missing from this page. Please tell us more about what’s missing:
You’ve told us there is incorrect information on this page. If you know what we should change to make it correct, please tell us:
You’ve told us this page has unclear or confusing information. Please tell us more about what you found unclear or confusing, or let us know how we could make it clearer:
You’ve told us there is a spelling or grammar error on this page. Please tell us what’s wrong:
You’ve told us this page has a problem. Please tell us more about what’s wrong:
Thanks for helping to make the Unity documentation better!
Is something described here not working as you expect it to? It might be a Known Issue. Please check with the Issue Tracker at issuetracker.unity3d.com.
Copyright © 2018 Unity Technologies. Publication: 2018.1-002N. Built: 2018-12-04.
I’m checking profiler performance of my game on an Android device. When I check CPU Usage I noticed that PlayerLoop is at 99.6% and the biggest percentage is consumed in Semaphore.WaitForSignal with 32.5% and the second is PlayerConnection.Poll with 27%.
Can someone explain if there is a way to improve this? Is the PlayerLoop at 99.6% «normal» or is too high?
Below screenshot results from Xiaomi MI 5 Android 8 

1 Answer 1
Provided percent in the profiler is «How mutch this item, contributes to the current execute time» and not «How much CPU you are using.
What is interesting to you is time in milliseconds for the biggest items. And whether something is too much or too little depends on what framerate you want to achieve.
What is Player Loop
The Player loop is the total time your game took to render 1 frame. In there you can find, all your scripts, rendering, and other engine functions.
What is Semaphore.WaitForSignal
Your Graphics pipeline is waiting for something else to finish. Usually, it means rendering is taking a while to finish, and some other parts of the graphics pipeline can’t proceed until rendering is complete.
Is Player loop 99.6% normal
Yes, it preferably should always be around 100% unless you are in the editor.
What is exactly 27ms in the player loop
Total time required to process and render one frame. To achieve 30fps in-game you need to have all frames below 33ms (1000ms/30fps)


