Пищалка – пьезодинамик Ардуино
Пищалка на Ардуино, которую часто еще называют зуммером, пьезодинамиком или даже баззером – частый гость в DIY проектах. Этот простой электронный компонент достаточно легко подключается к платам Arduino, поэтому вы можете быстро заставить вашу схему издавать нужные звуки – сигнализировать, пищать или вполне сносно проигрывать мелодию. В данной статье расскажем про отличие активных и пассивных зуммеров, разберем схему подключения пьезоэлемента к плате Ардуино и покажем пример скетча для управления пищалкой. А еще вы найдете пример мелодии, которыми cможете снабдить свой проект.
Описание и схема работы зуммера
Зуммер, пьезопищалка – все это названия одного устройства. Данные модули используются для звукового оповещения в тех устройствах и системах, для функционирования которых в обязательном порядке нужен звуковой сигнал. Широко распространены зуммеры в различной бытовой технике и игрушках, использующих электронные платы. Пьезопищалки преобразуют команды, основанные на двухбитной системе счисления 1 и 0, в звуковые сигналы.
 Пьезоэлемент “пищалка”
Пьезопищалка конструктивно представлена металлической пластиной с нанесенным на нее напылением из токопроводящей керамики. Пластина и напыление выступают в роли контактов. Устройство полярно, имеет свои «+» и «-». Принцип действия зуммера основан на открытом братьями Кюри в конце девятнадцатого века пьезоэлектрическом эффекте. Согласно ему, при подаче электричества на зуммер он начинает деформироваться. При этом происходят удары о металлическую пластинку, которая и производит “шум” нужной частоты.
 Устройство пьезодинамика пищалки
Нужно также помнить, что зуммер бывает двух видов: активный и пассивный. Принцип действия у них одинаков, но в активном нет возможности менять частоту звучания, хотя сам звук громче и подключение проще. Подробнее об этом чуть ниже.
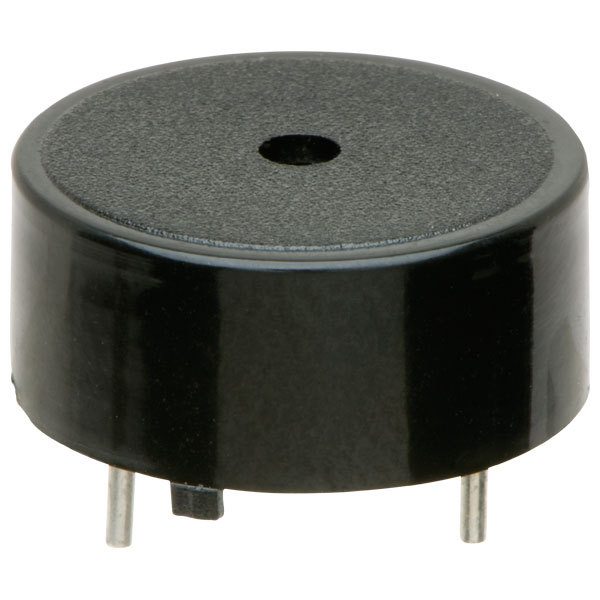
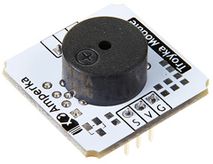
 Модуль пищалки для Ардуино
Конструктивно модуль исполняется в самых разных вариантах. Самый рекомендуемый для подключения к ардуино – готовый модуль со встроенной обвязкой. Такие модули можно без особого труда купить в интернет-магазинах.
Если сравнивать с обыкновенными электромагнитными преобразователями звука, то пьезопищалка имеет более простую конструкцию, что делает ее использование экономически обоснованным. Частота получаемого звука задается пользователем в программном обеспечении (пример скетча представим ниже).
Где купить пищалку Ардуино
Наш традиционный обзор предложений на Aliexpress
Отличия активного и пассивного зуммера
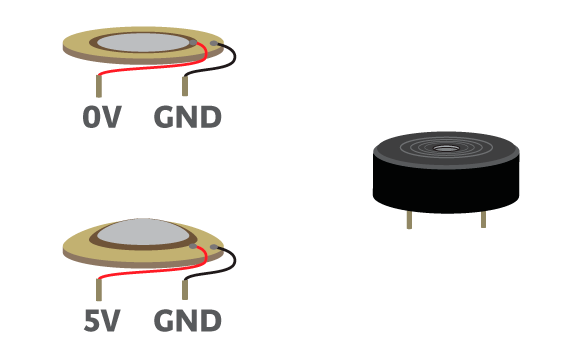
Главное отличие активного зуммера от пассивного заключается в том, что активный зуммер генерирует звук самостоятельно. Для этого пользователь должен просто включить или выключить его, другими словами, подав напряжение на контакты или обесточив. Пассивный зуммер же требует источника сигнала, который задаст параметры звукового сигнала. В качестве такого источника может выступать плата Ардуино. Активный зуммер будет выдавать более громкий звуковой сигнал в сравнении с его конкурентом. Частота излучаемого звука активного зуммера составляет значения 2,5 кГц +/- 300Гц. Напряжение питания для пищалки варьируется от 3,5 до 5 В.
Активный пьезоизлучатель предпочтительней еще из-за того, что в скетче не потребуется создавать дополнительный фрагмент кода с задержкой, влияющий на рабочий процесс. Также для определения того, что за элемент находится перед пользователем, можно измерить сопротивление между двумя проводами. Более высокие значения будут указывать на активный зуммер ардуино.
По своей геометрической форме пищалки никак не различаются, и отнести элемент к тому или иному виду по данной характеристике не представляется возможным. Визуально зуммер можно идентифицировать, как активный, если на плате присутствуют резистор и усилитель. В пассивном зуммере в наличии только маленький пьезоэлемент на плате.
Подключения зуммера к Arduino
Подключение модуля пьезоэлемента к Ардуино выглядит достаточно простым. Потребляемый ток маленький, поэтому можно просто напрямую соединить с нужным пином.
 Подключение пищалки к Ардуино (порт 12)
Электрическая схема подключения пьезоэлемента без сопровождающих модулей выглядит следующим образом.
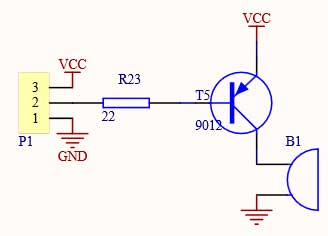 Схема подключения зуммера
На некоторых вариантах корпусов зуммера можно найти отверстие для фиксации платы при помощи винта.
Зуммер arduino имеет два выхода. Следует обратить внимание на их полярность. Темный провод должен быть подключен к «земле», красный – к цифровому пину с PWM. Один вывод настраивается в программе как «вход». Arduino отслеживает колебания напряжения на выводе, на который подаётся напряжение с кнопки, резистора и датчиков.
 Пищалка Арудино с названиями контактов
Напряжение на «вход» подается различное по значениям, система четко фиксирует только два состояния – вышеупомянутые 1 и 0 (логические ноль и единица). К логической единице будет относиться напряжение 2,3-5 В. Режим «выход» – это когда Arduino подает на вывод логический ноль/единицу. Если брать режим логического нуля, тут величина напряжения настолько мала, что ее не хватает для зажигания светодиода.
 Схема подключения пищалки к Ардуино
Обратите внимание, что входы довольно чувствительны к внешним помехам разного рода, поэтому ножку пьезопищалки через резистор следует подключать к выводу. Это даст высокий уровень напряжения на ножке.
Пример скетча для пьезодимнамика
Для “оживления” подключенного к плате ардуино зуммера потребуется программное обеспечение Arduino IDE, которое можно скачать на нашем сайте.
Одним из простейших способов заставить заговорить пищалку является использование функции «analogwrite». Но лучше воспользоваться встроенными функциями. За запуск звукового оповещения отвечает функция «tone()», в скобках пользователю следует указывать параметры частоты звука и номера входа, а также времени. Для отключения звука используется функция «noTone()».
Пример скетча с функцией tone() и noTone()
Схема подключения для примера выглядит следующим образом:
 Подключение пищалки к 3 пину Ардуино
Когда вы используете функцию tone(), то возникают следующие ограничения.
Вариант скетча для активного зуммера чрезвычайно прост. С помощью digitalWrite() мы выставляем значение 1 в порт, к которому подключена пищалка.
Вариант скетча для зуммера без tone()
Пример скетча для варианта без функции tone() представлен на изображении внизу. Этот код задает частоту включения звука один раз в две секунды.
Для корректной работы устройства необходимо задать номер PIN, определить его как «выход». Функция analogWrite использует в качестве аргументов номер вывода и уровень, который изменяет свое значение от 0 до 255. Это все по причине того, что шим-выводы Arduino имеют ЦАП (цифроаналоговый преобразователь) 8-бит. Изменяя этот параметр, пользователь меняет громкость зуммера на небольшую величину. Для полного выключения следует пропитать в порте значение «0». Следует сказать, что используя функцию «analogwrite», пользователь не сможет изменять тональность звука. Для пьезоизлучателя будет определена частота 980 Гц. Это значение совпадает с частотой работы выводов с шим на платах Ардуино и аналогов.
Примеры мелодий для зуммера
Для того, чтобы разнообразить работу с новым проектом, добавить в него «развлекательный» элемент, пользователи придумали задавать определённый набор частот звука, делая его созвучным некоторым знаменитым композициям из песен и кинофильмов. Разнообразные скетчи для таких мелодий можно найти в интернете. Приведем пример мелодии для пьезопищалки для одного из самых узнаваемых треков «nokia tune»из ставших легендарными мобильников Nokia. Файл pitches.h можно сделать самим, скопировав его содержимое так, как указано в этой статье на официальном сайте.
При написании собственных мелодий пригодится знание частот нот и длительностей интервалов, используемых в стандартной нотной записи.
 Частота нот для пищалки Ардуино
Заключение
В этой статье мы рассмотрели вопросы использования пищалки в проектах Arduino: разобрались с пассивным и активным зуммерами, осветили некоторые теоретические вопросы по строению пьезоэлемента. Узнали, как подключить пьезопищалку к ардуино и как запрограммировать скетч для работы с активными, пассивными модулями. Как видно, ничего особенно сложного в работе с зуммерами нет и вы сможете легко включить аудио возможности в свой проект. Причем помимо обычных гудков вы можете создавать целые музыкальные произведения.
Надеемся, что статья будет вам полезной. Если же вы хотите узнать, как работать с более качественным звуком, то приглашаем прочитать статью про MP3 и WAV аудио и музыку в ардуино.
Пьезо-пищалка
Товары из офиса нельзя заказать через интернет или забронировать. Можно только прийти, схватить и бежать. Доступное количество актуально на момент загрузки страницы.
Офис находится в 3 минутах ходьбы от м. Парк культуры по адресу: ул. Тимура Фрунзе, 8/5.
Товары из магазина-мастерской нельзя заказать через интернет или забронировать. Можно только прийти, схватить и бежать. Доступное количество актуально на момент загрузки страницы.
Магазин-мастерская находится в трёх минутах пешком от метро Лиговский Проспект, на территории пространства «Лофт Проект Этажи», по адресу Лиговский проспект 74Д.
Пьезоизлучатель звука HPA17A без собственного генератора частоты.
Для работы со звуком при подключении пьезо-пищалки к Arduino, можно использовать встроенную функцию tone или богатую возможностями библиотеку Tone.
Возможные альтернативы
Модуль с пьезодинамиком для простой звуковой индикации
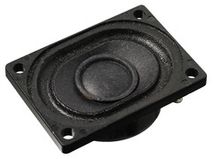
Широкополосный динамик импедансом 8 Ом и номинальной мощностью 1 Вт
PRODUCT SPOTLIGHT:
PIEZO AND MAGNETIC BUZZERS
Introduction

Welcome to the CUI Devices Product Spotlight on piezo and magnetic buzzers. Learn about CUI Devices’ buzzer product line, including a description of the main technologies used, their working principles, key specifications and possible applications.
Objectives
Piezo vs. Magnetic Buzzers
CUI Devices’ buzzer line utilizes two main technologies. Each technology has specific advantages and tradeoffs that must be taken into consideration depending on the application requirements.
Piezo Buzzer Characteristics
Magnetic Buzzer Characteristics
Piezoceramic Element Structure

At the heart of all piezo-type buzzers is the piezoelectric element. The piezoelectric element is composed of a piezoelectric ceramic and a metal plate held together with adhesive. Both sides of the piezoelectric ceramic plate contain an electrode for electrical conduction. Piezo materials exhibit a specific phenomenon known as the piezoelectric effect and the reverse piezoelectric effect. Exposure to mechanical strain will cause the material to develop an electric field, and vice versa.
Working Principle of Piezo Buzzers

When an alternating voltage is applied to the piezoceramic element, the element extends and shrinks diametrically. This characteristic of piezoelectric material is utilized to make the ceramic plate vibrate rapidly to generate sound waves.
Piezo Buzzer Structure

Piezo Buzzer Feedback
Some CUI Devices piezo buzzers include a feedback line. Driving circuits for buzzers with feedback tend to be simpler than those circuits without. Feedback is accomplished by dividing the piezo element into two, electrically isolated pieces. When the main piezo element is actuated it squeezes the feedback portion, creating a voltage on the feedback line. A simple way to use feedback is to have the feedback line connected to the base of a transistor. As the piezo element oscillates, the feedback signal will oscillate and the transistor will alternately block or allow current to flow.
Magnetic Buzzer Structure
This illustration highlights the structure of a typical magnetic buzzer. Like piezo technology, magnetic buzzers are available in transducer and indicator configurations. In a magnetic buzzer, the transistor acts as the driving circuit. Indicators include the transistor, creating a tone when a dc voltage is applied. Transducers lack this transistor, requiring a square wave signal to operate properly.

Working Principle of Magnetic Buzzers

The vibrating disk in a magnetic buzzer is attracted to the pole by the magnetic field. When an oscillating signal is moved through the coil, it produces a fluctuating magnetic field which vibrates the disk at a frequency equal to that of the drive signal.
Indicators vs. Transducers
As mentioned earlier in the presentation, piezo and magnetic indicators have the driving circuitry built into the design, creating a «plug and play» solution. Because of this, engineers do not need to worry about building a complex circuit to drive the buzzer. The disadvantage, however, is that indicators operate on a fixed frequency, reducing the flexibility offered to achieve an alternate frequency as application requirements change. Transducers, on the other hand, do not have the driving circuit built-in, so engineers are offered a greater range of flexibility when designing their circuit. The downside comes in the fact that transducers do require an external driving signal to operate properly, potentially adding complexity and time to the design cycle.
Indicator Characteristics
Transducer Characteristics
Key Buzzer Specifications
Frequency Response
How efficiently a buzzer produces sound at a given frequency.
Sound Pressure Level (Unit: dB Pa)
Sound pressure level, SPL, is the deviation from atmospheric pressure caused by the soundwave expressed in decibel Pascals. It is generally proportional to input voltage and decays by 6 dB’s when doubling the distance from the buzzer.
Resonant Frequency (Unit: F0 Hz)
All things have a specific frequency at which they tend to vibrate. This frequency is called the resonant frequency. For buzzers, the resonant frequency is the frequency at which they will be the loudest.
Impedance (Unit: ohm)
Electrical impedance is the ratio of applied voltage to current. The electrical impedance varies with frequency.
Lp = 10log10 (Prms/Pref) = 20log10 (Vrms/Vref)
A decibel is the scaled logarithm of the ratio of a measured value with respect to a reference value. Decibels are useful because they can show a huge range of values in a small space. For instance a sound pressure scale going from 0-120 dB can represent sound pressures from 20 µPa (micro-pascals) to 20,000,000,000,000 µPa. This roughly represents the lowest SPL a human can hear all the way up to uncomfortably loud sounds. Note: The generally accepted value for «Pref» in the formula above is 20 µPa.
Frequency Response

In a perfect world all devices would recreate every frequency at the exact same amplitude. In real life every device will have frequencies which it may amplify and frequencies which it will tend to reduce or attenuate. Frequency response curves show how a particular device responds to each frequency. SPL is plotted against frequency to indicate how the device will handle certain frequencies. Note: frequency is plotted on an exponential basis, similar to dB’s, it allows the full range of human hearing to be fit in a compact space.
The Human Ear and A-Weighting
20 Hz to 20 kHz tends to be the general range for human ears. This range is reduced with age, especially in males. In older males 13 kHz tends to be the upper end of the audible range. The human ear does not have a flat frequency response over the audible range. Certain frequencies tend to be attenuated while others are magnified. A-weighting attempts to compensate for this by discounting frequencies which the human ear is less sensitive to. It places priority on sounds between 1 kHz and 7 kHz.
Resonant Frequency

Every system has a particular frequency that it tends to vibrate at. For instance, if you pluck a string on a guitar that string will vibrate very near, or at, its resonant frequency. By driving a system at its resonant frequency, very large displacements, relative to the input signal strength can be achieved. Driving a buzzer with an input signal which has the same frequency as the buzzer’s resonant frequency, will create the greatest SPL with the least input power.
SPL Calculator

CUI Devices has developed an SPL calculator to allow users to convert a buzzer’s specified SPL on the datasheet to different real-world conditions, or to compare SPLs between two devices with different specified parameters. This tool makes it quick and easy for designers to specify the proper buzzer for their application.
Buzzer Sound Samples
Buzzers are implemented across many applications, usually to act as a warning signal. Click on the sound icons to sample common sound effects available in the CUI Devices buzzer line.
Sound Effects
Applications
Buzzers are typically used for identification and alarm purposes across many major industries. The major application categories that utilize buzzers for indication or alert purposes include: home appliances, automotive electronics, medical, safety and security, industrial, and office automation.
Mounting Configurations
CUI Devices’ buzzers are available in various mounting configurations depending on the application need, including SMT, PCB pin, wire lead, snap-in, vertical mount and panel mount.
Summary

CUI Devices’ buzzer line utilizes two main technologies, magnetic and piezoelectric. And their available mounting configurations allow for consumers to utilize CUI Devices’ broad product line depending on the application need.
Introduction to Buzzers: Piezo and Magnetic buzzers
Buzzers, they’re essentially an audio signalling device and can generally be found in our daily lives! They’re what wakes you up in the morning and reminds you something when you forgot to do so. In today’s article, we will be talking about buzzers!

We will be focusing on two types of buzzers: Piezo and magnetic buzzers since they’re more common as compared to the rest. With that said, let’s look at what will be covered:
Overview of Buzzers
What are buzzers?
Buzzers are electric sounding devices that generate sounds. Typically powered by DC voltage, they can be categorised as Piezo buzzer and magnetic buzzer. They come in different designs and uses as well, and based on that, they can produce different sounds!
Structure of the buzzers
There’s a difference in the working principle for Piezo and magnetic. Thus, we will first look at the difference in their structure:
Piezo Buzzer
As its name suggests, a Piezo-type buzzer’s core is the piezoelectric element. The piezoelectric element is made out of piezoelectric ceramic as well as the metal plate, they are held together in or piece by the adhesive.
Magnetic buzzer
As for the magnetic buzzer, it is mainly composed of the magnet, coil and the vibrating disk which is a ferromagnetic disk. This particular magnetic buzzer is an indicator which has the transistor.
Working Principle of the buzzers
Now that we’ve had a better look at Piezo and magnetic buzzers’ structures, we can move on to how they actually work:
Piezo buzzer
Due to the piezoelectric material, when an AC is passed through it, it’ll shrink and expand. This would then cause a vibration which would produce sound waves as you can see from the diagram.
Magnetic buzzer
In a magnetic buzzer, the current will be driven through the coil of wire and cause the vibrating disk to be attracted to it. The movement of the disk would produce the sound and it’ll return to its original state when there no current flowing through the coil of wire.
Variants of buzzers
Apart from the two main types of buzzers, they each also have sub-categories and other types of buzzers as well! So let’s take a brief look at them.
Electromagnetic buzzers
An electromagnetic buzzer consists of an oscillator, solenoid coil, magnet, vibration diaphragm, housing etc. Pretty much works the same as a magnetic buzzer, where they produce sound through magnetism, with a frequency of 2 kHz.
Mechanical buzzers
Mechanical buzzers are technically subcategories of electromagnetic buzzers, thus they consist of somewhat the same components. But what’s different is that the vibrating buzzer is mounted on the outer casing, instead of internally.
Electromechanical buzzers
Electromechanical buzzers are made out of electromagnet and bare metal disc. Works the same way as an electromagnetic and magnetic buzzer, it produces sound through the movement of the disc and magnetism.
Transducers and Indicators
Buzzers are actually designed to operate as transducers or indicators when they’re used in circuits. However, there are advantages and disadvantages when it comes to using indicators or transducers. So let’s look at each of their characteristics and differences:
Transducers
Indicators
Despite their differences, both transducers and indicators are able to produce continuous tones and slow/fast pulse sounds.
However, to do produce continuous tone, transducers need to supply a continuous fixed frequency square wave wile indicators need to supply continuous DC voltage. To produce slow/fast pulse sound, transducers need to supply square wave pulses of fixed frequency, while indicators to be alternatively switched on and off by applying PWM.
Key specifications of buzzers
Applications of buzzers
Electrical fire alarm
The fire alarm will only sound when a fire broke out so it’ll need to be loud and alarming to evacuate the people. Thus, a fire alarm would generally use s piezo buzzers. If you’re interested in making your own fire alarm, do check out our project below!
Microwave oven
I’m sure almost everyone has used a microwave oven before, where you set the timer and once the time is up, it’ll start beeping. Thus, a microwave oven uses a piezo buzzer as well just like the previous fire alarm. Since its purpose is to notify the user.
Before we jump into the fun projects you can do with buzzers, if you’re looking for a buzzer to experiment, Seeed does offer buzzers so do check it out if you’re interested!
Grove – Piezo Buzzer/Active Buzzer

Our Grove piezo buzzer makes it easy for anyone who’s interested to learn, as it simplifies the prototyping process with no soldering, or jumpers required! It has a resonant frequency of 2300±300Hz, sounds output of ≥85dB.
Here, we’re recommending the piezo buzzer since it is more versatile. Though if you’re interested in passive buzzer, do check out this and it is a Grove as well:
Grove – Passive Buzzer

With that said, let’s move on to our projects!
Projects with buzzers
How to Make a Fire Alarm
As we mentioned earlier, if you’re interested in building and installing a fire alarm at home, this is the project for you! It requires minimal materials and its simple enough to allow beginners to follow.
What you’ll need:
Sounds fun? Do check out the project for more details!
Control Volume of Piezo Buzzer- Circuits for Beginners
If you’re a complete beginner with electronics or a piezo buzzer, do check out this project. It’ll teach you all the fundamentals you need to learn about constructing a basic circuit with piezo buzzer and how to adjust the volume of it as well!
What you’ll need:
Learn the basics of using a piezo buzzer in a circuit by checking out this project!
Pocket Distance Alarm
During this Covid period, it is advised that we stand at least 1m apart from another person. Thus, this pocket distance alarm will definitely come in handy to help remind you and allow you to stay safe!
What you’ll need:
Sounds like something up your alley? Check out this project now!
Musical Keyboard using built-in Buzzer
Want to learn more about software like Micropython and Arduino? Using our Wio Terminal, you’ll be able to learn everything about Wio Terminal’s functions and passive buzzer, and how to turn Wio Termial into a musical keyboard through Ardupy by following along Lakshantha’s tutorial!
What you’ll need:
Try out this project if you’re interested in learning how to program your very own musical keyboard using only our Wio Terminal!
Summary
That’s all on buzzers! Did you understand the difference between piezo and magnetic buzzers better now? Buzzers are definitely one of the key components beginners need to learn before you move on to Arduino. Hope that you’ll be able to utilise buzzers and create more fun and interesting projects!
Once you’re able to understand how to utilise buzzers, we recommend:
Grove Beginner Kit for Arduino

New to Arduino? The Grove Beginner Kit for Arduino got your back! This kit is perfect for STEM teaching and beginners who purely want to learn about Arduino and coding, it brings you the simplest way to get started with Arduino. After you’re more familiar with Arduino, you can also take the modules out and use Grove cables to connect the modules.
Features:
Hope that this would help you on your electronics journey! Happy experimenting!


