Как работает репликация зон DNS
Одним из критически важных компонентов любой корпоративной сети, является сервер DNS. Практически все сетевые приложения основаны на использовании серверов DNS и их услугах, и в том случае если сервер DNS недоступен, практически вся сетевая активность может остановиться. Для того, чтобы обеспечить отказоустойчивость служб DNS, даже в случае выхода из строя сервера DNS, необходимо настроить как минимум один вторичный DNS сервер для каждой зоны.
Репликация зоны — это процедура обновления вторичного (secondary) сервера DNS, при которой копируются и обновляются все DNS записи с первичного (primary) сервера DNS. В том случае, если в вашей зоне содержится большое количество записей, который обновляются достаточно часто (например, динамическими клиентами DNS), необходимо продумать вопросы эффективного использования сети для трафика репликации зон DNS. Для оптимальной производительности рекомендуется размещать DNS сервера на контроллерах домена, и использовать интегрированные зоны Active Directory. Интегрированные зоны Active Directory разработаны для осуществления автоматической, безопасной репликации зон DNS. В службе Microsoft DNS выделяют следующие зоны репликации:
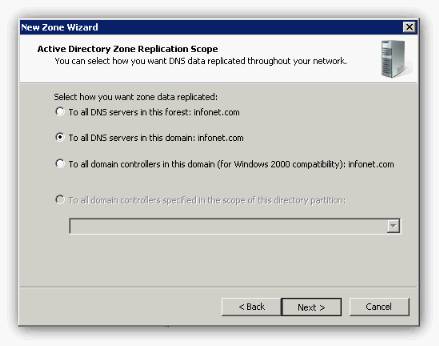
■ To All DNS Servers In This Forest (на все DNS сервера в лесу) репликация выполняется на все сервера DNS в лесу Active Directory, на контроллеры домена с ОС Microsoft Windows Server 2003 и Windows Server 2008. Данный тип репликации используется, если имеется множество серверов DNS во множестве доменах в лесу.
■ To All DNS Servers In This Domain (на все DNS сервера в этом домене) репликация на все контроллеры домена в текущем домене. Данная опция используется по умолчанию для интегрированных зон Active Directory.
■ To All Domain Controllers In This Domain (на все контроллеры домена в этом домене) – репликация на все контроллеры, в том числе, запущенные на ОС Microsoft Windows 2000 Server. Данная опция используется только в том случае, если у вас в сети есть сервера DNS на Windows 2000 Server. При такой конфигурации объем трафика репликации увеличивается, т.к. выполняется репликация всех записей DNS.
■ To All Domain Controllers In The Scope Of This Directory Partition – репликация на все контроллеры домена в указанном разделе приложений, в том числе и на сервера с Windows 2000 Server. В такой ситуации данные DNS реплицируются на определенные сервера DNS с Windows 2000 Server, тем самым, уменьшая область репликации. Такая опция позволяет уменьшить объем трафика репликации, однако требует дополнительной настройки.
Интегрированные зоны Active Directory могут находится только на контролерах домена; рядовые сервера домена, а также отдельные компьютеры не поддерживают интегрированные зоны Active Directory. В том случае, если вы не используете интегрированные в Active Directory зоны, репликация на вторичные сервера DNS осуществляется путем стандартной передачи зон DNS (zone transfer), которая является стандартным методом обновления DNS серверов и определена в RFC 1034 (http://www.ietf.org/rfc/rfc1034.txt) и RFC 1035 (http://www.ietf.org/rfc/rfc1035.txt). Сервера Microsoft DNS также поддерживают инкрементальную передачу зон, описанную в RFC 1995 (http://www.ietf.org/rfc/rfc1995.txt), которая предназначена для уменьшения трафика.
Как работает передача зон
Стандартные запросы DNS используют 53 порт UDP, а для передачи зон используется 53 порт протокола TCP. Протокол UDP более эффективен для пересылки запросов DNS, которые обычно состоят из двух составляющих: пакет с запросом, посылаемый на сервер DNS, и пакет с ответом, отправляемом серверов клиенту. Объем трафика передачи зон может быть достаточно большим (особенно для первой передачи зоны), поэтому решено использовать такие преимущества протокола TCP, как надежность и контроль передачи данных. Стоит отметить, что передача зоны является одним из потенциально уязвимых мест в безопасности сети, ведь получатель зоны может увидеть практически всю структуру вашей организации. К счастью, DNS сервер в Windows Server 2008 не позволяет передать зону на неавторизованные сервера. Для создания дополнительного эшелона защиты, на внешних межсетевых экранах следует закрыть 53 TCP порт (естественно, если это не будет препятствовать нормальной передаче зон).
В том случае, если и первичный и вторичный сервера DNS поддерживают инкрементальную передачу зон (эта функция появилась в Windows 2000 Server, в BIND 8.2.1 и более поздних версиях), будут передаваться только изменения в базе DNS. В том случае, если первичный или вторичный DNS сервер не поддерживает инкрементальную репликацию, каждый раз будет передаваться вся база данных целиком, а при большом количестве записей в зоне, эта передача может существенно утилизировать сеть.
Passive DNS в руках аналитика
Система доменных имен (DNS) является подобием телефонной книги, которая переводит удобные для пользователя имена, такие как «ussc.ru», в IP-адреса. Так как активность DNS присутствует практически во всех сеансах связи, независимо от протокола. Таким образом DNS логирование является ценным источником данных для специалиста по информационной безопасности, позволяющее им обнаруживать аномалии или получать дополнительные данные об исследуемой системе.
В 2004 году Флорианом Ваймером был предложен такой метод логирования, как Passive DNS, позволяющий восстанавливать историю изменений DNS данных с возможностью индексации и поиска, которые могут предоставлять доступ к следующим данным:
Данные для Passive DNS собираются с рекурсивных DNS-серверов встроенными модулями или с помощью перехвата ответов от DNS-серверов, ответственных за зону.

Рисунок 1. Passive DNS (взят с сайта Ctovision.com)
Особенность Passive DNS заключается в отсутствии необходимости регистрировать IP-адрес клиента, что позволяет защитить конфиденциальность пользователей.
На данный момент существует множество сервисов, предоставляющих доступ к Passive DNS данным:
| DNSDB | VirusTotal | PassiveTotal | Octopus | SecurityTrails | Umbrella Investigate | |
|---|---|---|---|---|---|---|
| Компания | Farsight Security | VirusTotal | Riskiq | SafeDNS | SecurityTrails | Cisco |
| Доступ | По запросу | Не требует регистрации | Свободна регистрация | По запросу | Не требует регистрации | По запросу |
| API | Присутствует | Присутствует | Присутствует | Присутствует | Присутствует | Присутствует |
| Наличие клиента | Присутствует | Присутствует | Присутствует | Отсутствует | Отсутствует | Отсутствует |
| Начало сбора данных | 2010 год | 2013 год | 2009 год | Отображает только последние 3 месяца | 2008 год | 2006 год |
Таблица 1. Сервисы с доступом к Passive DNS данным
Варианты использования Passive DNS
Используя Passive DNS можно отстраивать связи между доменными именами, NS серверами и IP-адресами. Это позволяет строить карты исследуемых систем и отслеживать изменения такой карты от первого обнаружения до текущего момента.
Также Passive DNS облегчает выявления аномалий в трафике. Например, отслеживания изменений в NS зонах и записях типа A и AAAA позволяет выявлять вредоносные сайты, использующие метод fast flux, призванный скрыть C&C от обнаружения и блокировки. Поскольку легитимные доменные имена (за исключением тех, которые используются для распределения нагрузки) не будут часто менять свои IP-адреса, а большинство легитимных зон редко меняют свои NS сервера.
Passive DNS в отличие от прямого перебора поддоменов по словарям позволяет найти даже самые экзотические доменные имена, например “222qmxacaiqaaaaazibq4aaidhmbqaaa0undefined7140c0.p.hoff.ru”. Также это иногда позволяет найти тестовые (и уязвимые) области веб-сайта, материалы для разработчиков и т.п.
Исследование ссылки из письма, используя Passive DNS
На данный момент спам является одним из основных способов, через который злоумышленник проникает на компьютер жертвы или крадет конфиденциальную информацию. Попробуем исследовать ссылку из такого письма, используя Passive DNS, чтобы оценить эффективность данного метода.
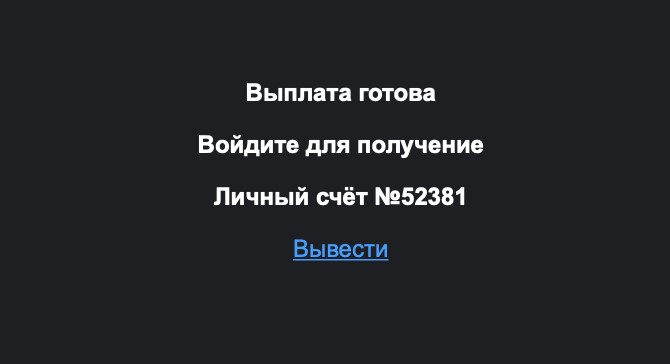
Рисунок 2. Спам письмо
Ссылка из данного письма вела на сайт magnit-boss.rocks, который предлагал в автоматическом режиме собирать бонусы и получать деньги:
Рисунок 3. Страница, размещенная на домене magnit-boss.rocks
Для исследования данного сайта был использован API Riskiq, который уже имеет 3 готовых клиента на Python, Ruby и Rust.
Первым делом узнаем всю историю данного доменного имени, для этого воспользуемся командой:
Данная команда выдаст информацию о всех DNS резолвах, связанных с этим доменным именем.
Рисунок 4. Ответ от API Riskiq
Приведем ответ от API к более наглядному виду:
Рисунок 5. Все записи из ответа
Для дальнейшего исследования были взяты IP-адреса, в которые данное доменное имя резолвилось на момент получения письма 01.08.2019, такими IP-адресами являются следующие адреса 92.119.113.112 и 85.143.219.65.
можно получить все доменные имена, которые связаны с данными IP-адресами.
IP-адрес 92.119.113.112 имеет 42 уникальных доменнных имени, которые резолвились в данный IP-адрес, среди которых имеются такие имена:
Ip-адрес 85.143.219.65 имеет 44 уникальных доменнных имени, которые резолвились в данный IP-адрес, среди которых имеются такие имена:
Связи с данными доменными именами наводят на фишинг, но мы же верим в добрых людей, поэтому попытаемся получить бонус в размере 332 501.72 рублей? После нажатия на кнопку “ДА”, сайт просит нас перевести 300 рублей с карты для разблокировки счета и отправляет нас на сайт as-torpay.info для ввода данных.
Рисунок 6. Главная страница сайта ac-pay2day.net
С виду легальный сайт, есть https сертификат, да и главная страница предлагает подключить данную платежную систему к своему сайту, но, увы, все ссылки на подключение не работают. Данное доменное имя резолвится только в 1 ip-адресс — 190.115.19.74. Он в свою очередь имеет 1475 уникальных доменнных имен, которые резолвились в данный IP-адрес, среди которых такие имена как:
Как мы можем видеть Passive DNS позволяет достаточно быстро и эффективно собрать данные о исследуемом ресурсе и даже построить своеобразные отпечаток, позволяющий раскрыть целую схему по краже персональных данных, от его получения до вероятного места продажи.
Рисунок 7. Карта исследуемой системы
Не все так радужно, как бы нам хотелось. К примеру, такие расследования легко могут разбиться о СloudFlare или подобные сервисы. А эффективность собираемой базы очень зависит от количества DNS запросов проходящих через модуль для сбора Passive DNS данных. Но тем не менее Passive DNS является источником дополнительной информации для исследователя.
Автор: Специалист Уральского центра систем безопасности
Rants on Security, CSIRT, Linux …
Previously Posted on April 19, 2007
Using Passive DNS for Incident Response
What is passive DNS?
According to isc.org “Passive DNS” or “passive DNS replication” is a technique invented by Florian Weimer in 2004 to opportunistically reconstruct a partial view of the data available in the global Domain Name System into a central database where it can be indexed and queried.
In practical terms passive DNS describes an historical database of DNS resolutions. What does this all mean? It means that you can lookup to what IP address a domain resolved in the past. This is even the case if that domain has been removed from the nameservers and is no longer available.
Important to note is that with passive DNS normally only the server to server communication is captured. The queries from stub-resolvers (typically that’s the local software preparing the DNS query) are not taken into account.
Why would you use passive DNS?
Passive DNS is very useful when doing incident response investigations.
Imagine a case where you receive information that a certain type of malware is using a domain “update.newaptvers.ion”. When you receive the information from your peers and you try to resolve the domain it points to 8.8.8.8. Using this IP address as an IOC is going to give you lots of false positives (for info: 8.8.8.8 is Google DNS). Now with the use of passive DNS you are able to look up to what IP address(es) this domain resolved in the past. If the domain has been captured by passive DNS sensors you will get a set of network IOCs that you can use to conduct a further investigation.
Passive DNS – Common Output Format
There is an Internet-Draft, draft-dulaunoy-dnsop-passive-dns-cof-01, describing a common output format of Passive DNS Servers which clients can query. You can query passive DNS servers that support COF with a client API via for example PyDNS. The result of your query will then be in JSON format.
In this post I will not cover PyDNS but PassiveDNS::Client, a Ruby application to do passive DNS queries. Currently PassiveDNS::Client has not yet support for this common format but I found this tool to be the only one that has flexible support for lookups on different passive DNS servers.
PassiveDNS::Client
Different servers
The PassiveDNS::Client has support for different passive DNS servers
The most useful supported server, in my opinion, is the one for PassiveTotal. PassiveTotal by itself already allows you to enable other external sources for retrieving data making the results more useful.
Install and configuration
Installing the PassiveDNS::Client is described in detail on the GitHub page. The steps to get it installed boil down to
Once installed you have to create the configuration file, typically found in $HOME/.passivedns-client.
For this post I use PassiveTotal and VirusTotal so my config file looked like this
Using passive DNS
Test case for incident response
How would you use the passive DNS client? Imagine you were doing incident response based on a set of IOCS (and flash back to mid-2015). In this case I start with the IOCs for Operation Potao provided by ESET. The IOCs contain a number of domain names like for example the domain truecryptrussia.ru.
If you now do a lookup of the domain you will notice that it resolves to 104.27.168.41. That IP is part of CloudFlare. Doing a research based on hits to the CloudFlare network is not feasible in a large network (or in a small network, it will be very difficult to draw conclusions based on hits to CloudFlare).
This is where passive DNS can help. If you query passive DNS servers (in this case I use PassiveTotal and VirusTotal) you get a history of the DNS records for this domain.
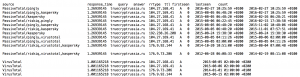
For this domain you can see that there are a lot of registrations pointing to CloudFlare. However there are also three registrations not pointing to CloudFlare. If you are doing an investigation around mid of 2015 then you can certainly use the IPs 192.238.26.208 and 176.9.92.144 to check for traffic in your network. The other IP, 176.9.73.206, seems to be to “old” (last seen early 2014).
Note that the listed domain and investigation steps are only listed for demonstration purposes to show you how an investigation could take place based on passive DNS data.
As an extra : sometimes attackers will first use some “probes” (either towards your network or by silently testing if unusual outbound traffic is detected). If they use the same domain name for these probes but later on switch to a different network for conducting the mass of the attack you will still be able to reconstruct what happened, based on the network information gathered via passive DNS.
Output formats
PassiveDNS::Client supports a number of output formats. The default is to print out the results on the console (by default tab-delimited). If you would like to automate the process of enriching your intelligence database you will probably use JSON, XML or CSV support. These are a couple of the settings that you need to supply for getting a different output format :
Querying different servers
In the example given above I used PassiveTotal and VirusTotal. PassiveDNS::Client also supports other servers like for example
Running your own passive DNS server
Passive sensors
There are a couple of options for running your own passive DNS server. You can run a passive DNS sensor provided by Farsight Security. This allows you to contribute to the existing dataset and make it more valuable, for you and for the community.
Another option is to run your own passive DNS sensor and using the data only internally. The best option that I found for this was using passivedns from Gamelinux.org. From a high level view this is a network sniffer that extracts DNS packets and stores them in a log file. You can then use a Perl script to monitor the log file and store the events in a sql database.
Combining with Moloch
I just started experimenting with running Moloch for grabbing the entire network traffic. Moloch stores network traffic details (either from sniffing or from pcap files) in a central database for later processing. 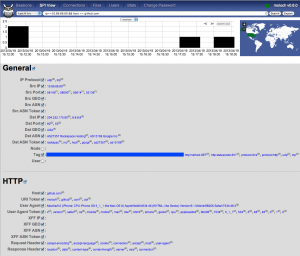
(image from https://n0where.net)
Moloch has a feature that allows you to query only the DNS queries but I found it a bit cumbersome to extract all the queries (and results) that happened for a specific domain name over a given time frame.
This is where I used a different instance with passivedns that looks at the same traffic. Note that passivedns is also able to read the pcap files, it is not limited to only live traffic.
A security colleague explained a working setup with an IDS storing the individual pcap files (for example rotated every 100MB) and then later processing the pcap with Moloch (a post on this is coming soon). I added a post-process task with passivedns on the same pcap files that extracts domain information and query results and then makes the data available in a sql database.
This setup allows me to get the best of both worlds. Three worlds in fact :
Remarks on the location of the sensors
The numbers of sensors that you can place will always be limited so you have to choose the location wisely. If your users are allowed to do DNS queries directly to the internet you might be missing out on data because the traffic is not seen by the sensor. Ideally you request users to use your own DNS server and block all other outgoing DNS traffic. Additionally this also allows you to more easily implement blocklists on DNS level. Your company-network DNS server then makes a great place to put a sensor.
Conclusion
I knew about passive DNS for a while but I’ve never came to putting it to use. Some informal talks during the last FIRST Technical Colloquium introduced me to Moloch and playing around with it gave me the idea for putting it together with passive DNS.
All in all I think passive DNS (both online and offline) is a very valuable source of information if you have to conduct an investigation.
One thought on “ Using Passive DNS for Incident Response ”
Leave a Reply Cancel reply
This site uses Akismet to reduce spam. Learn how your comment data is processed.
How to Use Passive DNS to Inform Your Incident Response
The Domain Name System (DNS) is one of the key foundations of the internet. The DNS acts as a sort of phone book by translating user-friendly names like “Google.com” into numeric IP addresses that computers use to move packets of data over a network.
The phone book of the internet isn’t stale, though — it changes frequently. You can track these changes with a process called passive DNS replication. By understanding the significance of changes in the identity of the systems that communicate with your network, you can more capably build a timeline of events when you enact your incident response plan.
What Is DNS Logging?
A DNS log is one of many data sources through which you can detect security incidents and start your incident response plan. DNS log monitoring can be done in two ways: by looking at the content of the logs and checking for malicious activity, or by analyzing anomalies in the volumes, frequency, and types of requests and responses.
There are essentially two types of DNS logs concerning client behavior:
Knowing when, where, how and by whose request each event in the DNS log occurred is crucial when building timelines. This also means that a time field is essential. That’s where passive DNS replication comes in.
How Does Passive DNS Work?
Passive DNS replication can happen in several ways. You can run a passive sensor that sniffs the DNS traffic and records the answers. Or, you can attach it as a module to an existing network monitor service, use it as a plugin with a name server or extract the data from stored network captures.
The data compiled by DNS replication gives you a historical overview of DNS responses, showing exactly where a certain domain led in the past. The technique was invented in 2004 to reconstruct a partial view of the data available in the global DNS into a central database where it can be indexed and queried.
It’s important to note that it is not necessary to register client IP addresses when storing the replication data, so it’s very effective at protecting the privacy of individual users.
When to Use DNS Data
Consider that you are investigating a compromised machine and you’ve been handed its DNS request and response logs. You have a rough idea of when the infection took place, which was well before the initial steps of the investigation were started.
The DNS logs show that during the suspected time frame, the machine completed multiple queries for a single domain. This is most likely the domain used by the malware.
You can use this data to extract additional information by looking at the intrusion detection logs. You can also track other infected machines. It’s important to note, however, that in this example, the intrusion detection system (IDS) doesn’t resolve domains; it only stores IP addresses of the captured events.
When you resolve the domain during the investigation, you get the response “8.8.8.8.” This IP address corresponds with one of Google’s public DNS servers. It’s highly unlikely that an attacker used these servers to further host malware. In this case, without additional logs or data, it’s very difficult to know to which IP address the malicious domain pointed during the time of the infection.
From an attacker’s point of view, these changes in domain resolution are put to use by registering a domain and first having it point to something less suspicious.
During the dormant phase (before the malware campaign is launched) in the schema above, the domain points to 9.9.9.9, the Quad 9 DNS services. Then, when the campaign is launched, the resolution is changed to an attacker-controlled host (1.1.1.1, for example). This is the operation phase. Notice that the time to live (TTL) value can influence the success of the campaign. A TTL instructs the client how long to cache a given result. If the TTL is set too high, it’s possible not all infected clients will get the “new” information.
Once the campaign is completed, the attacker can abandon the domain and have it point to nonrelated infrastructure. Without passive DNS replication data, there would be no record of that activity. But, if DNS traffic and IP address information has been tracked, you can follow the attacker’s crumbs back the source.
Unifying Passive DNS Methods
There are many implementations of passive DNS software that all have their own, custom output format. Having different schema can make standardization and automation very difficult, especially if you need to exchange that information across networks. To mitigate this, the Internet Engineering Task Force (IETF) published a document describing a common output format for passive DNS.
Build Your Own
Your own internal data is a treasure chest of information that can be used to detect security incidents or supplement ongoing investigations. If you want to consume passive DNS, you can start with the queries done in your network. There are a number of open source and commercially available solutions that can help you with this, such as Zeek and passivedns-client.
Bro (Zeek)
You can then use standard SQL commands to search for historical information (there is also an HTTP API interface). An example referring to the use case above could consist of:
When deploying DNS monitoring:
In some situations, it is impossible to conduct a live inspection of the traffic. Instead, do a packet capture on the most important network exits or routing points, record the DNS-related traffic, and then read the PCAP files with Bro and do the analysis.
passivedns-client
Whereas the Bro module generates the records ( server ), the passivedns-client allows you to query for results from a multitude of sources. As the name implies, this is the client part of a setup. It is a Ruby application that allows you to query:
An application programming interface (API) key is required to access VirusTotal and PassiveTotal, for example, whereas accessing the service of CIRCL requires that you contact them first. The client can export to CSV, XML, JSON or YAML format.
Use Ready-Made Solutions
The following open source and commercially available solutions can also deliver access to historical DNS resolution data.
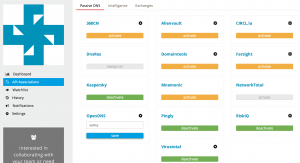
PassiveTotal
One of the primary data sets of PassiveTotal gives access to historical DNS resolutions. The set is built from various sensors located around the globe, producing an extensive picture of historical resolutions. The additional pivot possibilities within PassiveTotal make it very useful for computer security investigations.
PassiveTotal partners with other sources, such as as Kaspersky, Alienvault, Virustotal and CIRCL.lu, to enrich the data. And you are not limited to the web interface; you can also get access via your own tools through the API.
VirusTotal
Similar to PassiveTotal, VirusTotal provides an extensive set of historical DNS resolutions. This data set is also integrated with other pivot information as connected malware samples and malicious files downloaded from a domain. You can access the VirusTotal database via the web interface, but you can also integrate it with your own tools via the API.
DNSDB
DNS Database (DNSDB) is a database that stores and indexes both the data available via Farsight Security’s Security Information Exchange and authoritative DNS data that various zone operators make available. Whereas access to PassiveTotal and VirusTotal is free (at least for a restricted set of queries), DNSDB is only accessible to authorized users.
Improving Incident Response and Threat Intelligence
There are a few scenarios in which you might implement passive DNS information in both your incident response plan and your threat intelligence processes.
For instance, a resolution information alert can flag IPs associated with domains that are outside of your organization’s control or that belong to well-known malicious network blocks. You can enrich recorded domains with the date on which they were registered; an increase in requests for newly registered domains could indicate a malware outbreak.
Ultimately, the more data you have at your disposal, and the more meaningful context within which you are able to analyze it, the more efficiently you should be able to detect anomalies and build defenses for known threats or respond to active breaches. Such enriched knowledge is invaluable to every aspect of your security program.


