Eclipse has Oomph
Consider the tasks needed each time you set up a fresh development environment to work with a particular version of a specific project:
These tasks need to be well documented and evolve from release to release for each and every project.
With Oomph you can manage all this more effectively by formalizing the setup instructions so they can be performed automatically with the click of a button. In this article we’ll focus on the user’s experience as opposed to how authors create setup descriptions for their projects. For the end users, Oomph provides a wizard to drive all aspects of the provisioning process. For provisioning new installations from scratch, Oomph provides an RCP application to launch the installer wizard; it’s downloaded and unzipped just as for any Eclipse Package download. Launching that results in the following:

The initial page allows the user to choose a product to install from one or more product catalogs. The Eclipse product catalog is generated from the Eclipse Packaging Project’s p2 repositories, so it allows users to install any version of any product they’d normally find on Eclipse’s main download page. Oomph’s underlying infrastructure supports bundle pooling for all aspects of the installation (and, optionally, even of the target platform), i.e., when installing multiple products using Oomph or when provisioning multiple target platforms, the installations and target platforms can share all the common bundles and will download each bundle only once. This dramatically reduces disk space as well as speeding up installation and target platform provisioning time. Of course one can disable bundle pooling to produce an installation exactly like you get with an unzipped package download. You can also see there is a dialog to manage the bundle pools.
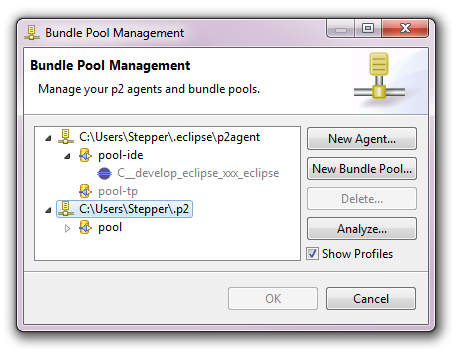
This allows one to manage the pools and agents, do garbage collection of unused bundles, and even repair damaged bundles by downloading the same version of that bundle from the internet. With Oomph the user has flexible control.
Note that for those familiar with the early prototype version of Oomph, the current architecture is dramatically more flexible and less invasive. You’ll notice that on the next page of the wizard.
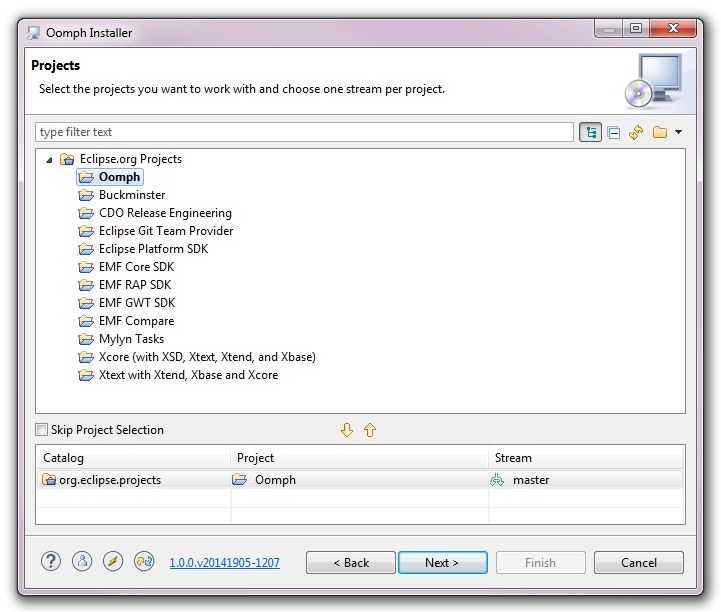
On this page you can select projects that have provided Oomph setup descriptions for provisioning a workspace to work with the source code for that project. But this aspect is optional, i.e., you can use Oomph only to install a product, or to install a product as well as provision a workspace for that product to use. If you double click on the Oomph project, you’ll see it’s added to the bottom of the dialog, where you can choose which stream of the project you’d like to have in the workspace. Of course Oomph only has a master stream at this point. Oomph is designed with composition in mind, i.e., it’s possible to provision multiple projects into one workspace. This is definitely a technical challenge for which Oomph provides a more flexible, high-performance target platform implementation. Proceeding to the next page, the user is prompted for information needed to complete the product installation and the project provisioning.
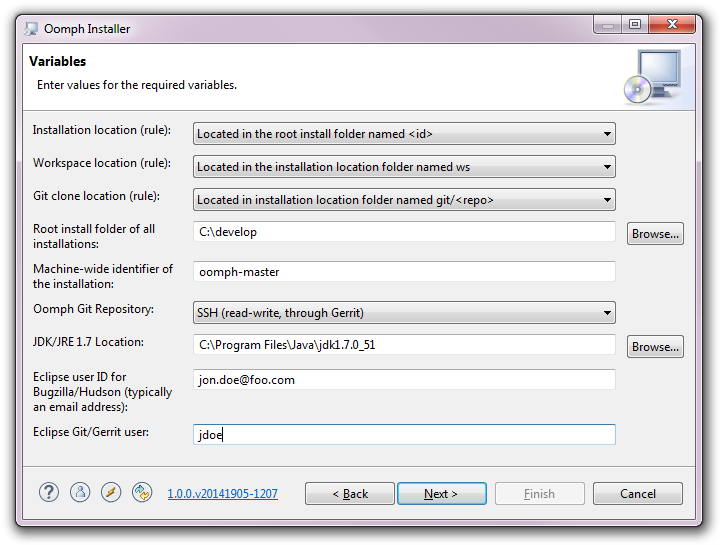
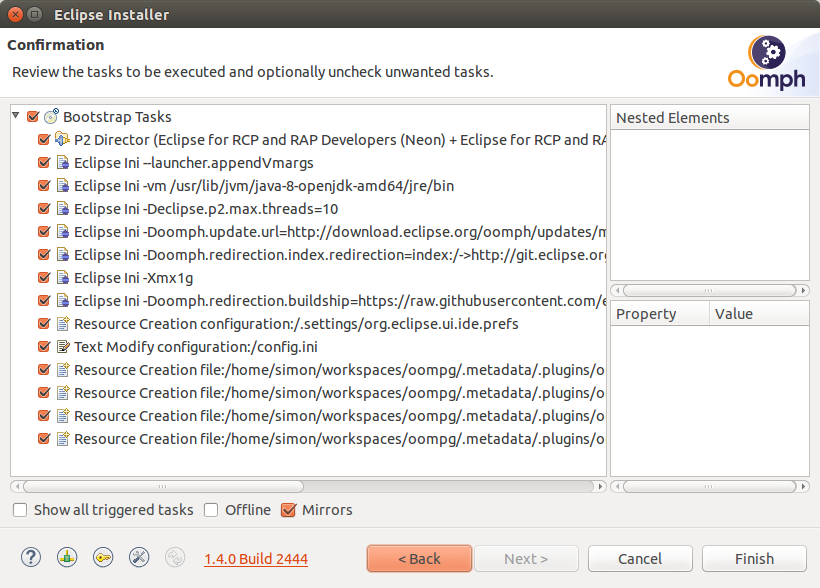
Most of the choices made are recorded, so the very first time you install something, you’ll have quite a few choices to make, but on subsequent reuse, that’s dramatically reduced. Proceeding to the confirmation page, you’ll see the follow:
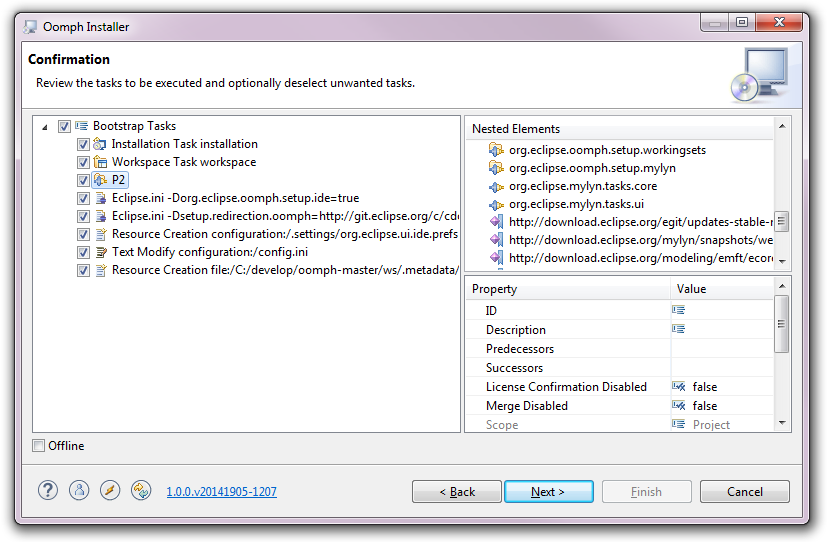
These are the tasks that will be performed to produce the installation and to preconfigure the workspace for the projects being provisioned. Tasks can be disabled, if desired, but during this initial installation most are absolutely required. Proceeding beyond this page will kick off the installation process.
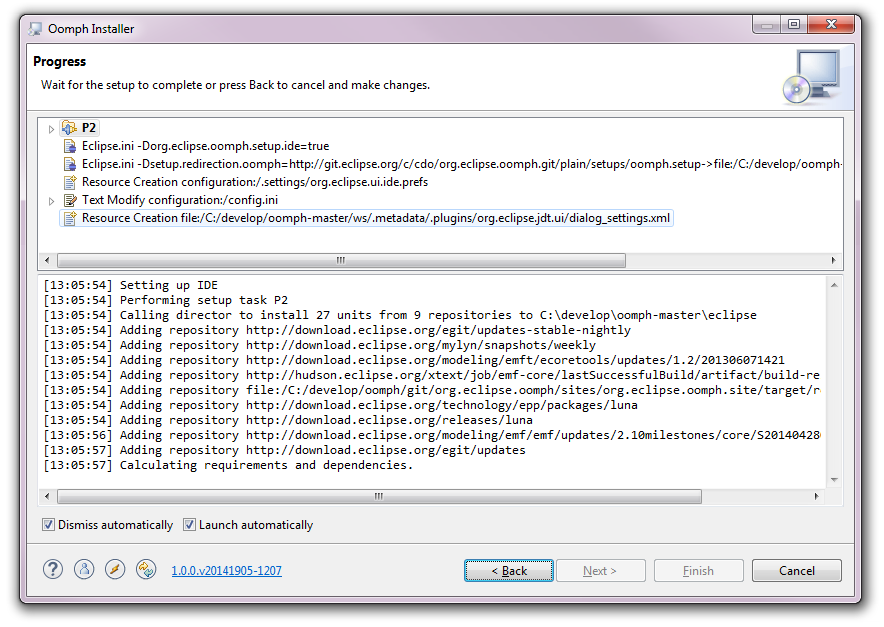
The first time users install a product, this process can take quite long because a large number of bundles need to be downloaded from the internet, but subsequent installations can take as little as 20 seconds. When the process completes, the installed product will be launched and any remaining aspects of the installation process are performed in the launched product. The running product will automatically bring up the installer wizard to show progress on the remaining tasks.

In this article, the Oomph project itself was selected for provisioning, so the tasks include cloning the Git repository, provisioning the target platform needed by the Oomph source projects, and defining working sets to organize those projects. Upon completion, the resulting workspace looks as follows:
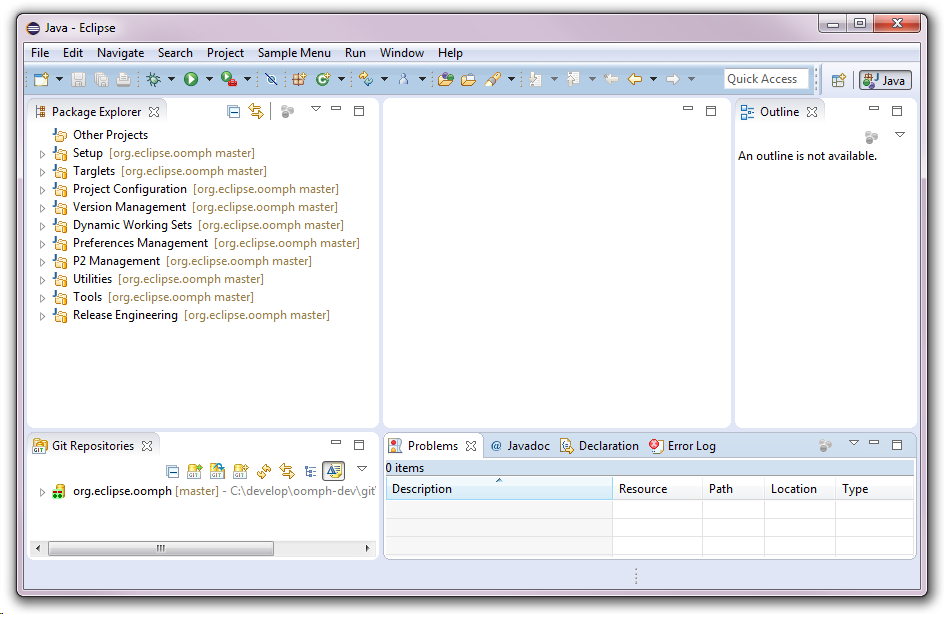
Note that because Oomph’s artifacts require tools such as EMF’s generator and Ecore Tool’s graphical editor, those tools have already been installed along with the product.
That’s it, the users can now work on the Oomph project source the same way as an Oomph committer, and can commit their changes to Gerrit for review.
Another exciting aspect of Oomph is its support for managing, among other things, personal preferences. The editor for user tasks can be opened via the toolbar and then the Eclipse preferences dialog can be opened via the editor’s toolbar contribution:

All preferences changed will be recorded as tasks, and those tasks will automatically be performed in each Oomph-installed product. So now users can decide which workspace-specific or installation-specific preferences they want universally the same in all their installations. In addition, any type of task can be authored in the user tasks editor, i.e., additional p2 tasks for installing a user’s personal favorite tools into each and every product.
Revisiting the initial question of «the tasks needed each time you set up a fresh development environment to work with a particular version of a specific project», with Oomph that boils down to launching the wizard, choosing what you want and where you want it to be, and letting Oomph do all the rest. The expensive parts of the installation and provisioning process are generally those that involved internet access, i.e., downloading bundles and cloning repositories, so even if those take quite long, they can run unattended, while you focus on real work.
For more information you can read the project proposal and if you want to try it, you can follow the instructions in the wiki.
This tutorial describes how to use the Eclipse installer based on Oomph. It also describes how to create and maintain custom setup files for Oomph to provide your standard configuration for the Eclipse IDE.
Learn more in the Learning Portal. Check out our
1. How can you provide a customized Eclipse IDE to your team?
Setting up a development environment can be a time consuming task. Such a setup can include:
the installation of certain plug-ins
the configuration of certain preferences
cloning certain Git repositories
importing projects from these Git repositories
Doing all this manually can be time consuming and error prone.
Oomph is the technology used for the Eclipse installer and this technology can also be used to provision a pre-configured and customized Eclipse IDE for the developer team. Oomph allows to automate this setup process via a setup profile. This setup profile contains the tasks for setting up your custom Eclipse IDE.
The Oomph installer allows to choose this profile and applies these settings automatically.
2. Using the Eclipse installer with predefined profiles
The following description explains how to use the Eclipse installer with the pre-configured configuration files.
2.1. Download the Eclipse installer
The Oomph installer can be found on http://www.eclipse.org/downloads/ Download the installer package fitting to your platform and extract it.
The installer is a small Eclipse application.
2.2. Start the installer
In the extracted download you find the eclipse-inst or eclipse-inst.exe file, which you can use to start the installer.
Start the installer and choose a certain Eclipse distribution. This will download the selected package and start it.
2.3. Choose and use default profiles
In order to work with a profiles, switch to the ADVANCED MODE…
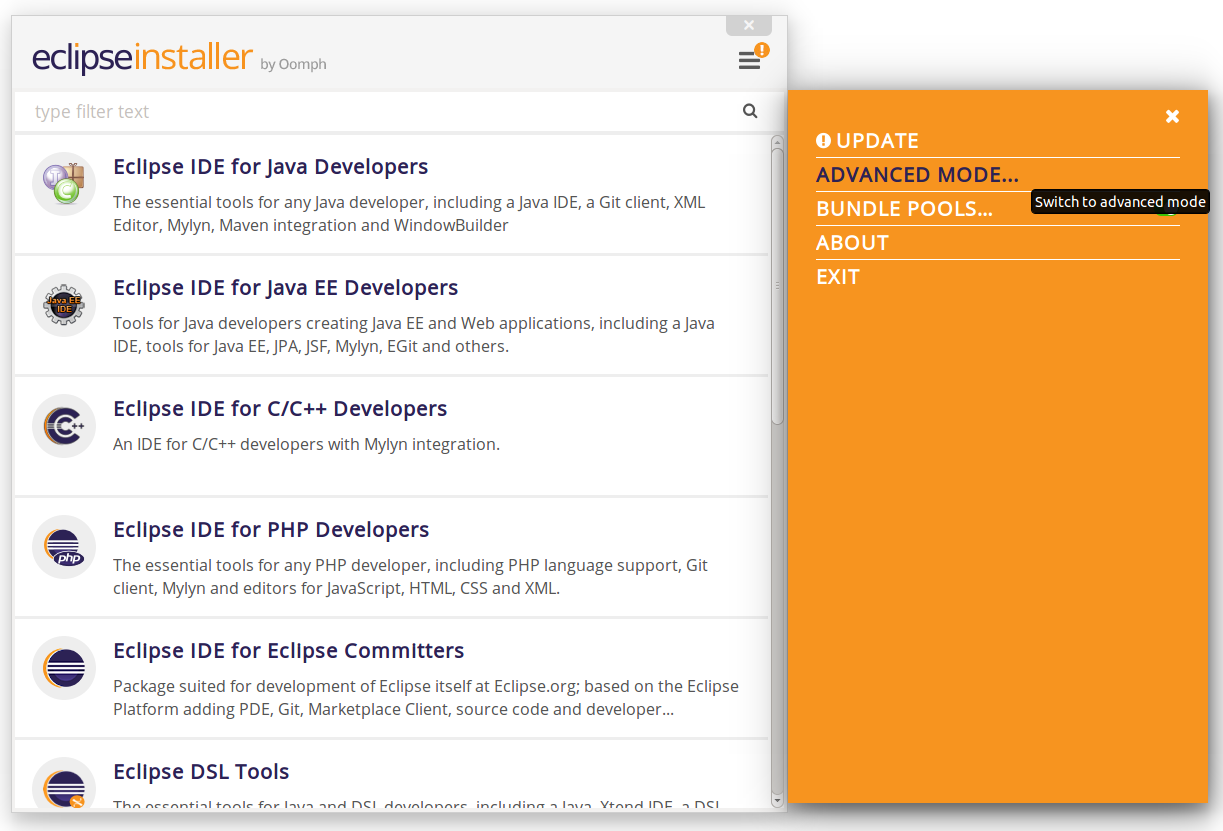
In the advanced mode a certain EPP can also be chosen and when pressing Next > a certain profile can be chosen.
Once Finish has been clicked all the tasks will be processed and a pre-configured Eclipse installation will be started.
3. Oomph custom setup
3.1. Using a new profile
Out of the box the installer provides certain default categories containing different profiles, e.g., for Eclipse Projects. But it is also able to identify user defined profiles like the Vogella-Setup.
Additional user setups can be added by using the green plus button besides the filter text.
Depending on the chosen profiles there will be some extra variables for the installation on the next page.
After the variables are configured properly the last wizard page will give an overview about the setup tasks.
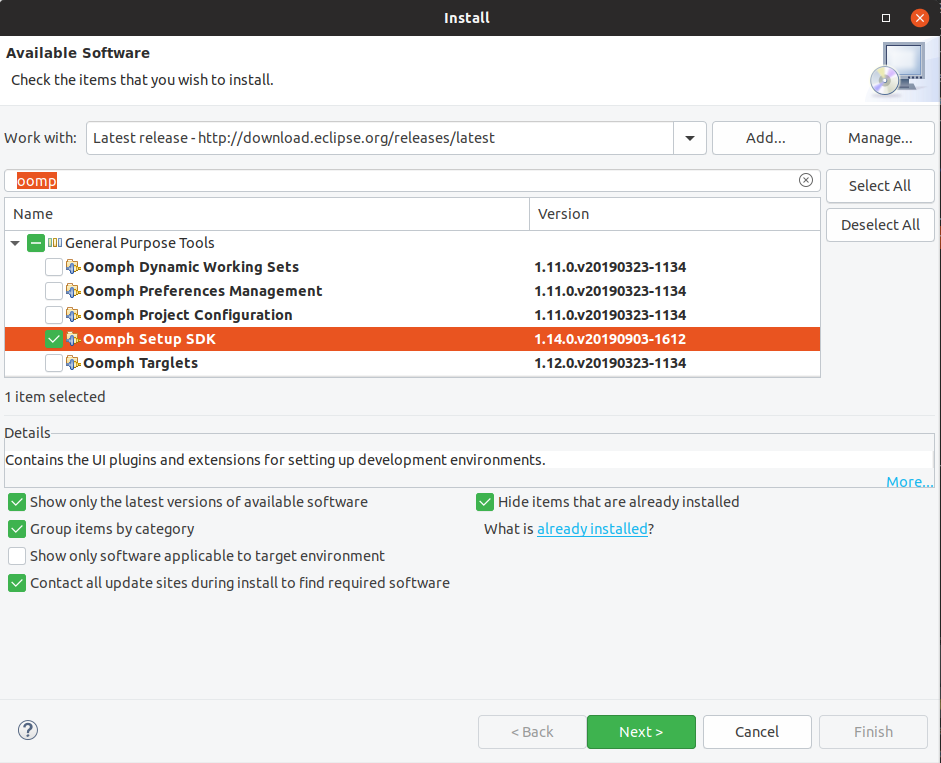
3.2. Install the Oomph Setup SDK
Select Help Install New Software… and use http://download.eclipse.org/releases/latest to install the Oomph Setup SDK.
3.3. Creating a new profile
See https://wiki.eclipse.org/Eclipse_Oomph_Authoring for detailed information about the detailed configuration.
4. Exercise: Create and test a custom setup project model
In this exercise you learn how to create your own project setup model to:
Clone Git repositories
Import the included projects
Configure some preferences
4.1. Creating a new profile
Oomph
The Oomph Project is dedicated to providing extensions to the Eclipse Platform that improve the user experience.
One of Oomph’s showcase technologies is the Eclipse Installer. The installer exploits Oomph’s flexible and powerful setup engine to automate the installation of applications as well as the provisioning of workspaces. For an overview of this technology in action on a very large useful example, have a look at the instructions for Provisioning the Platform SDK which creates a dedicated installation for working the source code of all projects that comprise the Eclipse Platform’s SDK.
Note that the latest version of the installer supports installing Marketplace listings.
Contents
Eclipse Installer
The Eclipse Installer can be used to create specialized installations and to provision customized workspaces.
Features
The following technologies are supported by Oomph:
Update Sites
We offer three types of drops: release, milestone, and nightly. They can be found in these composite repos:
The following is an uber composite of the three above composites:
For each of the four composite repos we offer a smaller variant that contains only the latest drop:
The single drops are individually available under http://download.eclipse.org/oomph/drops as follows:
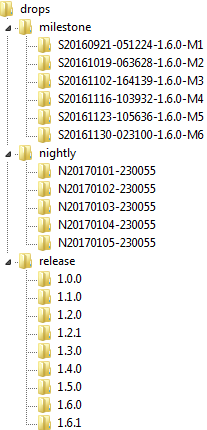
Note that at most five nightly drops are kept and that milestone drops are only kept until shortly after the next release.
Authoring Setup Models
Frequently Asked Questions
Please read the FAQ, learn from the authoring tips and tricks, or revisit our help center.
Getting in Touch
First browse the FAQ to see if your question has already been answered.
As a user you should post your questions and comments to the public forum:
You can also monitor the developer mailing list or discuss development topics:
If you encounter trouble or miss a feature please:
Contributing to Oomph
Tutorials
Articles
Videos
This page was last modified 00:03, 19 October 2019 by Steve Kelem. Based on work by Ed Merks and Eike Stepper.
Oomph Basic Tutorial
Oomph is a project providing tooling to make the installation and configuration of Eclipse instances easier. The ultimate goal is to install and set-up an Eclipse IDE or product with a single click. Oomph also allows to share setups, as an example, you can preconfigure an IDE to work on a certain project and all developers can use this setup to get easily involved in the project.
Before we get started with the hands-on tutorial, we will introduce some basic concepts in this section.
Oomph stores configuration information in files, which can be easily shared. Those files are called “Setup Models”. There are two types of setups models in Oomph.
Product setup models define a complete Eclipse instance to be installed. This includes all plugins, which shall be contained in the Eclipse installation as well as default preferences and other basic settings. Product setups are comparable to the Eclipse packages you can download from eclipse.org (e.g. the Java EE Edition or the Modeling Edition). The difference being, you can chose exactly what should be in your product. Additionally, you can add plugins, which are not part of the release train, e.g. Checkstyle.
Project setup models define the set-up for a specific development project. This includes gut repositories, projects to be checked out, project-specific settings, etc..
Project setup models always need a product setup model first to create the Eclipse instance. However, Oomph already provides the standard Eclipse Packages as product setup models. So it is possible to just create a project setup model without the need to configure a product and vice versa.
Later in this tutorial, we will describe in detail how to specify product setup models and then project setup models. Before we cover this, a few words about how Oomph is working in general and about the different components it consists of. The following diagram shows a (simplified) overview of all relevant Oomph components. The Oomph installer (also called Eclipse installer) is a dedicated application, you can download and launch. As the name implies, it is responsible for installing Eclipse instances. Therefore, it presents the user a list of available project setup models and, subsequently, a list of available project setup models. Based on those two models, it will create an Eclipse installation for you. Additionally, it allows the user to select a few settings, which are related to the installation, such as the installation directory. We will describe the installer more in detail later.

The Oomph Updater is responsible for keeping an existing Eclipse instance up-to-date once it has been created. Therefore, on every start-up, it checks the product setup model for any changes in the configuration. If there are any changes, e.g. a new bundle has been added, it will apply those changes automatically to the existing Eclipse instance.
The Oomph Project Setup component reads a project setup model and applies it to a created Eclipse instance. This means, it configures the Eclipse with project specific settings. Some of those settings are already applied during the installation (e.g. the addition of bundles) and are therefore taking care of by the Oomph Installer. Some project specific things can only be done, once the Eclipse instance is already created and started, therefore, the Oomph Project Setup component runs in this Eclipse instance and manages this second step. As an example, it clones specific Git repositories, imports projects, configures Mylin queries, and so on. We describe the configuration of an project setup model in more detail in the section Project Setup Models.
Installing the three Oomph runtime components into an Eclipse instance is optional. The “Oomph updater” and the “Oomph project setup” are typically wanted to keep the installation up to date and to enable the usage of project setup models. Therefore, we recommend you always include those two runtime components. The “Oomph Authoring” is only required, if users of the Eclipse instance are expected to create and edit Oomph profiles. As this also involves the creation of user specific profiles, based on common profiles, we recommend you additionally install this runtime component.
After this basic introduction, we will describe the Oomph components in more detail. In the first section, we explain how to use “The Oomph Installer / Eclipse Installer” from an end-user perspective. In the second section, we give a general introduction about “The Oomph Authoring Tooling. Subsequently, we describe how to create “Oomph Product Setup Models” and “Oomph Project Setup Models”.
The Oomph Installer / Eclipse Installer

In the following sections, we will describe all of the options of the Oomph installer. Those, which are only available in advanced mode are marked as such.
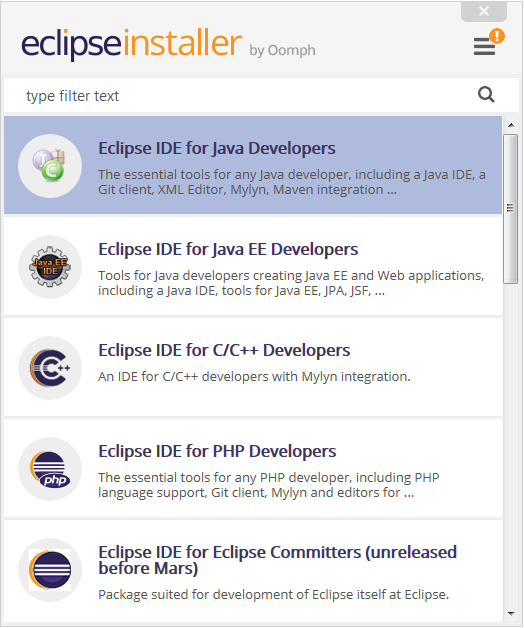
Select Product Setup Model
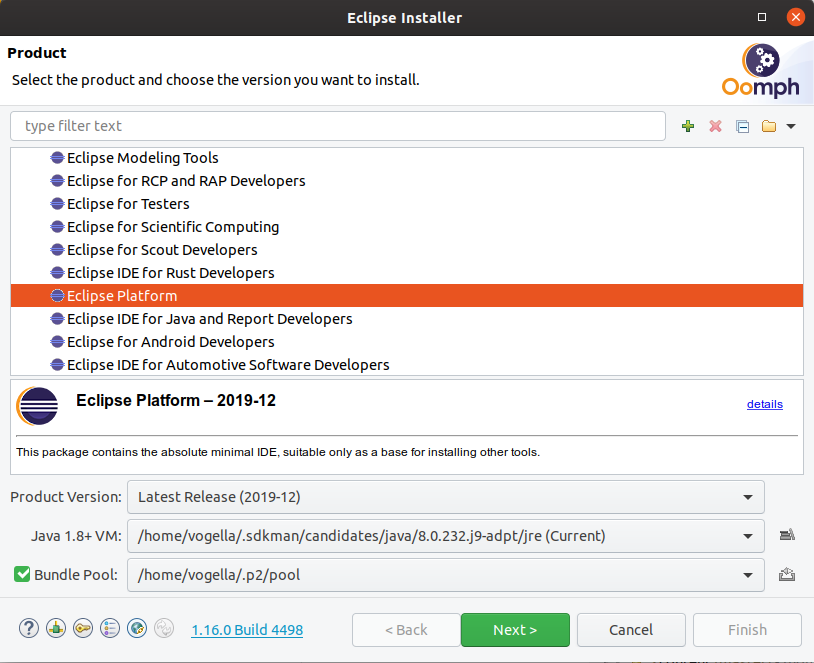
On the first page of the installer, you can select the product, you want to install from a list of available product setup models. The simple mode shows a flat list, the advanced mode groups them by “product catalogue”. By default, the list contains all standard packages provided by the Eclipse Packaging Project (EPP), such as “Eclipse for Java Developers” or “Eclipse for PHP Developers”. However, you can add your own product setup models here, which is described in this section. To select a product to be installed in the simple mode, you need only to click on it. In the advanced mode, select it and click “next”.
Product Version (advanced)
The advanced mode allows you to specify the simultaneous release on which the installation will be based on, e.g. “Mars”, “Mars.1” or “Neon”. That means, that all bundles will be installed from the corresponding release update site. Please note, that a certain Eclipse version must be explicitly supported by a product setup model. Alternatively, you can also choose the “latest release”, which will use the most recent Eclipse release, or “latest”. This will use the developer builds of the upcoming Eclipse release. The simple mode will always use the latest release.
Configure JVM
Both modes allow you to configure the JVM to be used for the Eclipse installation. (second page for the simple mode, first page for the advanced mode). This JVM will be used later to start the Eclipse installation you install with the Oomph installer.
Configure installation directory
Both modes allow you to specify the directory, in which the Eclipse instance will be installed. Please note, that if you use bundle pools (see next section), the installation directory will mainly contain the executable launcher, the instance-scoped preferences, and some ressources. The bundles, of which an Eclipse installation contains will be placed in the bundle pool.
Configure Bundle pools (advanced)
Add product setup models (advanced)
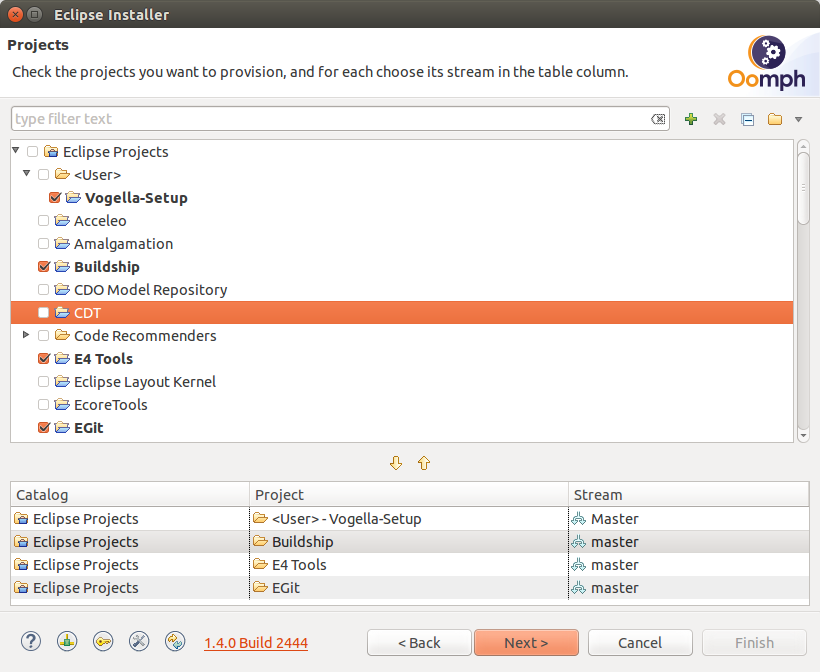
Select Project Setup Model (advanced)
After you have selected a product, the advanced mode also allows you to select a project setup model. As described before, project setup models will do project specific set-ups, such as checking specific repositories, setting up Mylin queries, as well as installing additional bundles, which are only required to work on a specific projects. As for the product list, the installer shows a list of available public setups as before, you can also add your own custom setups models on a project level.
To select a specific project, double click it in the list. Please note, that it is possible to add several project setup models to the list below, before you trigger the installation. This will execute all project setup tasks from all selected projects, so in theory, you receive an Eclipse working on multiple projects. However, as the setups from different projects might collide, this is a rather special case in practice.
Project setup models can support different “Streams”. That means, the setup for this project is sightly different for different versions or releases. If a project supports more than one stream, you can choose the stream to be installed in the table of selected projects.
Select Installation Folder
On the last page in both modes, you can select the installation folder for the Eclipse instance to be installed. In this folder, Oomph will create the launchable allowing you to start the installed Eclipse as well as instance specific resources and settings. Please note that if you use bundle pools, the installation directory will not contain the bundles of which the installation consists, they will be retrieved from the respective bundle pool instead (on start-up). The simple mode also allows to create a desktop and menu entry to start the installed instance. In the advanced mode, you must directly start the launchable in the installation folder or create the shortcut yourself.
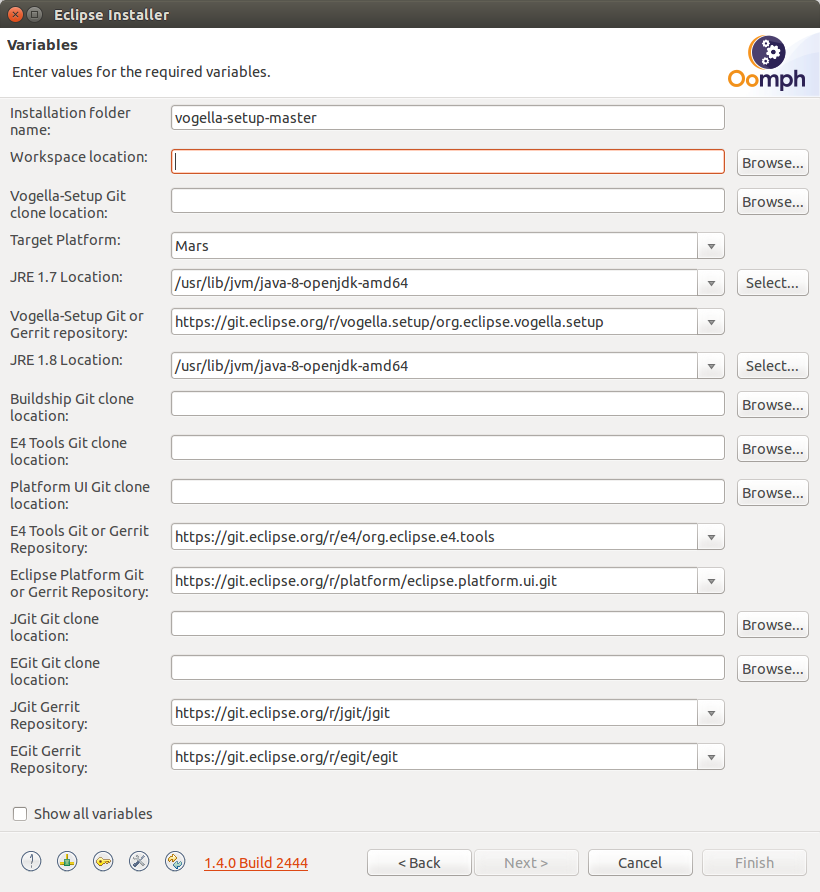
Project specific settings (advanced)
In the advanced mode and if you have selected a project specific setup model, you might need to enter some project-specific variables. Those are defined in the project setup model and can therefore differ from project to project. A typical example is the user name, which is used to access git repositories. If you are in doubt about an available variable, you should contact the party, who provides the project setup model you want to install.
The Oomph Authoring Tooling
Both artifacts can be opened in a tree-based editor. It displays a hierarchy of elements, which specify the setup model in detail. In the following two sections, we describe the most relevant elements of a product setup model and a project setup model.

Both, product and project setup models are extensively based on using variables. This improves the maintainability of Oomph profiles and also allows you to connect generic profiles to user specific settings. As an example, a project setup needs to know about the JRE in order to be used for launching applications. When specifying a project setup model, you do not know, where the JRE of a future user is located, therefore, the profile is bound to a variable, which can then be instantiated by the later user of a profile, meaning the user can select the JRE to be used. Some variables are predefined by Oomph, for example the location of the Eclipse Git and Gerrit server.
Oomph Product Setup Models

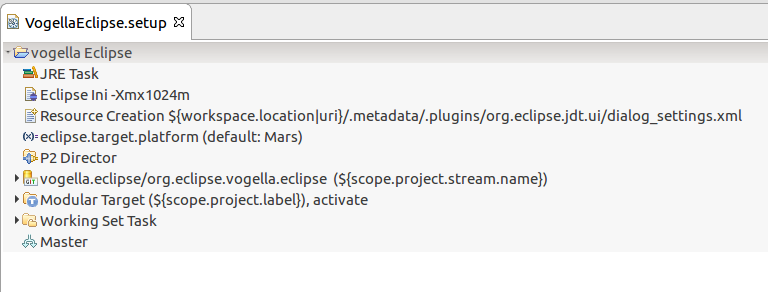
Once you have create the product setup model, it is opened with the Oomph editor. As you can see in the following screenshot, the initial model contains one root node and three elements on the first level. The root node represents the product itself. In its properties, you can adapt the Label, the id, and the description. This information will be shown in the Oomph installer, when users select your product.
The node “BrandingInfo” contains two key/value pairs, which specify the name of the folder, in which the product will be installed. This is not the installation folder name, which can be specified in the installer before the installation. Oomph will create a subfolder in the installation folder that is named as specified in the product setup model. For our use case, we leave those values to the default “eclipse”. The next element “Installation” is required by Oomph, but can be ignored for now.

The fourth element “Mars” is a “Product Version”, it has been created because we selected “Mars” in the initial creation wizard. Product versions allow us to maintain a product setup model for several Eclipse release streams in parallel, e.g. for Mars and Luna. At the moment, our product just supports Mars. You can add additional product versions with a right click on the product (the root node). If we unfold the Mars product version node, we see the core element of the initial product, a “P2 Director” element. This element specifies a list of features, which will be installed into our product.

In the following sections, we will describe the above mentioned elements as well as the other most relevant elements in more detail. Please note that this is not a complete list, we just focus on the core features of Oomph. If you feel something is missing, please contact us, as we might be able to extend this tutorial in the future.
Products and Product Versions
The root of every product setup model is a “product”. It can contain elements that describe steps to be taken during the installation. A product contains a “product version”. Product versions are like branches or release streams for a product, this allows you to maintain a product in multiple versions. A typical use case is to maintain a product for several Eclipse major versions, e.g. Luna, Mars and Neon. Users of your product setup model can select which product version they want to install in the Oomph installer. Product versions can be created directly as children elements of a product. If you work with product versions, all following elements can be either created in the product or a sub element of the product version. Elements in the product (root) will affect every installation of the product setup model. Elements underneath a product version will only be applied if the user has selected this specific version. So at the end, product versions will inherit everything from the containing product and can add version specific things. Both, products and product versions allow us to define a name and a label.
P2 Director
As one of the most important elements, the “P2 Director” specifies the content of your Eclipse installation. More precisely, the features and bundles to be installed. As described before, P2 directors can be added to the product or a specific product version only. To add bundles and features, the P2 director element supports two sub elements, which can be added as children elements.
Oomph Project Setup Models
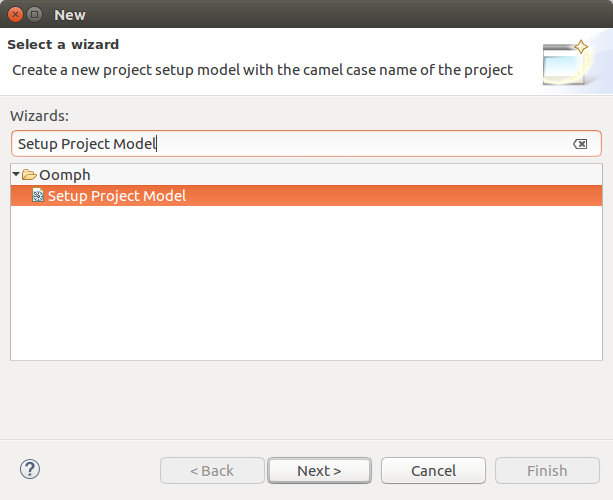
In this section, we describe how to define a custom project setup model. In order to create one, right click a container project, click “new” and select Oomph => Setup Project Model.
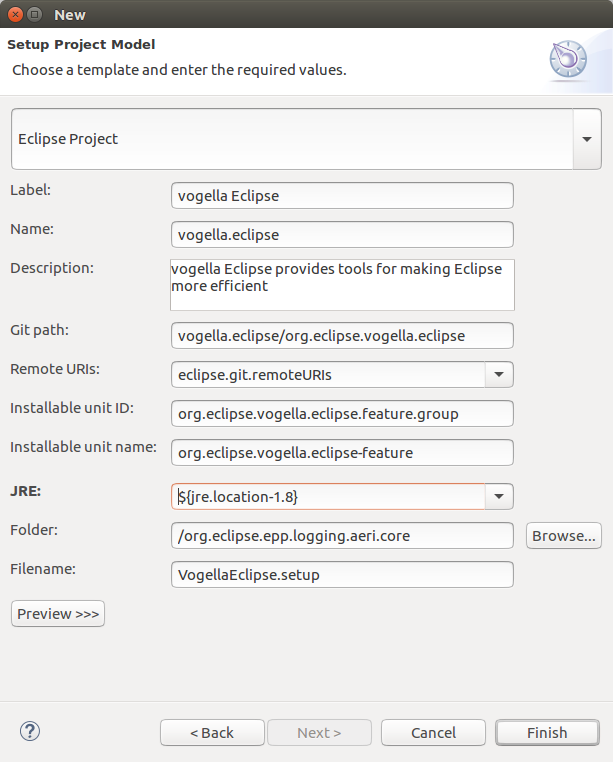
The wizard allows you to select between three templates: Eclipse Project, GitHub Project, and Simple Project. If you choose Eclipse or GitHub, the wizard will assist you in adding your specific repository from which you plan to check the sources. In turn, this will save configuration effort. In the following, we will assume you set-up a project setup model for an Eclipse project, however, this can easily be transferred to GitHub or any other hosting service. The initial wizard allows you to specify a Label, a name and a description for your project.
If you use the Eclipse or GitHub project template, you just need to specify the Git path within the Git repository, as Oomph already knows the URL for the repository itself and will use a variable to define it. For Eclipse projects, you can configure under “Remote URIs”, whether the repo should be accessed using Git, Gerrit or both. Based on the repository information, Oomph will be able to clone the project repository, if you execute the project setup model later on.
The next thing to consider is configuring the projects to be imported to your Eclipse workspace after the repo has been cloned. There are two ways of configuring it, please see the next section to learn more about them. This also covers the next two properties in the initial wizard to configure an “installable unit”.
The final option in the initial wizard is selecting the default JRE for you project.

After finishing the wizard, the Oomph authoring tooling creates a pre-configured project setup file for you. In the following sections, we will describe possible adaptations of this default, starting with the configuration of which projects are imported after the repo is cloned.

Simple Project Import
Oomph allows you to specify which projects are to be imported into the workspace after the Git repo has been cloned. Thereby, you can directly start to work on the sources after you have installed your IDE with the corresponding project setup model.
There are two way of specifying the project import in Oomph. The first and simple one is to import all projects from a git clone. The second one, and this only works for projects based on bundles and features, is to specify a “root feature”, which transitively includes all the bundles you wish to be imported. This includes the use of a concept called “Modular Target” (aka “targlet”).
In the following, we describe both ways of importing projects. Please note, that the project setup model creation wizard will set-up the second option for you, so, if you do not want to use “targlets”, you need to adapt it.
Projects Import Task
In order to simply import projects from a git clone, please add a “Projects Import” task to your project setup model:

After adding the project import task, you need to configure it using a “Source Locator”, which can be created as a child element of the project import task.


To filter imported projects, you can add “predicates” as a child node to the source locator, e.g. you could only import “plugins”:

Using the simple project import, Oomph will import all projects from the clone location into your workspace (depending on the predicates) without checking whether the OSGi dependencies of the project are satisfied or not. This is useful for plain Java projects or if you want to use your own “classic” target definition file instead of the targlet platform created by Oomph.
Project import using the Targlets Task
The alternative to the simple project import task is the “Targlets” (“Modular Target”) task, which is specific for OSGi-based projects. Instead of adding a “Projects Import” task, please add a “Targlet” task to your project setup model. If you have used the project setup model creation wizard, Oomph will already create a template targlet for you.

The ”Targlets” task defines what makes up your project setup. This not only includes features to be imported from repositories, but also dependencies like the eclipse platform. A Targlet contains requirements, those features which need to be resolved. It further can contain Source Locators, this is used to resolve the requirements from the sources by importing the features and its plugins. And finally it contains repositories, which are used to resolve the dependencies as binaries by adding them to a target definition.
During the resolution, all features (and their projects) which are exclusively available from a git repository will be imported as projects, all other features will be used in the oomph target. Oomph will transitively resolve all requirements, so if your project has one “root feature”, it is enough to add this one to the targlet.

Please note, that targlets only work with OSGi projects. The advantage of using targlets is that you can ensure, that the resulting workspace will be fully resolved without any dependency issues. Please also note, that you cannot use a default target definition file in combination with a targlet and your installation will not finish if a dependency is missing.
Working Sets
The working sets element allows you to pre-set-up workings sets in which imported projects are structured in the workspace. The working sets provided by Oomph are more powerful than the traditional working set support of Eclipse, it allows you to assign projects based on rules. As an example, you can define a working set for regular projects and another one for all test projects. As this is based on a rule (e.g. a name convention), new projects will automatically be assigned to the right working set.
Working Sets can be created as child elements of the Working Sets root node and should have a name assigned. If you right click a Working Set, you can create Predicates, which influence the content of the Working Set. Those Predicates can also be combined. In the following we describe the most frequently used Predicates. To test your dynamic working sets, you can apply them to your current workspace. Right click in the Oomph project setup editor and select “Working Sets Preview”. A dialog will shows you how the project which is in your current workspace would be structured following the current configuration.
Repository Predicate
This allows you to specify a repository from which projects are included. The repository is defined by selecting one project from this repository. All projects from the same repository will then be included in this Working Set. In the sample project setup model, created by the initial wizard, there is an initial Working Set including everything from the same repository, which contains the project “org.eclipse.cool.stuff-feature”.
Name Predicate
The Name Predicate allows you to define a regular expression, which is matched against project names. Projects that match the expression will then be included into the Working Set. As an example, a Name Predicate with the pattern “.*\.test\.*” will include all test projects.
Inclusion/Exclusion Predicate
These predicates allow you to depend on the content of another working set and either include or exclude it in the working set. As an example, if you have configured a working set containing all tests, you could configure a second working set now with the main code, which just excludes the test working set.


