Node graph out of date rebuilding что это
Ещё там такая надпись вылазет когда загружаешся
Node Graph out of Date. Rebuilding.

ai_disable 0 консоле
По поводу Node Graph out of Date. Rebuilding.
Чтобы пофиксить этот геморой сделайте следующее, откройте блокнот и пропишите в нем: ai_norebuildgraph 1 сохраните как autoexec.cfg в директории игры : например с:\HL2\cfg\autoexec.cfg и геморой пройдет 🙂
Сохранись, выйди, войди, загрузи. Если не прошло надо пройти уровень так, а в следующем всё ОК.
купи лицен3ию за 600 рэ на 5 СД.
В чарли продавалась там было 2 комплетка.
Вобще то в Чаплине продавалась за 850р
в якутске уже ни где не продают. так что можешь взять у меня за 800р.
Напиши просто в консоле «AI_DISABLED 1»!
PS: пиши 1 а не 0 как говорил GHOST. understand me БЭЛЭЭТ!
AI_Disabled 1 вещь нудная, поэтому советую скачать патч: Half-Life_2_Fixall_P_1
Node graph out of date rebuilding что это
FAQ по техническим вопросам (ЧИТАТЬ перед заданием вопроса ОБЯЗАТЕЛЬНО!)
Q: При каждой загрузке карты, уровня, сохраненки возникает надпись Node Graph Out
of Date.
Q: При загрузке ранее сохраненной игры, появляется надпись A.I. Disabled и все персонажи
стоят столбом.
А: Решений несколько:
1. создаем файл autoexec.cfg в (..\hl2\cfg\)
в нем прописываем ai_norebuildgraph 1
ставим параметр Read Only, сохраняем.
2. Идем в hl2\cfg\, создаем текстовый файл:
ai_norebuildgraph «1»
ai_disable «0»
Переименовываем его в ai_fix.cfg, сохраняем, ставим параметр Read Only.
Открываем в блокноте valve.rc, приводим его в следующий вид:
// load the base configuration
//exec default.cfg
// Setup custom controller
exec joystick.cfg
// run a user script file if present
exec autoexec.cfg
exec ai_fix.cfg
//
// stuff command line statements
//
stuffcmds
// display the startup level
startupmenu
сохраняем файл.
второе решение автоматизировано в фиксе HalfLife2v1.0AIRebuiledFixEng.zip (несложно
поискать в Google)
3. Если и это не работает:
Лезем в папку map\graph.
Меняем системную дату на к примеру 01.01.2010.
Открываем по очереди все файлы в этой папке и, не изменяя, сохраняем их.
Меняем системную дату обратно.
Q: Перед входом в лабораторию Илая, девушка встает около открытого лифта и ничего
с этим поделать нельзя.
A: Опять же решений несколько
1. Ставим английскую озвучку (глюк проявляется только в версиях с русской озвучкой)
2. В момент, когда девушка «залипла», делаем быстрое сохранение (F6), затем сразу
быструю загрузку (F9)
3. В момент, когда девушка начинает вещать о «завихрениях», надо прижаться к решетке,
рядом с желтым агрегатом, и не дергаться. Должно помочь.
Q: Неправильно отображается вторичный боезапас (например, гранатомет в автомате).
Q: Неправильный индикатор в левом нижнем углу.
Q: Не отображаются подсказки.
A: Лечится патчем HL2.HUD.FIX-edministrator.rar (в Гугль). Добавляем/перезаписываем
файлы из этого архива в папку \bin.
Q: Нет мимики персонажей, кроме G-Man’a в самом начале.
A: Патч lipsync_patch.exe решает проблему.
Руководство по инсталляции:
1. Запустить и распаковать в папку с Half-Life 2. Должна появиться подпапка lipsync_patch
Q: Как включить русские субтитры в английской версии?
A: Два способа:
1. В реестре в ветке HKEY_CURRENT_USER\Software\Valve\Steam нужно поменять свойства
в ключе «Language» на «russian»
или
2. Введите в консоли команду cc_lang russian.
Nodegraph


Contents
A nodegraph is a special component of a map designed to aid real-time NPC navigation. Nodegraphs consist of manually placed «nodes» with automatically generated links. They are automatically created when a map is loaded into a game which allows NPCs.
Each individual node represents a precise position on the map that NPCs can move to. The game automatically generates «links» between adjacent nodes. NPC navigation uses these links to move from node to node, although not necessarily to the precise location of the nodes themselves, and not necessarily in straight lines.
Compiling
Components
Nodes
Different nodes exist for different types of navigation. Most NPCs use Ground Nodes, which automatically fall to the ground by default. Air Nodes are used by Flying NPCs and remain suspended in mid-air. Climb Nodes are used by Climbing NPCs and are designed to be used around ledges.
The following entities are used to place AI nodes in Hammer:
Links
When a nodegraph is built, Source’s AI system draws straight lines between all nodes less than 720 units apart and calculates which ways NPC Hull types can travel down each path. Dynamic objects like physics props and doors are ignored during this process.
Nodegraphs compute multiple types of links based on different types of nodes:
The following entities are used to control the way nodes are linked:
Construction
Node placement
The goal of a nodegraph is to record pathways, and the pattern of your node placement should reflect this. It should be possible to travel anywhere across your map by tracing a straight line from one node to another. Generally, this means placing a node on each corner of an obstacle. The more detailed an area, the more nodes will be required for NPCs to properly navigate. If you do not provide enough, NPCs will not make use of tactical opportunities, and may even have trouble simply walking around. Provide no nodes at all and NPCs will be practically stranded, unable to do anything more complex than static actions like shooting and acting.
However, this is not to say you should blast your map into oblivion with an avalanche of nodes. Low-detail areas can be beneficial sometimes, as areas through which you want NPCs to travel but not get bogged down. If you are building a beach assault for example, you will probably want to keep the beach relatively sparse of nodes to ensure that the attacking NPCs keep moving until they reach cover (even if you did add nodes, there would probably be few landmarks for the AI to make use of).
The destination should have a dense nodegraph however, to ensure that the NPCs do not all arrive at the same point and trip each other over.
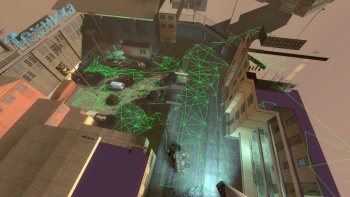
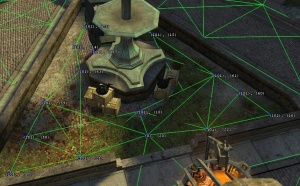
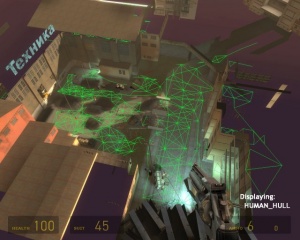
The actual density with which to place the nodes is up to you. You can use the image to the right as a guide to the numbers you should be aiming for. Note how the graph is quite sparse on the building roof to the extreme right, but much denser down on the ground, where the player will be.
map_edit
Placing nodes in Hammer can become very tedious. To speed the process up, you can use map_edit to place nodes from a first-person perspective at run-time. You can also perform advanced tasks such as manually removing node links. map_edit places nodes ten units above the ground, resolving displacement difficulties automatically.
Hint nodes
Hint nodes are navigation nodes with meaning, presenting NPCs with information about the area in which they are located. Their application is very important for a successful nodegraph.
There are several key hints that you should know about when constructing your nodegraph:
Entrance / Exit Pinch Forces NPCs to file through one at a time and prevents congestion. You should place one of these anywhere that a wider area narrows into a smaller one, particularly doorways. Narrow corridors should have a hint of this type at both ends. You may want to place the node slightly before or after the pinch, if there are problems with its links or with NPCs reaching it. It is quite possible to have two hints of this type adjacent to each other if there is enough room. Crouch Cover Low Crouch Cover Medium These two hints tell NPCs that a node is safe to take cover at. While the safety of a node could be calculated off the cuff, placing this hint makes its location more obvious to the AI and lowers processing overhead. NPCs won’t use the hint if it can be seen by a hostile. Override jump permission NPCs that generally do not jump (e.g. npc_citizen, npc_alyx) can have their behaviour overridden by this hint. NPCs that jump as a part of their basic AI (e.g. Antlion, Fast Zombie) do not need these hints. A start and end jump permission hint are required, and NPCs will not attempt jumps that they cannot make or that would hurt them.
There are many more useful hints: for a complete list, see the Hint nodes article.
Debugging the graph
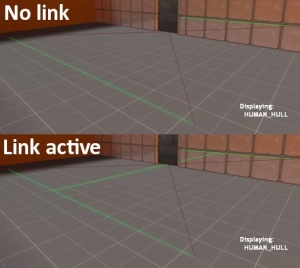
If there is no link between two mission-critical nodes, or if there is a link that does not fit the NPC hull you need, the next job is to rearrange the nodes in question so that there is. You must consider:
Is the path between the nodes straight? A node’s job is to define straight paths. NPCs then take that information and turn it into curved paths through triangulation if needed. Create a new node between the non-linking two if you need to round a corner. Is the path between the nodes big enough for the NPC hull on all axes? Don’t forget the ceiling height! This is especially important for air nodes. If a node is too near to a wall, links to it will be invalidated, even if the NPC could just stop a little short. Keep in mind that the path must be big enough in a straight line. There can’t be anything poking into the projected hull at any point. Use the maroon line, if there is one, as a guide.
If you have a hull problem at a corner, or the start or end of a corridor, try moving the node out into the open a little. It probably won’t make too much difference and will save having to make a second node.
Link control
The info_node_link is a VERY valuable entity. It «forces» a connection between two nodes.
For example, if you are building an elevator and an NPC needs to come along for the ride, it is sometimes difficult to get the info_nodes to work properly since the elevator is a brush-based entity and not a world brush. This can cause a myriad of problems and the NPC will not want to get on the elevator, even if you have a scripted_sequence on it. However, by using an info_node_link you can solve this problem.
Simply place an info_node on the ground and another right above the elevator platform. Now make an info_node_link close to those nodes. Check the properties of the info_nodes and get their NodeIDs. Now go back into the properties of the info_node_link and put the target NodeIDs in the starting and ending node sections. That’s all there is to it. You will now have two connected nodes that can be enabled/disabled on command.
Suggested node patterns
Some locations require careful node management. The Valve Developer Community’s recommendations for these situations follow:
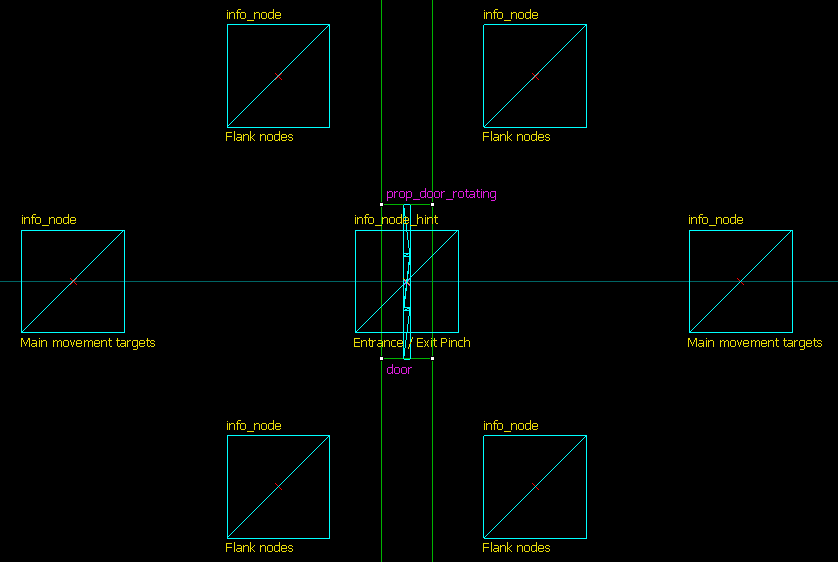
Optimal node pattern for doors
Please help to expand this list with your own findings!
Usage by NPCs
When an NPC attempts to build a route, it accesses the nodegraph to follow these steps:
Crumplecorn’s Home Page
In playing Half-Life 2 you may run into the problem that you get the message ‘Node Graph Out Of Date. Rebuilding. ‘ and from that point the AI may cease to function.
There are 2 ways that this can happen:
If the message appears when a map is first loaded, and there is a period where the screen is frozen and sound stutters (i.e. the game is doing something in the background), then it actually is rebuilding the graph (which is what the AI uses to find its way around), and everything should be fine.
However, if the message appears but the game does no processing, i.e. the game does not freeze when the message appears (most commonly happens when loading a savedgame), then the graph has not been rebuilt, and the AI will not function.
There are actually 2 distinct problems here; the lack of a node graph and the AI being switched off. The AI can be toggled in the console by running the ai_disable command, this will solve the AI being switched off. If the AI is switched off nothing will move. This is not a solution to the graph problem however, as while basic AI like the zombies are fine, more advanced AI, like the antlions following you, breaks without the graph.
To rebuild the node graph, the map must be loaded from scratch. This is easily done with the ‘map’ command. First, start the game and load your save. Assuming the graph is not correctly rebuilt, go into the console and look for the last line which starts ‘spawnserver’. Right after this is the name of the map that was last loaded, which is the map you are currently on. Type ‘map’ followed by this name and hit return to load the map from scratch, which should cause the graph to be rebuilt, you’ll know because it will say it is doing it, and will freeze for a few seconds as described above. Once this is done, load your game again and it should be back to normal. If the AI is still switched off run ‘ai_disable’ to toggle it back on.
Written by Crumplecorn
Last Updated 22/12/2007
Конструкция пути
Contents
Nodegraph ‘конфигурируется дизайнером уровней, чтобы облегчить навигацию ИИ NPC в реальном времени. Nodegraph состоит из нескольких вручную размещенных узлов и количества автоматически сгенерированных связей между узлами. Каждый отдельный ‘Узел’ представляет собой точное положение на карте, на которое могут двигаться NPC. Nodegraph ‘Links’ генерируется во время компиляции, но может быть отрегулирован с использованием сущностей Link Control. NPC, перемещающиеся по AI, будут перемещаться от Узла к Узлу через Ссылки, хотя не обязательно в точное местоположение самих Узлов и не обязательно по прямой линии.
Compiling
There can be two nodegraphs in each map (although both are compiled to the same AIN): one for Flying NPCs (‘air’), and one for walking, driving, or otherwise land-locked NPCs. An NPC could switch between the two, but there is currently no known example of such behaviour. (crows?)
Air nodes are suspended at the location they are placed, but Ground nodes drop to the ground automatically during compile unless specifically told not to through the Keep editor position flag.
Components
The following entities are used to create nodegraphs:
Construction
Node placement
The goal of a nodegraph is to record pathways, and the pattern of your node placement should reflect this. It should be possible to travel anywhere across your map by tracing a straight line from one node to another. Generally, this means placing a node on each corner of an obstacle. The more detailed an area, the more nodes will be required for NPCs to properly navigate. If you do not provide enough, NPCs will not make use of tactical opportunities, and may even have trouble simply walking around. Provide no nodes at all and NPCs will be practically stranded, unable to do anything more complex than static actions like shooting and acting.
However, this is not to say you should blast your map into oblivion with an avalanche of nodes. Low-detail areas can be beneficial sometimes, as areas through which you want NPCs to travel but not get bogged down. If you are building a beach assault for example, you will probably want to keep the beach relatively sparse of nodes to ensure that the attacking NPCs keep moving until they reach cover (even if you did add nodes, there would probably be few landmarks for the AI to make use of).
The destination should have a dense nodegraph however, to ensure that the NPCs do not all arrive at the same point and trip each other over.
The actual density with which to place the nodes is up to you. You can use the image to the right as a guide to the numbers you should be aiming for. Note how the graph is quite sparse on the building roof to the extreme right, but much denser down on the ground, where the player will be.
map_edit
Placing nodes in Hammer can become very tedious. To speed the process up, you can use map_edit to place nodes from a first-person perspective at run-time. You can also perform advanced tasks such as manually removing node links. map_edit places nodes ten units above the ground, resolving displacement difficulties automatically.
Hint nodes
Hint nodes are navigation nodes with meaning, presenting NPCs with information about the area in which they are located. Their application is very important for a successful nodegraph.
There are several key hints that you should know about when constructing your nodegraph:
Entrance / Exit Pinch Forces NPCs to file through one at a time and prevents congestion. You should place one of these anywhere that a wider area narrows into a smaller one, particularly doorways. Narrow corridors should have a hint of this type at both ends. You may want to place the node slightly before or after the pinch, if there are problems with its links or with NPCs reaching it. It is quite possible to have two hints of this type adjacent to each other if there is enough room. Crouch Cover Low Crouch Cover Medium These two hints tell NPCs that a node is safe to take cover at. While the safety of a node could be calculated off the cuff, placing this hint makes its location more obvious to the AI and lowers processing overhead. NPCs won’t use the hint if it can be seen by a hostile. Override jump permission NPCs that generally do not jump (e.g. npc_citizen, npc_alyx) can have their behaviour overridden by this hint. NPCs that jump as a part of their basic AI (e.g. Antlion, Fast Zombie) do not need these hints. A start and end jump permission hint are required, and NPCs will not attempt jumps that they cannot make or that would hurt them.
There are many more useful hints: for a complete list, see the Hint nodes article.
Debugging the graph
If there is no link between two mission-critical nodes, or if there is a link that does not fit the NPC hull you need, the next job is to rearrange the nodes in question so that there is. You must consider:
Is the path between the nodes straight? A node’s job is to define straight paths. NPCs then take that information and turn it into curved paths through triangulation if needed. Create a new node between the non-linking two if you need to round a corner. Is the path between the nodes big enough for the NPC hull on all axes? Don’t forget the ceiling height! This is especially important for air nodes. If a node is too near to a wall, links to it will be invalidated, even if the NPC could just stop a little short. Keep in mind that the path must be big enough in a straight line. There can’t be anything poking into the projected hull at any point. Use the maroon line, if there is one, as a guide.
If you have a hull problem at a corner, or the start or end of a corridor, try moving the node out into the open a little. It probably won’t make too much difference and will save having to make a second node.
Link control
The info_node_link is a VERY valuable entity. It «forces» a connection between two nodes.
For example, if you are building an elevator and an NPC needs to come along for the ride, it is sometimes difficult to get the info_nodes to work properly since the elevator is a brush-based entity and not a world brush. This can cause a myriad of problems and the NPC will not want to get on the elevator, even if you have a scripted_sequence on it. However, by using an info_node_link you can solve this problem.
Simply place an info_node on the ground and another right above the elevator platform. Now make an info_node_link close to those nodes. Check the properties of the info_nodes and get their NodeIDs. Now go back into the properties of the info_node_link and put the target NodeIDs in the starting and ending node sections. That’s all there is to it. You will now have two connected nodes that can be enabled/disabled on command.
Suggested node patterns
Some locations require careful node management. The Valve Developer Community’s recommendations for these situations follow:
Optimal node pattern for doors
Please help to expand this list with your own findings!
Usage by NPCs
When an NPC attempts to build a route, it accesses the nodegraph to follow these steps:


