Как настроить IPTV на MikroTik
Установка пакета multicast
Чтобы настроить IPTV на роутерах MikroTik, сначала необходимо установить дополнительный пакет multicast. Для этого выполните следующее:
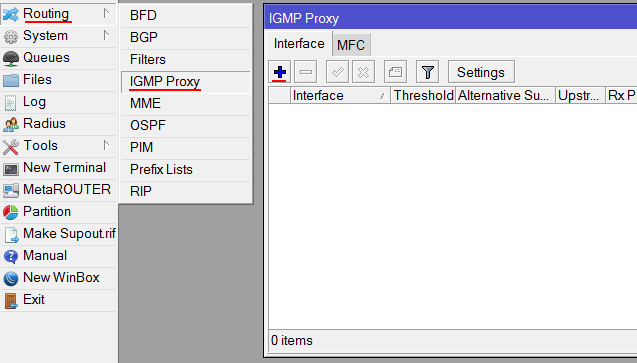
Настройка IGMP Proxy
Выполним настройку IGMP Proxy на MikroTik.
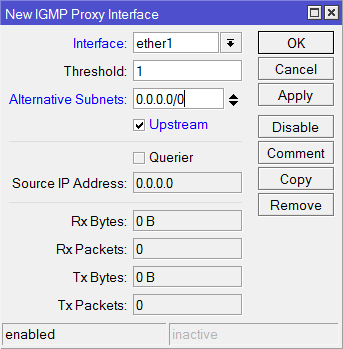
В выпадающем списке Interface выберите WAN порт, к которому подключен кабель интернет провайдера и поставьте галочку Upstream.
В поле Alternative Subnets укажите подсеть стриммеров. Если вы не знаете данные подсети, то попробуйте указать: 10.0.0.0/8, 172.16.0.0/12 и 192.168.0.0/16.
Я настраивал IPTV для Maxnet, и у меня все заработало c Alternative Subnets 0.0.0.0/0. Но так лучше не делать. Используйте 0.0.0.0/0 только если не смогли найти необходимую подсеть.
После ввода параметров нажмите кнопку OK.
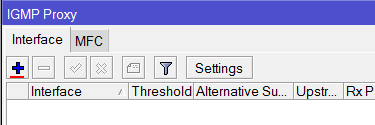
Еще раз нажмите синий плюсик, чтобы указать на какие порты передавать IPTV.
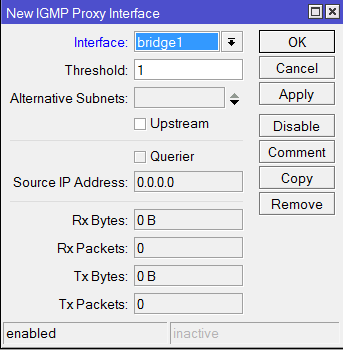
В выпадающем списке Interface выберите порт, на который нужно пробросить IPTV, и нажмите кнопку OK. В Interface желательно указывать один конкретный порт, чтобы не было проблем с производительностью роутера.
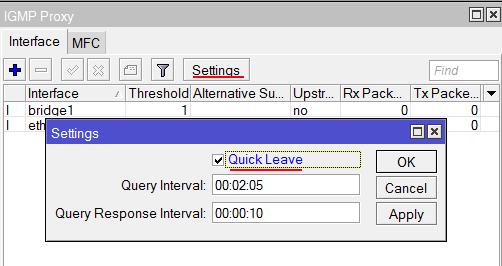
Нажмите кнопку Settings и поставьте галочку напротив Quick Liave. Это позволит быстро переключаться между каналами.
Настройка Firewall
Чтобы фаервол пропускал IPTV, необходимо добавить разрешающие правила. Откройте меню New Terminal.

Выполните в терминале следующие команды:
/ip firewall filter add action=accept chain=input comment=»Allow IGMP» disabled=no in-interface=ether1 protocol=igmp
/ip firewall filter add action=accept chain=forward comment=»IPTV UDP forwarding» disabled=no dst-port=1234 protocol=udp
Настройка Wi-Fi
Если вы транслируете IPTV по Wi-Fi, то необходимо выполнить следующие настройки.
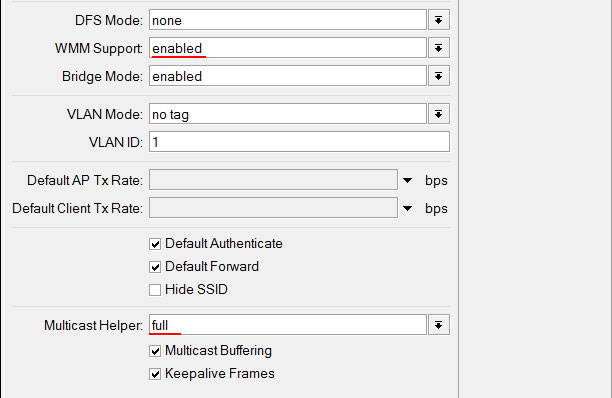
Найдите параметр WMM Support и выберите enabled. Он включит поддержку Wi-Fi multimedia. Если у вас много клиентов, то его лучше не включать, поскольку один клиент может мультикастом съесть весь канал.
В параметре Multicast Helper выберите full. Это позволит отправлять мультикаст пакеты по MAC адресам клиентам, подключенным к Wi-Fi.
После этого нажмите кнопку OK.
На этом настройка IPTV на MikroTik окончена.
Настройка IPTV на Mikrotik

Для примера настройки IPTV мы взяли Mikrotik RB2011UiAS-2HnD. Не совсем домашний роутер, конечно, но настройка на других устройствах принципиально ничем отличаться не будет.
Сброс настроек точки доступа
Этот пункт необязателен. Если вы настраиваете IPTV на роутере с рабочими настройками, которые вы делали ранее, то выполнять нижеописанные действия не нужно. Не помешает также сделать бекап конфигурации.
Сбросить настройки к заводским можно тремя способами:
 Механически: зажимаем кнопку Reset на вашем Mikrotik и ждем, пока роутер не перезагрузится. (На большинстве Mikrotik советуем зажимать кнопку ДО включения оборудования, и, не отпуская держать около 10-ти секунд после включения)
Reset Configuration в меню самого роутера (на экране настройки). Актуально только при наличии сенсорного экрана на роутере.
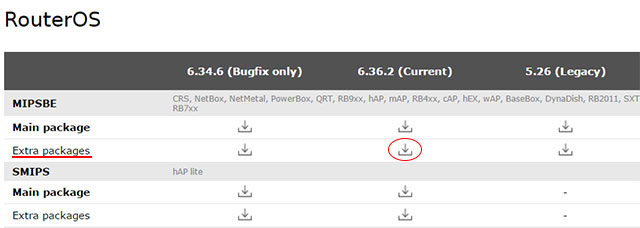
Обновление RouterOS (добавление пакета для IPTV)
Обновление необходимо для того, чтобы установить дополнительный пакет для IPTV.

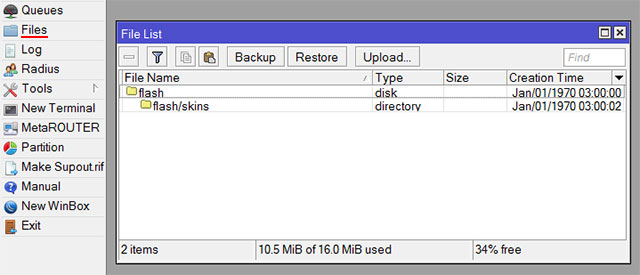
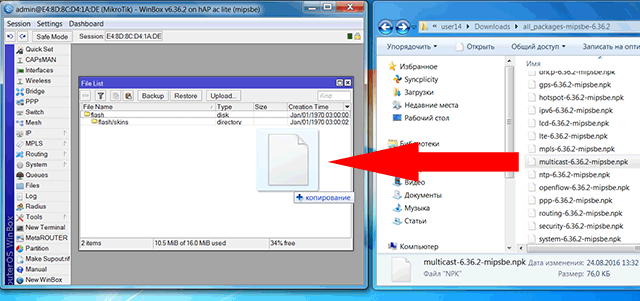
Открываем его и перетаскиваем в окно Files наш скачанный файл из распакованного архива под названием multicast-x.xx-mipsbe.npk.

Роутер перезагрузится и обновит прошивку. Процесс может занять до 5-ти минут. Питание в это время отключать не следует!

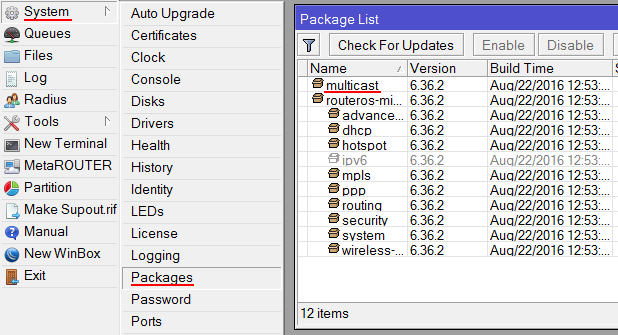
Если таковой имеется, значит, вы все сделали правильно.
Настройка IGMP Proxy

В новом интерфейсе, в поле Interface выбираем порт, по которому у нас поступает интернет, в нашем случае это ether2-master и устанавливаем галочку галочку Upstream, как на скриншоте:

Чуть ниже в поле Alternative Subnets следует указать альтернативные подсети. В том случае, если вы не знаете, что туда вписывать, попробуйте самые распространенные варианты: 10.0.0.0/8; 172.16.0.0/12; 192.168.0.0/16.
В крайнем случае можно оставить и нули, но лучше все же найти нужную подсеть, чтобы роутер не обращался ко всему интернету.
Подтверждаем изменения, нажимаем OK.
В нашем случае это bridge, потому что к нему подключен стационарный ПК.
То есть в первом случае мы указывали порт, куда входят данные, а теперь – откуда выходят.

После мы нажимаем кнопку Settings и ставим галочку напротив Quick Leave. Делаем мы это для того, чтобы иметь возможность быстро переключаться между каналами.

Настройка Firewall
Настраиваем наш Firewall, который не пропускает IPTV на данный момент, для этого мы создаем новый терминал, нажимаем New Terminal и открывается вот такое окно:

Теперь мы должны выполнить в этой консоли несколько команд:
/ip firewall filter add action=accept chain=input comment=»Allow IGMP» disabled=no in-interface= ether2-master protocol=igmp
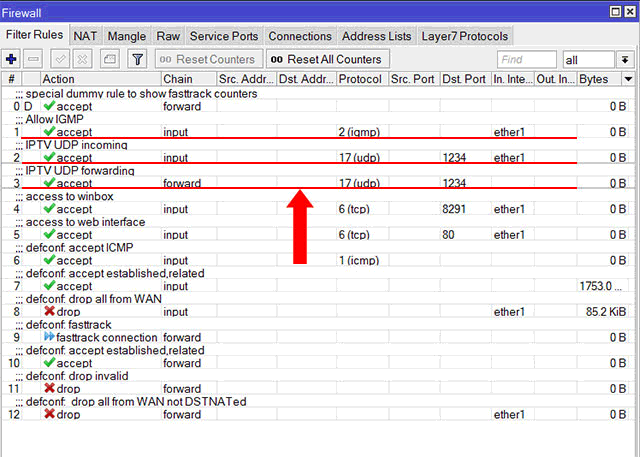
/ip firewall filter add action=accept chain=input comment=»IPTV UDP incoming» disabled=no dst-port=1234 in-interface= ether2-master protocol=udp
/ip firewall filter add action=accept chain=forward comment=»IPTV UDP forwarding» disabled=no dst-port=1234 protocol=udp
1234 – порт неофициально зарегистрированный для передачи потокового видео и IPTV
Далее нужно в меню IP выбрать пункт Firewall и перейти на вкладку Filter Rules. Мы создали исключающие правила, и чтобы они работали, они должны быть выше запрещающих. Перетягиваем их вверх с помощью мыши.
Настройка Wi-Fi
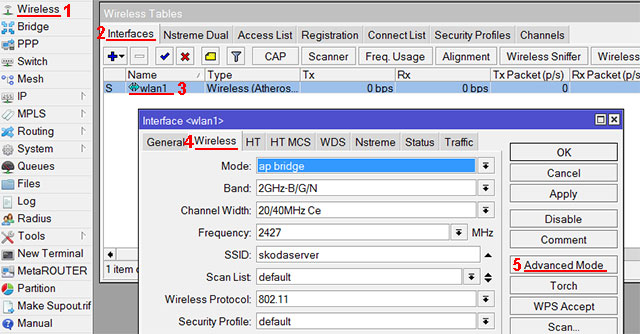
В случае, если вы раздаете или собираетесь раздавать IPTV посредством Wi-Fi нужно добавить дополнительные настройки. Для этого открываем по порядку:

После нажатия кнопки Advanced Mode появляются дополнительные параметры:

Все, подтверждаем кнопкой OK и наслаждаемся просмотром программ.
Осталось только проверить работоспособность нашей конфигурации. Мы использовали для этого IPTV плеер, предварительно загрузив лист каналов для нашего провайдера (Велтон Телеком) в настройках плеера.

Мы можем видеть, что наша настройка полностью работоспособна. Приятного просмотра!
Manual:Routing/Multicast

Applies to RouterOS: v3.x, v4.x
Contents
Summary
Requirements
Multicast is available on all architectures supported by RouterOS. Packages required:
Note: v3.x routing-test and multicast packages are incompatible. In case when both are present one of them will be disabled
Note: To get the package you have to download all-packages archive and upload/install multicast package separately on the router
Protocol independent multicast (PIM)
General PIM protcol settings.
| Property | Desciption |
|---|---|
| switch-to-spt (yes|no, default: yes) | whether to switch to Shortest Path Tree (SPT) phase if multicast data bandwidth threshold is reached. For routers upstream from RP, if this option is disabled, it means that the router will not proceed from protocol phase one (register encapsulation) to native multicast traffic flow. It is recommended to enable this option. |
| switch-to-spt-bytes (integer, default: 0) | multicast data bandwidth threshold. If this threshold is reached in the specified time interval, switching to Shortest Path Tree (SPT) happens. If value 0 is configured, switching will happen immediately. |
| switch-to-spt-interval (time, default: 100s) | time interval in which to account multicast data bandwidth, used in conjunction with switch-to-spt-bytes to determine if switching threshold is reached. |
Interfaces
Menu: /routing pim interface
Since RouterOS v4.6 it is possible to specify source address interface will use to participate in multicast cloud. Previously one of interface addresses was chosen without any particular order.
Configuration of interface of the router that will participate in multicast network. Interfaces that are not configured here (or in IGMP-Proxy) will discard multicast packets.
When deploying multicast configuration over wireless links one should be cautious how and what works. For details about multicast and wireless links.
Note: There is no interface count limitation in this menu other than how much hardware can handle
| Property | Desciption |
|---|---|
| alternative-subnets (IP address/mask Default: nil) : | if router can receive multicast streams over groups that are not in standard Class-D section then you have to set up this field, so these groups are recognised as multicast groups and will not be discarded. |
| assert-override-interval (time Default: 3s) | time that is subtracted by assert winner from assert-time field, to ensure, that assert winner will always send its assert messages before everyone else. |
| assert-time (time Default: 3m) | Time interval when assert-winner will send out repeated assert. |
| comment (text) | text information for the entry |
| copy-from (number) | use other, already configured entry as stencil for this new one |
| disabled (yes | no; Default: no) | state of the entry |
| dr-priority (integer Default: 1) | if for stream source more than one router with multicast support is available, then one with highest priority will become Designated router of that multicast stream and will handle stream delivery to RP. Higher value means higher priority. |
| hello-holdtime (time Default: 1m45s) | how long consider sender of hello packet received on interface in neighbour list. (usually 3.5 times of hello-period) |
| hello-period (time Default: 30s) | how often hello packet will be sent over this interface. |
| hello-trigerred-delay (time Default: 5s) | when interface starts to participate in multicast cloud then this value is max time interface will wait before sending hello packet. That period of waiting is random from 0 to value set in this field. |
| igmp-version (IGMPv1 | IGMPv2 | IGMPv3 Default: IGMPv2) | what IGMP protocol version to support on the interface. |
| interface (interface name) | interface name that will participate in multicast cloud with these settings. |
| join-prune-holdtime (time Default: 3m30s) | how long save join or prune status before discard it |
| join-prune-period (time Default: 1m) | time interval between sending out join or prune messages |
| preferred-source-address (IP address Default: 0.0.0.0) | address that should be used to send out IGMP/PIM packets. Address used should be already assigned to interface. (introduced in 4.6) |
| propagation-delay (integer in milliseconds Default: 50) | expected propagation delay between PIM routers on this network or link. |
| protocols (pim, igmp; Default: ‘pim,igmp ) | what protocols to support on the interface |
| require-hello (yes|no Default:yes) | if sending PIM router have to be neighbour to receiving (this) router to work with those packets. |
| tracking-support (yes | no Default: yes) | if propagation-delay is not negotiated or is not set then that value will be suppressed, if one of PIM neighbours has set false in this field, then propagation-delay will be suppressed. |
| override-interval (integer in milliseconds Default: 250) | will override propagation-delay negotiated value if set delay time is smaller than this. |
Rendezvous point
Rendezvous point configuration. Rendezvous point (RP) is a distribution point for multicast group, source provides its data to it, and if there are any subscribers, then RP will provide data to client. Note, that RP will always receive data stream if that exists.
| Property | Desciption |
|---|---|
| comment (text) | add comment to static RP entry |
| copy-from (number) | creates another RP just like one you pointed to with number you used. |
| disabled (yes, no) | used to change status of RP entry effectively disabling or enabling it. |
| group (multicast group address Default: 224.0.0.0/4) | sets what group this RP will be assigned to. Values accepted are class D ip addresses with mask, thus effectively marking multiple groups to this RP entry e.g. 224.10.10.0/24 will add 256 groups starting with 224.10.10.0 till 224.10.10.255. |
| hash-mask-length (number 4..32 Default: 30) | when multicast group have multiple RPs, and they are same scope and same priority, then this value is compared. and so you can load balance this way. |
| priority (number Default: 192) | if several RPs are available for multicast group, and they are both with same scope, then RP with highest priority is chosen. Smaller non-negative value is considered of higher priority. Example: priority of 100 is higher than priority of 101. |
| address (IP address) | at what address you have to look for RP for multicast group specified in group field. If group is set to one of routers interfaces, it should be reachable through whole multicast network, if it not, you will have to set up rules in MRIB (multicast routing information base). |
Rendezvous point candidates
Menu: /routing pim rp-candidates
Rendezvous point candidate configuration, when RP is elected for multicast group
| Property | Desciption |
|---|---|
| comment (text) | additional textual information about entry |
| copy-from (number) | create this entry using other entry as a stencil |
| disabled (yes | no Default: no) | state of entry |
| group (multicast group address Default: 224.0.0.0/4) | routes with will be chosen to be a group RP if no other RP will not participate with higher priority |
| holdtime (time Default: 2m30s) | after what time next election will be initiated |
| is-scope-zone (yes|no Default: no) | if set to yes, scope-zone setting is obeyed, if set to no, then scope-zone just represents range of groups that it will function as RP |
| priority (number Default: 192) | value is used when RP is elected, lower value mean higher priority |
| interface (interface) | to what interface to bind to if this router is elected as multicast groups RP |
Bootstrap router candidates
Menu: /routing pim bsr-candidates
bootstrap router candidate configuration
| Property | Desciption |
|---|---|
| comment (text) | set text describing bsr-candidate list entry |
| disabled (yes|no Default: no) | set state of the list entry |
| hash-mask-length (number 4..32 Default: 30) | to how much first bits of multicast group should be hashed to reduce protocol overhead |
| is-scope-zone (yes|no Default: no) | if set to yes, scope-zone setting is obeyed, if set to no, then scope-zone just represents range of groups that it will function as BSR |
| priority (number Default: 1) | priority of the router in bsr election |
| scope-zone (IP address/mask Default: 224.0.0.0/4) | multicast group range that this router will function as BSR |
| interface (interface) | interface of the router that bsr-candidate will be attached to and if elected BSR |
Multicast route information base
MRIB routes are used for reverse path forwarding check. In a way, they perform opposite function that FIB (Forwarding Information Base) routes: FIB is used to find the right By default, MRIB is populated by FIB routes. Use «multicast» routing filter chanin to control that or set specific parameters for imported FIB routes (e.g. you can change the distance of the route). In addition, you can specify static MRIB routes. This is useful only if you are using multihoming and multicast packet flow will be different from unicast packet flow.
Active MRIB entries that are imported from FIB are shown with «dynamic» flag.
| Property | Desciption |
|---|---|
| comment (text) | textual note to entry can be added to static entries only. |
| copy-from (number) | use other entry as a template to create new one. |
| destination (IP address/mask Default: 0.0.0.0/0) | hosts that will be reachable through gateway |
| disabled (yes|no Default: no) | status of entry |
| metric (integer Default: 1) | value of cost of the route. Route with least weight will be used if available. |
| gateway (IP address) | address through where hosts listed in destination field will be reachable. |
IGMP group status
Menu: /routing pim igmp-group
| Property | Desciption |
|---|---|
| interface (interface) | group join request received/sent on this interface |
| group (IP address) | IGMP group of interest |
| source (IP address) | source of IGMP request |
| state (exclude | forward | don’t forward) | state of IGMP group membership |
| version (IGMPv1|IGMPv2|IGMPv3) | version of IGMP protocol used |
| timeout (time) | time when entry will expire if not refreshed |
Multicast neighbors
Menu: /routing pim neighbors
This menu only allows to see information about multicast routers that are reachable within one Ethernet from all interfaces participating in multicast routing. This list is created and updated automatically according to state of multicast network.
| Property | Desciption |
|---|---|
| address (ip address) | IP address of neighbour multicast router that router have received hello packet. |
| interface (text) | on what interface hello packet was received |
| priority (number 1..255) | priority of the neighbour router |
| holdtime (time) | how long entry will be held in neighbour list (configured in interface menu hello-holdtime) |
| timeout (time) | how much time left when entry will be dropped from list if no hello packets are received. Every time hello packet is received this entry will be refreshed. |
Bootstrap router status
Multicast forwarding cache status
| Property | Desciption |
|---|---|
| group (IP address) | name of multicast group |
| source (IP address) | source of multicast group data |
| rp (IP address) | address of RP for that multicast group |
| incoming-interface (interface) | interface that is used to receive multicast data stream |
| outgoing-interface (interface) | interface that is used to transmit multicast data stream |


